This template is designed to allow you to easily track and manager your expenses using budgets and copying transactions downloaded from your bank or credit card statement.
The template can be downloaded here
DOWNLOADING TRANSACTIONS
Once you have a download of your transactions from your statement, copy the data into the Import tab. The transaction dates into column A, the description from your statement in column C, and the amount in column D. Important to note that expenses should be positive (refunds negative), as should income. For payments/transfers I will cover further down but it will be negative if it is an outflow from the account/payment source or positive if an inflow. The source of your transactions will be selected in cell G2.
The suggested vendor column will autofill once it finds vendors matching the description you copied in column C. If not, you will want to setup the vendors using the setup button on the right of the page and click on manage vendors from where you can add, modify, and delete vendors. Once vendors are setup and all the suggested vendors are filled, click on the next button which is to Apply Names. This will fill the vendor column. After this is done you are ready to click on Copy Expenses. This will now move your transactions into the All Transactions tab. We focus on this tab next to go over how to manually enter transactions.
MANUALLY ENTERING TRANSACTIONS
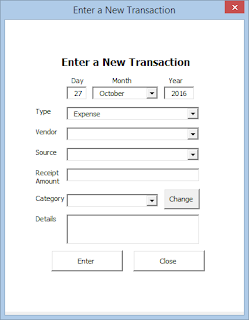
You can manually enter transactions from the All Transactions tab by clicking the New Expense button at the top (or CTR:+SHIFT+T as the shortcut key is noted in each of the buttons up top).
MODIFY TRANSACTIONS AND ALLOCATIONS
You can also modify existing transactions by clicking on the Modify Transaction button on the same tab which is the same screen as the new expense screen (see below) except filled out with the selected transaction’s details.
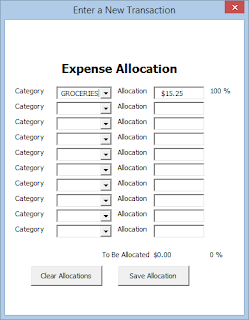
Additionally, you can change the allocation. When setting up a vendor you assign a default category. However in this template you can break out a line item into as many as ten different cost categories. For example, if you go to a department store it may not be as simple as saying all those expenses relate to groceries, clothing, baby items, electronics, or whatever else is sold there. You could have all those cost categories and more in one receipt. This is where you can break out that detail, by clicking on the Change button next to the category drop down.
ACCOUNT TRANSFERS/CREDIT CARD PAYMENTS
Payments from one account to another are not an expense and may not be important enough for you to track. However, for the sake of completeness and making sure all your transactions are accounted for and balances reconciled, this can be accomplished here by setting up a vendor equal to the name of another payment source. In this template if you make a payment from one payment source to another it is recognized as a transfer rather than an expense (in the manual entry screen you can also specify transfer rather than expense). If the source of your payment is the bank and your vendor is your credit card (e.g. you are paying your credit card from your bank account) then on your bank account this amount should be negative and on the credit card it will be a positive. Transfers should add up to 0 every month unless you are missing one side of the entry. You can also manually enter transfers from the AllTransactions tab. Again, transfers are not necessary but helpful for the sake of reconciling to make sure all balances match.
ACCOUNT BALANCES
The Balances tab is used for reconciliation purposes to make sure the balance on your statement at the end of the month matches the balance here. It will reconcile according to the statement month and year rather than just looking at the calendar month and year. This will allow you to more easily reconcile to a specific statement. In row 17 you will want to enter any opening balance you have from these accounts.
BUDGET CATEGORIES
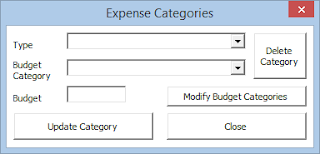
You can create budgets and also break them into multiple categories. By default I have setup my categories into whether the expenses are essential, discretionary, or irregular. However you can change these from the setup button (from the All Transactions or Import tabs), selecting Manage Expense Categories, and then selecting Manage Budget Categories.
From the Managing Expense Categories section you can create, modify, and delete budgets as well as change monthly amounts.
CASH FLOW AND PER DOLLAR SPENDING
These tabs show spending based on the budgets created and arranged in accordance with the different budget categories.
SUMMARY
Lastly, the summary tab provides a summary of the expenses. In row 1 you can specify the month, year, and budget category you wish to review. The bar graphs below show in red how much an expense is over budget, and if there is dark green that indicates the budget has been partially used and the dollar amount specifies how much has been used with the light green portion what is remaining
Further down below the graph you will see a summary of the largest expense items, as well as top items by category where you will be able to select multiple expense categories to review at once. Alternatively, you could also go to the All Transactions tab and filter the data from there to view what made up an expense category.
NOTE ABOUT CUSTOM FUNCTIONS
There are multiple custom functions in this template and occasionally they might get stuck – show an error instead of the calculated value. To correct this just hit ctrl+alt+F9 if you notice error values as this should fix the issue.
NOTE ABOUT CUSTOM FUNCTIONS
There are multiple custom functions in this template and occasionally they might get stuck – show an error instead of the calculated value. To correct this just hit ctrl+alt+F9 if you notice error values as this should fix the issue.


how to change year