BankRecGeneric

Bank Reconciliation Template 2023: Use Auto-Matching Rules to Speed Up Your Recs!

Introducing the Ultimate Bank Reconciliation Excel Template – your time-saving companion for hassle-free financial management!

Are you tired of spending hours manually matching transactions and dealing with duplicates during your bank reconciliations? Look no further! This downloadable Excel file is here to revolutionize the way you handle your finances. Packed with powerful features and user-friendly functionalities, this template will streamline your reconciliation process like never before.

Key features

Automated Transaction Matching: Say goodbye to tedious manual matching. This Excel template is equipped with an intelligent algorithm that automatically matches transactions, making your reconciliation process a breeze. Experience unmatched efficiency as the template swiftly identifies and pairs up corresponding transactions, freeing up your valuable time.

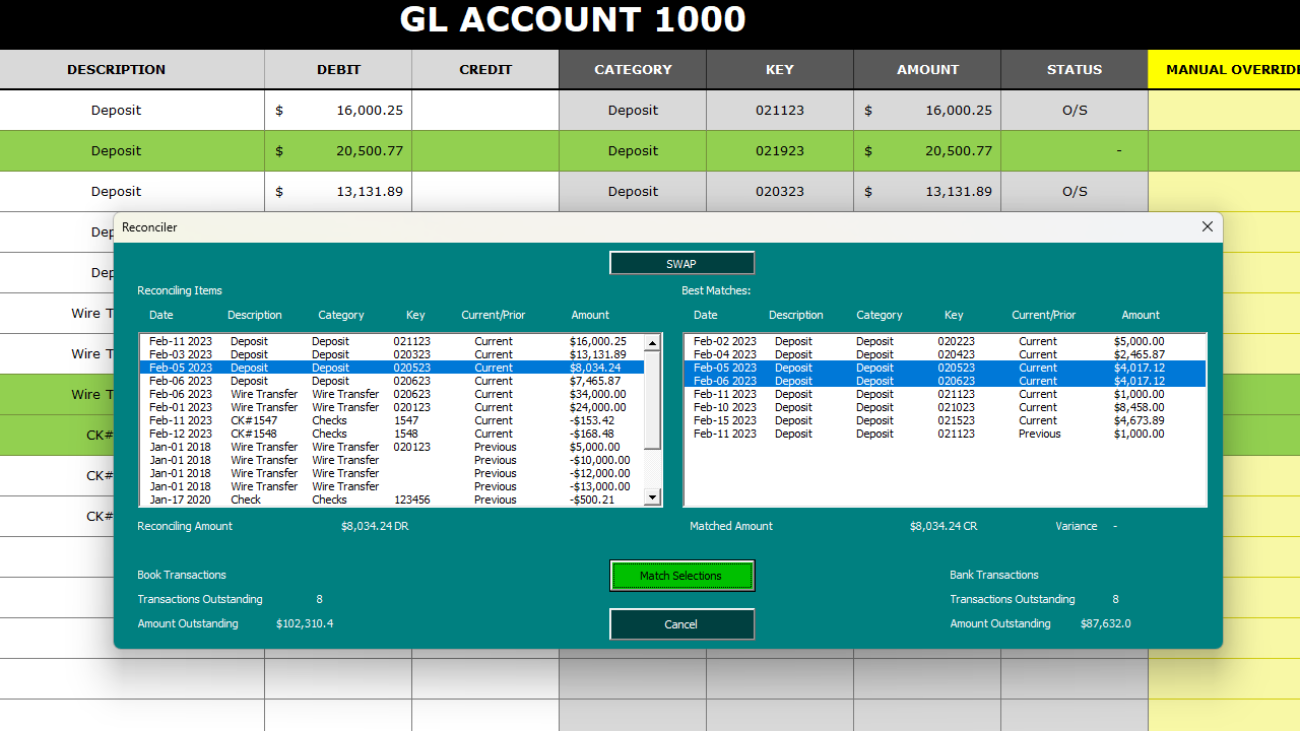
Effortless Manual Matching: Whatever the template doesn’t end up matching, you can do so manually using the Reconciler. It’s a much easier process than the manual approach as once you select a transaction, it will find related transactions that you can match the transaction to. Simply review the related items displayed, and with a few clicks, you’ll have your transactions matched accurately and swiftly.
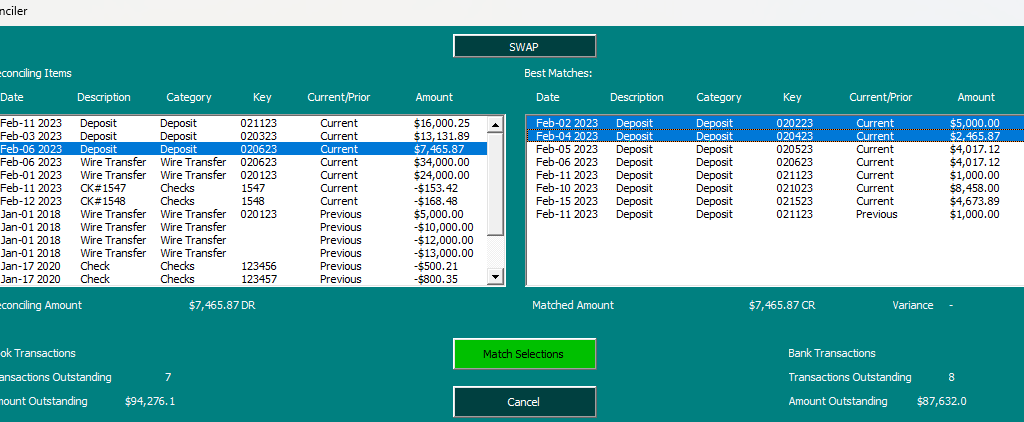
Using the bank reconciliation template to easily match transactions.

Duplicate Detection: This template also checks for duplicates and will be careful not to match any items where there is a duplicate entry. You can still match these transactions manually using the Reconciler, but you won’t have to worry about the template automatically matching items where there are duplicates. This helps ensure accuracy and integrity when doing the automatic matching.

Flexible Matching Rules: Take full control of your reconciliation process with customizable matching rules. The Excel template empowers you to create rules to automatically match transactions on a 1-to-1 basis, 1-to-many, or even many-to-many, tailored to your unique needs.

Matching rules in the bank reconciliation template.

By creating these rules, you can specify how a transaction should be classified.

In the above example, if a description contains CK#, then it will belong to the ‘Checks’ category. For the key, which is used to help match a transaction, it will take the next 4 numbers. So if you have CK#1234, then 1234 would be the key. For a transaction to automatically match, it will need to be part of the same category, have the the same key, and amount. In the case of 1-to-1 matches, it will only need to find another transaction that matches this criteria. The one exception is if there is a duplicate; in that case, the transactions won’t automatically match. The auto-match is designed to minimize false matches.

For the Wire Transfer example above, it will simply use the date as the key. Since it’s a 1-to-1 match, it will look for another Wire Transfer on the same date with the same amount.

The deposit example shown above is slightly different in that it relies on the date but it is a 1-to-Many match type. However, this can also work as a many-to-many matching type as well. That’s because it will look for all of the deposits on that date, across the book, bank, and previous outstanding items. Only if the total of all the deposits on that date are a match will the auto-match rules kick in and say that everything is a match. You might use this type of matching if you have multiple deposits on the GL side that total just a single deposit amount on the bank side, or vice versa.

Easy Overrides. If you need to force a match, you can do so by entering any value in the ‘Manual Override’ column. This will clear the O/S status and indicates that the transaction has been matched. In the example below, just entering an ‘X’ is enough to mark off a transaction as being reconciled:

Overriding a transaction on the bank reconciliation template.

Quickly Generate Reports and Start a New Month: With just a click of a button, this Excel template generates a comprehensive report summarizing outstanding items. Gain valuable insights into your financial status and easily identify discrepancies that require attention. Stay on top of your bank reconciliations with accurate, up-to-date information at your fingertips. Clicking on the Reconcile Month button will summarize your outstanding items. You can also clear all the data with the Clear Data button. Click the New Month button when you’re done reconciling and want to close out the month. It will transfer all your current outstanding items to the previous outstanding items tab.

Buttons on the bank reconciliation file.

Try the bank reconciliation template for yourself!

Whether you’re a small business owner, a financial professional, or an individual managing personal finances, this Bank Reconciliation template is your go-to solution. Experience unparalleled ease, accuracy, and efficiency in your reconciliation process. Save time, reduce errors, and take control of your financial management like never before.

Best of all, you can try it out for free to see how you like it. Download the trial version here. If you decide you want to buy the full version without restrictions and full VBA code available, check out the product page here.


If you like this Bank Reconciliation template, please give this site a like on Facebook and also be sure to check out some of the many templates that we have available for download. You can also follow me on Twitter and YouTube. Also, please consider buying me a coffee if you find my website helpful and would like to support it.

reconciler1100x620

Bank Reconciliation Template With Side-by-Side Matching and Automatic Matches

UPDATED VERSION: Check out the new 2023 version of this bank reconciliation template

This bank reconciliation template is an update from an earlier file that was made three years ago. It offers many of the same features with some notable improvements, and I’ll go over both in this post. I’ll start off by highlighting the key features and how it can help improve the bank reconciliation process for you.

Matching transactions is easier than ever in this new bank reconciliation template

In the earlier version, the bank reconciliation template looked at the total of transactions for a day or that matched criteria and so it didn’t make match individual items. It can be a mixed bag since some people prefer one way of matching (e.g. multiple cash transactions on a book entry matching up to one large bank deposit amount versus having one deposit for each entry). This template tries to make both methods a bit easier.

The auto-matching feature takes care of the latter approach where each line is effectively given a unique id that will be used to match against other transactions. This is ideal for one-to-one matches where you don’t want to look at just the totals.

If you’ve used the earlier version of this file, you’ll know that in this template, you can set up categories and keys associated with them. For example, if a check transaction shows up on your accounting system as CK#1234 you can create a rule in this template to say anything with CK in the description is categorized as a check and that the numbers that follow the number sign form the key, or the unique identifier. You can create these rules in the Setup tab.

Here are a couple of examples as to how this looks:

setting up categories and keys on the bank reconciliation template

The Category is just the name of the category and the Identifier is what Excel will be looking for in the item description to see if it falls into that category or not. For checks, I’ve used the use numbers after identifier to say that what comes after CK# is what should be the key or the criteria that the template will be looking for when auto-matching. If there is no criteria, you can leave this blank and it’ll simply look at the amount and the category. However, this can be less accurate depending on if you have duplicates and similar data in your bank and book downloads.

You can also cap the length of the key, which is what I did in the above example, setting the Length of Key to 4. What this does is say that only the first four numbers will be pulled after the identifier. You can leave this blank and everything will be included. There is also a section for Gap if you don’t want it to immediately start pulling numbers after it finds the key. For instance, if I used CK as the identifier rather than CK#, then I’d want to set the Gap field to 1, to ensure that it skips over the next character, which in this case would be the # sign. But if you want to immediately pull data after the identifier, you can leave the Gap blank.

Alternatively, you can also just use the date as your key but that will not be very precise. The template and auto-matching will only be as strong as the rules that you put into place.

Manually matching transaction is easy, too

Even if you can’t auto-match all your transactions, I’ve tried to make this template as easy as possible to bulk match transactions as well. While the auto-matching is designed to help one-to-one matches, it’s also possible to match multiple transactions to one. This can be done using the Reconciler, which can be accessed via the Ribbon:

Ribbon buttons on the bank reconciliation file.

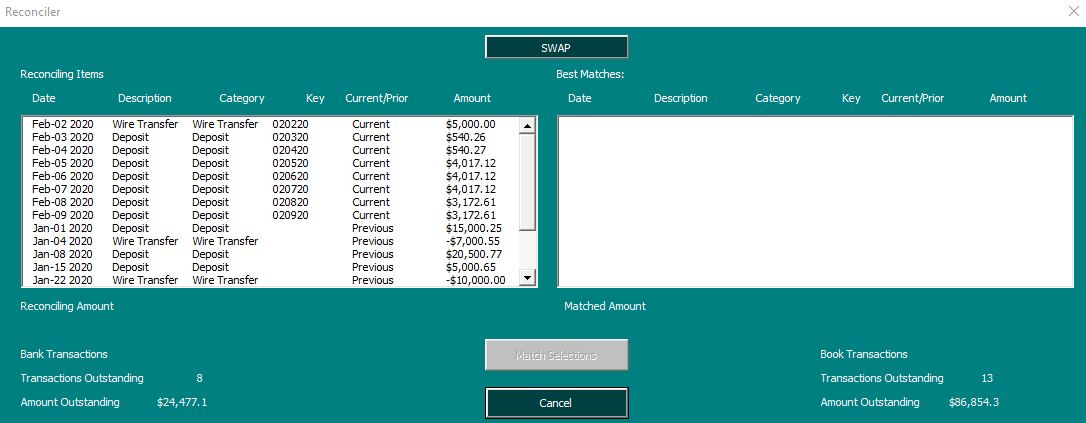
In the previous version, these buttons were within the file. Now, they’re on the home tab within the Ribbon, making it easy to access from anywhere in the file. Select a transaction from either the Book or Bank tabs and click the Reconciler button and you’ll have an interface where you can easily match transactions side-by-side:

In the previous version, side-by-side matching was not possible in the Reconciler and this allows you to easily do your matching within this interface. If I select the first transaction, which is a wire transfer, it will show me all the possible wire transfers I can match it to:

However, the ability to match the transactions won’t appear until I have the credits and debits matching an equal amount on both sides, to prevent running into a situation where I’ve matched an unequal amount:

By default, there will be no warning to pop-up when you’re matching transactions. However, if you prefer there to be one, you can change this in the Setup tab where there’s an option to toggle the confirmation from ‘No’ to ‘Yes.’

With it set to off, you can continue going through and matching transactions to ensure that you don’t have to click boxes before moving on to the next item to match. As it’s set up, you can match multiple items to one amount. However, you can’t match multiple-to-multiple and if you want to match multiple to one, then select the one transaction that will be matched to multiple items when launching the Reconciler. In the above screenshot, any transactions on the left-hand-side can be matched to multiple transactions on the right-hand-side, but not vice versa.

However, there is a SWAP button at the top of the form, which is also new, which can allow you to easily switch between the two views.

On both the Book and Bank tabs, there is a column for Manual Override and if you want to match an item manually you just need to enter a value in here. And that’s what the Reconciler does when you’re matching transactions. This is also where the next key feature comes into play: auditing and correcting your matches.

Audit trail from the Reconciler makes it easy to see which transactions are matched to one another

In the transaction that I matched above, it posted this in the Manual Override section:

You’ll notice that it says Previous BOOK Row 6. What this tells me is that the transaction was reconciled on the Previous OS Items tab, which includes transactions carried over from the previous period. It also tells me the row it was on and that it came from the book side. If the entry were to say Current, then it would be from the current transactions and that it would just be from the Book tab rather than the Previous OS Items tab.

If I wanted to undo this match, I could just press delete and clear the data in the Manual Override column. However, if you do this, be sure to clear off the other entry or entries related to it. Otherwise, you can be out of balance if you only cleared out one side of what was matched.

Reconciling the month

Once you’re done with your reconciliation and you want to see a list of your outstanding items, you can click on the Reconcile Month button in the Ribbon. This will spit out the outstanding items and group them by category. This process is similar to how the older version of the file worked.

When you’re finished and ready to start a new month or period, you can click on the New Month button which will clear the Book and Bank tabs and move any outstanding items over to the Previous OS Items tab. You’ll now be able to start a new month or period.

You can also use the Clear Data tab if you just want to remove everything and start completely from scratch

Testing out the file

If you want to give this file a try, please download the bank reconciliation template for free here. You can test out all the functions. There is a limit of just 25 transactions on the Bank and Book tabs. If you want the full version of the product, including with the code unlocked, please visit the product page here.


If you liked this post on the new bank reconciliation template, please give this site a like on Facebook and also be sure to check out some of the many templates that we have available for download. You can also follow us on Twitter and YouTube.

Bank Reconciliation Categories

Bank Reconciliation Template: Automate and Easily Reconcile Transactions


PLEASE NOTE THERE IS A NEWER VERSION OF THIS TEMPLATE AVAILABLE HERE

A bank reconciliation can be a time-consuming process but this template can help speed it up. By assigning categories and setup quick ways to match items, you can quickly accelerate the reconciliation process. With an easy interface to match transactions, this template should help speed up what can otherwise be a tedious process.

Download Options

This version has been discontinued. Instead, please refer either to the 2020 or 2023 versions.


Note on #NAME? Errors

If you see this error message in the spreadsheet it means you have not enabled macros when opening the file or the calculations have not been able to update. If you think macros have been enabled and updated calculations but don’t see the results updated, then just try re-opening the file and that should fix the issue.

How to Use This Template

This template allows you to easily reconcile your bank to your book by 1) categorizing transactions, and 2) reconciling any matches based on those categories.

Setting up Categories to Match Transactions


In order to categorize transactions, you will need to use the Setup tab to first create the rules that will find and identify categories. The setup tab has five columns: Category, Identifier, Key, Length of Key, and Gap.

Bank Reconciliation Categories
 

The Category column is simply the name of the category (e.g. wire transfers, deposits, cheques).

The Identifier is what needs to be in your transaction description to be flagged as belonging to this category. For example, suppose the following description on your bank statement indicates cheque # 1234 was cashed:

C#1234

In the above example you would want to set C# as your identifier since that is how you can identify this is a cheque and should belong to the cheque category. The category can have multiple rules (for example, the way a cheque is indicated on your bank is likely not the same as on your general ledger)

The next column, the Key, is what should be used to try and match and reconcile these types of transactions. This is a drop-down selection as there are multiple options: use date, use letters after identifier, use numbers after identifier, and use alphanumeric string after identifier. You can also leave this blank if you don’t want the template to try and automatically reconcile these transactions or if there is no discernible key that can help identify the transaction.

To use the date will mean just the date is used, nothing else. In the case of a cheque this will not work since you might have multiple cheques deposited in a single day, so to just look at date will not correctly reconcile these types of transactions.

In the case of cheques you will want to select ‘Use numbers after identifier’ since that will pull only numbers and not any text. If you need text you can select the option for ‘Use letters after identifier’, or if you need both numbers and letters – ‘Use alphanumeric string after identifier’

The Length of Key column is how long you want the key to be. Suppose the following description:

C#12340000000

Although the cheque number is 1234 the description leaves trailing numbers afterward or might have some other detail afterward that doesn’t pertain to the cheque number. In this case you will not want every number, but just the first four.

The Gap column is used if you don’t want to start retrieving text or numbers after the identifier. For example:

C#001234

In the above example there are two zeros before the cheque number. In such a situation I would set the gap to 2. This would skip the first two characters after the identifier and then start pulling numbers or text after that.

In my example image above I set the identifier to C#, a key length of 4, and a gap of 2. Here is some sample data and how it extracts the key field based on the rules I set out above:

Sample Bank Rec Data

In the first row there was no space between the identifier and the cheque number, as a result, my key only pulled the last two numbers.

In the second row there was one space, so only three numbers were pulled.

In the third row there were two spaces and as a result all four numbers were correctly extracted into the key field.

In the fourth row I added trailing 0s after the cheque number but since my length is set to 4, it does not include those extra numbers.

In the fifth and six rows I show that whether it is numbers or letters before the cheque number is irrelevant since the gap is set to 2. Now in the case of row six, I would not need to set a gap because if I am only looking at numbers it would have skipped the letters anyway.

Note that these rules are not specific to either the book or bank tabs; any rules will be applied to both. However, in all likelihood you would need to setup rules for the same type of transaction multiple times since the way your book shows a type of transaction is probably not the same way your bank will.

If for whatever reason there is no consistency in how some of your transactions appear you could leave the details on the setup tab for the key as blank, that way you still can categorize the transactions (if there is an Identifier) but with nothing set for the key the template won’t match any of those transactions for you, which brings me to the next part: reconciling the data.

Matching Transactions


In order to reconcile that data you will of course need to download your transaction details into the ‘Bank’ and ‘Book’ tabs. Columns A:D are highlighted in yellow and those are the only ones you need to fill in. They include fields for Date, Description, Debit, and Credit. The Description field is the field that will be used for finding what category a transaction belongs to and extracting the key.

Columns E:H are formulas and are pulled from columns A:D.

In order for the template to match and reconcile items, it will look at the following:
– Are the categories the same?
– Do the keys match?
– Do the amounts match?

If all three criteria match, then the Status column will show a ‘-‘ indicating 0; that the amounts are reconciled. Otherwise it will show a value of ‘O/S’

There is also column I, Manual Override. If you mark an ‘X’ in this field, it will make transaction marked as reconciled, regardless of whether the template finds a match or not.

Manual Override

In the above screenshot the second row is reconciled once I enter an ‘X’ in the Manual Override column. Any reconciled items will highlight in green.

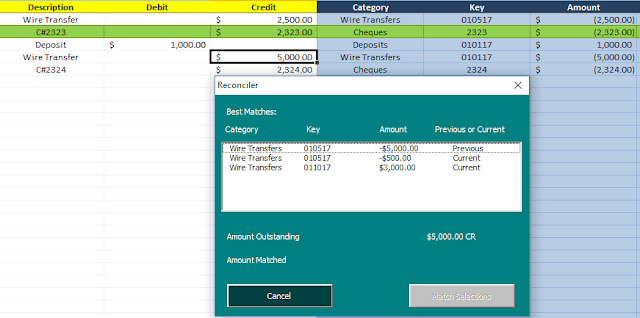
Alternative, you you can select a line item that has a status of O/S and click CTRL+SHIFT+X which will bring up the Reconciler window which will show you potential matches for the item you are looking to reconcile.

 
Reconciler

In the above example I pressed the shortcut keys while selecting the row with the $5,000 wire transfer. Since it is O/S it pulls up the Reconciler window. The Reconciler shows all the wire transfers from both the previous O/S tab as well as the Bank tab (in this example I was on the Book tab). Exact dollar matches show up at the top. Note the first result shows an amount of -$5,000 – the negative does not indicate a credit, it pulls the amount from the amount field which just shows the negative as being an outflow of cash. Because an outflow of cash on the bank is a debit, if I select the -$5,000 it will show $5,000 DR as being the amount matched, which is shown on the next screen:

Matching Transactions

Because the debits match the credits, the Match Selections button has turned green and can now be pressed. Doing so will enter an ‘X’ in the manual override field for these amounts. You will only be able to match the selections if the debits and credits match. You can select multiple items if they add up to the total outstanding.

Completing the Bank Reconciliation

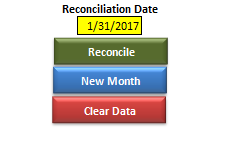
Once all the bank and book data are entered and you have finished matching which items you can, go to the Reconciliation tab where there you will see three buttons on the right hand side:

Bank Reconciliation Buttons

The Reconcile button will generate the reconciliation and show you which items are outstanding. It will group the outstanding items by category – refer to the screenshot at the beginning of the post. If the adjusted balances match and the amounts reconcile to 0 then it will highlight that line in green, otherwise it will be in red to indicate a variance. The reconciliation date you will need to enter in the yellow highlighted cell.

The New Month data will clear all your existing data but before doing so will put your existing O/S items into the Previous OS Items tab so on your next month’s reconciliation they can be used to match new transactions.

For example, if cheque #1111 does not clear this month it will be moved to that tab. If on next month’s transactions there is a transaction on the bank for this cheque number the template will be able to reconcile it automatically. Nothing extra needs to be done to do this, as when looking for matches, both the bank and book tabs look at the Previous OS Items tab to clear any items from there as well.

Lastly, the Clear Data button will do just that – get rid of everything from every tab.

The template at the top has some sample data so you can test out and see how it works.