Custom Function: Extract All Matching Data

The purpose of this function is to act as multiple vlookups to pull all data that has multiple matches, and allows the user to specify how they want the data delimited

The function is called EXTRACTALL and it has four arguments:
Argument 1: Looup Field. This is the value that you are looking for. If it is text, make sure it is in quotes
Argument 2: Lookup Range. The range the function is going to search to find the value specified in argument 1
Argument 3: Output Range. If a match is found in the lookup range, this is what will be returned. The ranges should be the same length
Argument 4: Separator. This is how the results will be separated.

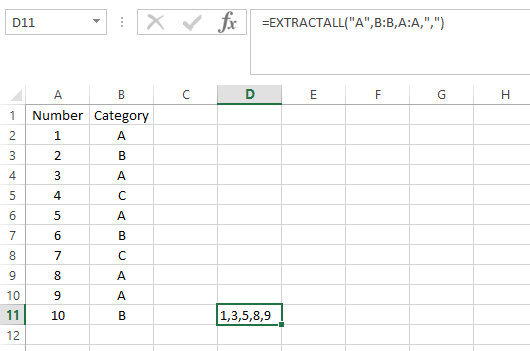
An example of the formula is below:

=EXTRACTALL(“A”, B:B,A:A,”,”)

This will look for the letter A in column B, and when there is a match the value from column A will be pulled. All values will be separated by commas.

You will note the values that correspond to A’s are 1, 3, 5, 8, and 9 which is what the result displays in cell D11. This acts effectively the same as a lookup function might with the difference being this will pull every match and put it into one cell whereas a lookup will just grab the first match and nothing else. This is more useful in the case of text values because after using this formula (especially if a comma separator is used) you can convert from a comma delimited field into multiple fields.

Below is the code:

Function extractall(lookupfield As String, lookuprange As Range, outputrange As Range, separator As String)

Dim cl As Range
Dim counter, offsetcol As Integer

counter = 0
extractall = “”


offsetcol = outputrange.Column – lookuprange.Column


For Each cl In lookuprange

    If cl = lookupfield Then
        counter = counter + 1

            If counter > 1 Then

               extractall = extractall & separator & cl.offset(0, offsetcol)
            ElseIf counter = 1 Then

                extractall = cl.offset(0, offsetcol)
            Else

            End If
    End If

Next cl

End Function

Simple VBA Tricks

A couple quick snippets of VBA code that can help you impress your friends although might not have much real utility.

First up: have Excel speak to you

Application.speech.speak “text”

Where text is what you want Excel to say. Just like with any other code you can of course use variables for this to alternate. You could create a list to cycle through various messages as well.

Another one: opening a URL

ThisWorkbook.FollowHyperlink “http://www.google.com”

The above code will open Google when triggered in the default browser.

Find the xth occurrence of a day in a month

This function is called dayx. It consists of the following arguments: occurrence number, day of the week, month, year. For example:

dayx(2,”Monday”,10,2014)  or dayx(2,1,10,2014) will return the second Monday of October 2014, which is October 13, 2014

For information on how to insert a custom function, see this post.

Here is the code for this function:
———————————————————————————————————————–

Function dayx(xoccurrence As Long, xday As String, xmonth As Long, xyear As Long)


Dim firstweekdayofmonth As Long
Dim currentmonth, endofmonth, firstdayofmonth As String


Select Case UCase(xday)
    Case Is = “MONDAY”
        xday = 1
    Case Is = “TUESDAY”
        xday = 2
    Case Is = “WEDNESDAY”
        xday = 3
    Case Is = “THURSDAY”
        xday = 4
    Case Is = “FRIDAY”
        xday = 5
    Case Is = “SATURDAY”
        xday = 6
    Case Is = “SUNDAY”
        xday = 7
End Select

‘Convert month number to name
currentmonth = Format(DateAdd(“m”, Val(xmonth) – 1, “January 1”), “mmmm”)
endofmonth = Format(WorksheetFunction.EoMonth(Format(DateAdd(“m”, Val(xmonth) – 1, “January 1”), “mmm dd, yyyy”), 0), “mmmm dd, yyyy”)

‘Determine the first day of the month
firstdayofmonth = Weekday(currentmonth & ” 1, ” & xyear, vbMonday)

‘Calculate
If xday >= firstdayofmonth Then
dayx = Format(currentmonth & ”  ” & (7 * (xoccurrence – 1)) + 1 – (firstdayofmonth – xday) & ” , ” & xyear, “mmmm d, yyyy”, vbMonday)
Else
dayx = Format(currentmonth & ”  ” & 7 + (7 * (xoccurrence – 1)) + 1 – (firstdayofmonth – xday) & ” , ” & xyear, “mmmm d, yyyy”, vbMonday)
End If

dayx = Format(DateAdd(“m”, 0, dayx), “mmmm dd, yyyy”)

End Function

———————————————————————————————————————–

Cleaning up data – getting rid of blank or 0 values in Excel

This function is designed to help clean up a spreadsheet if you want to either delete or hide cells that have 0 or empty values. How this works:

I select a range of data that I want to get 0s and blank cells out of (it doesn’t have to be a column) and run the macro.

The macro will hide everything that is a blank cell or a zero value in my range:

What if I only wanted 0s, or blank cells only? What if I wanted to delete the entire row that has that cell?

In the code below, you can change these options based on what you want the function to do. I have created two variables called option1 and option2. Their values are bolded in red.

If I change option1 from 1 to 2, then only 0 value cells will be affected, a value of 3 will mean only blank cells are.

For option 2 I can choose to hide the entire row (1), hide the entire column (2), delete the row (3), delete the column (4), clear the cells (5), delete the specific cells and shift cells up (6), or delete the cells and shift left (7).

Changing the values in red allows you to make any of the above changes.

The code for the macro is below. I suggest assigning a shortcut for this macro to run it quickly.
———————————————————————————————————————–

Sub cleanupdata()

Dim option1, option2 As Integer

option1 = 1
‘Option1
‘1 = blanks and 0s
‘2 = 0s only
‘3 = blanks only

option2 = 1
‘Option2
‘1 = hide row
‘2 = hide column
‘3 = delete row
‘4 = delete column
‘5 = clear cells
‘6 = delete cell, shift up
‘7 = delete cell, shift left

Dim activerange As Range
Dim cl As Range
Dim selectedcells As Collection
Dim numberofitems As Integer
Set selectedcells = New Collection

Set activerange = Selection

For Each cl In activerange

Select Case option1

    Case Is = 1 ‘Blanks and 0s
            If Len(cl) = 0 Or (Len(cl) > 0 And cl = 0) Then
                selectedcells.Add cl
               
            End If
           
    Case Is = 2 ‘0s only
            If Len(cl) > 0 And cl = 0 Then
                selectedcells.Add cl
            End If
                     
    Case Is = 3 ‘Blanks only
            If Len(cl) = 0 Then
                selectedcells.Add cl
            End If
           
End Select
Next cl

numberofitems = selectedcells.Count

On Error Resume Next
Select Case option2
    Case Is = 1
        For counter = 1 To numberofitems
        selectedcells.Item(counter).EntireRow.Hidden = True
        Next counter
    Case Is = 2
        For counter = 1 To numberofitems
        selectedcells.Item(counter).EntireColumn.Hidden = True
        Next counter
    Case Is = 3
        For counter = 1 To numberofitems
        selectedcells.Item(counter).EntireRow.Delete
        Next counter
    Case Is = 4
        For counter = 1 To numberofitems
        selectedcells.Item(counter).EntireColumn.Delete
        Next counter
    Case Is = 5
        For counter = 1 To numberofitems
        selectedcells.Item(counter).Delete
        Next counter
    Case Is = 6
        For counter = 1 To numberofitems
        selectedcells.Item(counter).Select
        Selection.Delete shift:=xlUp
        Next counter
    Case Is = 7
        For counter = 1 To numberofitems
        selectedcells.Item(counter).Select
        Selection.Delete shift:=xlToLeft
        Next counter
End Select

End Sub

———————————————————————————————————————–

Using Custom Functions and Macros

If you come across a custom function or macro that you want to use in your spreadsheets, this post will show you how to do so.

As far as coding goes, they key difference in a function as opposed to a sub procedure in Excel is in the way the code is executed. In a function, you enter in just like you would any other function, by typing out the name of the function and entering in any required arguments. With a sub procedure, it is typically executed via an event, a button, or shortcut key. Also with a function, the user will manually enter values for key variables, whereas for a sub procedure in most cases those will be calculated within the procedure itself.

I’ll demonstrate how a custom function works and how to copy it into your code.
Below is a basic function that will multiply a value by 5:
__________________________________________________________________
Function times5(multiply As Integer)
times5 = multiply * 5
End Function
__________________________________________________________________

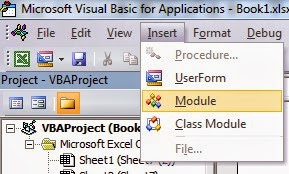
If you came across this code and wanted to insert it into your spreadsheet, what you would do is open VBA (alt + F11). Once inside VBA, click on Insert and select Module


Now paste the code into that module
And that’s all you would need to do before you can start using a custom function. Now if I go back into a worksheet, I can begin using the code by using the name of the function in my formula.

 There is only one argument in my function that I have to enter, that is for the multiply variable. Inside the function times5 there is one variable declared (multiply). The formula multiplies the variable by 5 to arrive at the result. If I had multiple variables (e.g.if the first line read Function times5(multiply as integer, multiply2 as integer) then that would signify two variables that need to be identified) then I would need to enter more than one argument, the way you would for any other function in Excel that has multiple arguments. But in this case I only have one variable.
Now as you will see, the result is the multiply variable multiplied by 5.
I can access this function for any worksheet within this workbook. If you want to copy a custom function to your spreadsheet, follow the above steps and then you can utilize that function in your worksheets. 
The one downside of custom functions is that the tool tips that normally show up in regular Excel formulas telling you what arguments are required are not available and so you need to make a note of what arguments are required for a function.

Inserting a Sub Procedure (Macro)

If instead of a custom function you had sub procedure (macro) you wanted to copy into your code, the steps would be the same, except instead of using a formula to execute the code, you would need to assign either a shortcut key or a button

Brief Intro to Macros and VBA

If you do a lot of repetitive tasks (and even if you don’t), macros can help save lots of time. In some cases you can be talking hours worth of work in one macro.

Recording a Macro

Now, if you’re not familiar with macros or VBA at all, a good way to learn is through the macro recorder tool (this is under the View tab in the ribbon). When you record your macro, you can see what was created on the VBA side by pressing ALT+F11 – you can also edit your macro here. You can do much more in VBA by coding straight from that screen, as the macro recorder is limited (e.g. it can’t create variables or other complex codes). But the macro recorder helps you learn how to reference different items.

When you create a macro – whether directly from VBA or the macro recorder, you can assign a shortcut (or a button to it) to it, saving you time in executing it.

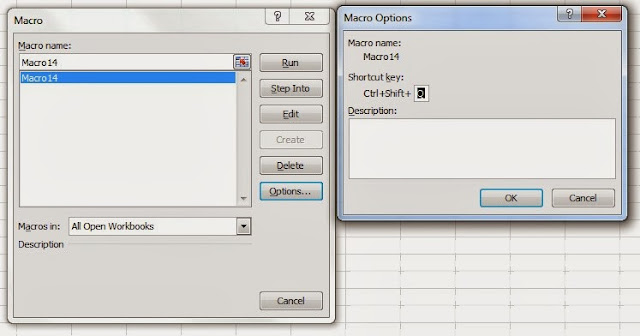
To assign a shortcut: select the view macros option under the view tab and then select options for the macro you want. There it will allow you to assign a shortcut (see below)

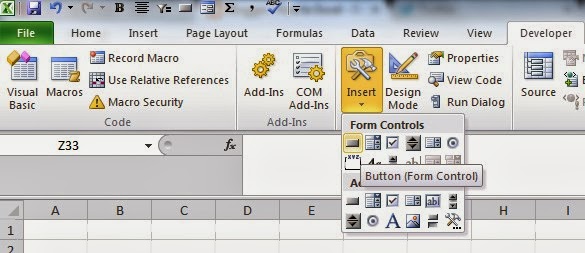
For a button, you will need the developer tab enabled. If you don’t have it, go under Excel options and under ribbon options you will see an option to enable it.

Once enabled, under the developer tab you will see an insert controls button where you can insert a button (see below)

Once you do that you will create the size of the button, and when you are done it will ask you to assign a macro to it. And now when you click on that button your macro will run.

Inserting VBA Code

If you run across VBA code that you want to copy into your spreadsheet, you want to make sure it is put in the proper section.

If it is a custom function, you want to make sure that is put in a module to work properly. If you do not see a module section in VBA, you will need to add one from the Insert menu.

If it is just a macro (denoted by ‘Sub’ and then the name of the procedure) it can be put in a module, the worksheets, or the workbook section. If you want the macro to work in all worksheets, then I would recommend putting it in the workbook rather than the individual sheets.