AgedARReport1

Create an Accounts Receivable Aging Report in Excel

An aged accounts receivable (AR) report can help you identify accounts with overdue receivables. It can help you stay on top of your AR to ensure that you are prioritizing collection efforts based on their relative ages.

Here’s a sample of what your AR data might look like, showing customers, invoice dates, due dates, and amounts:

Using a pivot table, we can summarize these details to determine how old the AR is, and create a report to help us stay on top of overdue accounts.

Creating the accounts receivable table

First, I’ll convert this data into a table, and call it tblAR. By creating a table, it will make it easy to add to the data and update it, and for the pivot table to refresh easily as new data is entered. Next, I’ll add a column to calculate the number of days past due. The formula for that is as follows:

=IF([@[Due Date]]>TODAY(),0,TODAY()-[@[Due Date]])

Now my table shows the number of days past due. And since it uses the TODAY() function, it will automatically update.

A table containing accounts receivable data.

Next, I need to create a lookup table for the aging, which I’ve setup as follows:

Then, I’ll create a lookup formula to determine what the description should be based on how old the receivable is. In my spreadsheet, the lookup table is in columns H and I. The following formula will pull in the ‘description’ field:

=VLOOKUP([@[Days Past Due]],H:I,2,TRUE)

Now I have a complete table that shows the correct aging category based on the days past due:

Setting up the pivot table

Once the data is ready to go, the next step is to create the pivot table. When putting the Aging Category in the Rows section and the Amount in the Values section, this is what the pivot table looks like:

A pivot table summarizing invoices by age.

This gives me a broad high-level overview of the overall aging. However, I can also set this up so that it breaks it down by customer. For that setup, I can put the Customer Name field in the Rows section, and the Aging Category going across in columns:

A pivot table breaking down aged receivables by customer.

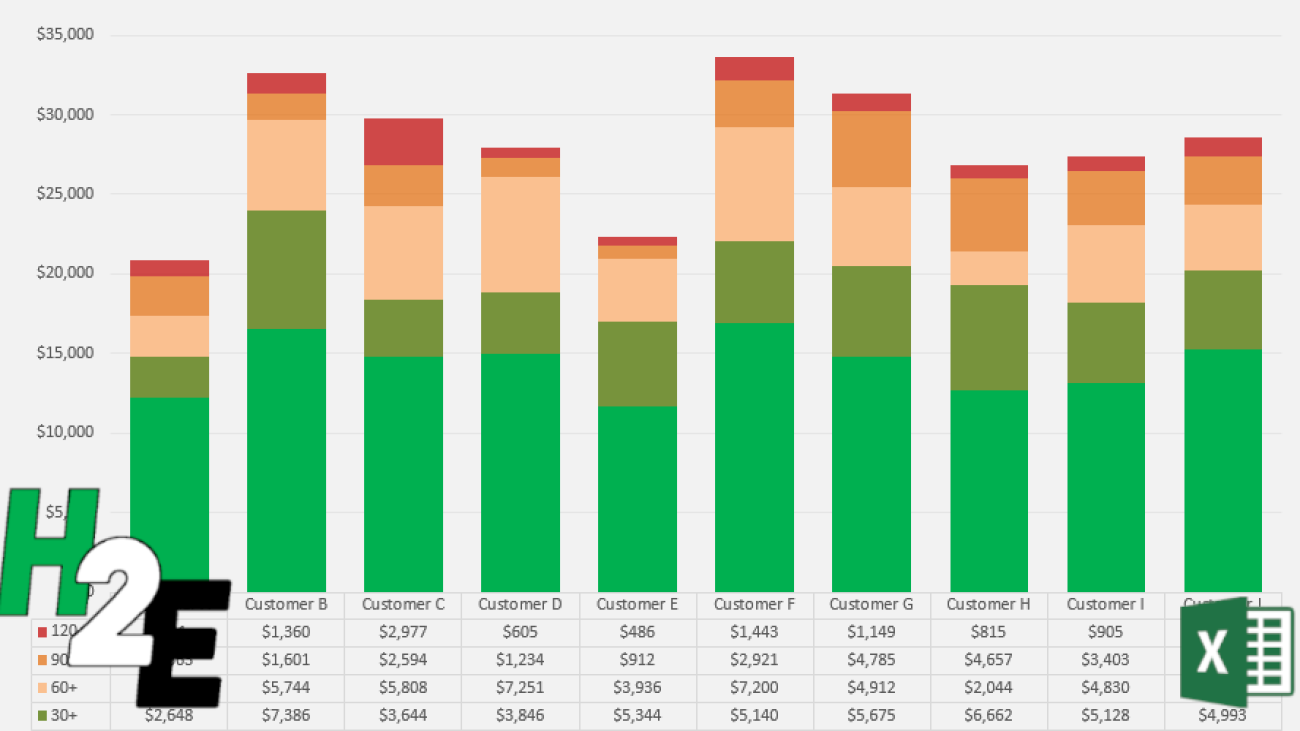
I have dragged the ‘Current’ value to the front to ensure that the text value is at the start. Next, I will create a chart to help visually show the aged AR data. Since there are multiple aging categories per customer, a stacked column chart is ideal in this situation. Then, after applying custom formatting colors to each aging category, I have a visual representation of the AR aging chart:

An aged accounts receivable report displayed using an Excel chart.

If you have a lot of customers and can’t fit all of them on a single chart, you could insert a slicer to make it easy to select one or multiple customers.

An aged accounts receivable report displayed using an Excel chart and slicers.

To help visualize this further, I can also add a data table that shows the breakdown of the different aging categories. To enable this, select the chart, click on the Design tab, select Add Chart Element and select a Data Table With Legend Keys:

An aged accounts receivable report displayed using an Excel chart and slicers and a data table.

If you like this post on How to Create an Accounts Receivable Aging Report in Excel please give this site a like on Facebook and also be sure to check out some of the many templates that we have available for download. You can also follow me on Twitter and YouTube. Also, please consider buying me a coffee if you find my website helpful and would like to support it.

H2Etax

How to Calculate Tax Included in an Invoice

If you are creating an invoice and need to account for taxes, usually you just need to multiply the subtotal by the percentage due for taxes. However, it gets trickier when the tax amount is already included within the invoice total and you need to work out what the amount relating to tax is. This is important if you need to determine how much in taxes you need to claim on an expense or how much you need to collect if you’re the seller. Below, I’ll go over a sample invoice calculation to show how can determine the tax amount whether it is included in the total or not.

Calculating taxes on an invoice

Let’s start with the basic calculation. This is how you might normally determine the taxes on an invoice and the total invoice value:

Sample invoice calculation including taxes.

The calculation is straightforward as what you do is just take the subtotal, multiply that by the tax rate, and add that back to the subtotal. Another way is to just take the subtotal and multiply it by a factor of 1 + the tax rate. In this case, it would $100 x 1.10. But let’s pretend we don’t know the subtotal and just know that the invoice total is $110.00 and the tax rate is 10%. In order to calculate the pre-tax amount, we need to do the steps in the opposite order. To prove this out, let’s use a bit of algebra:

$100 + ($100 x 10%) = $110

This can be simplified as follows:

$100 (1 + 10%) = $110

Now let’s solve for $100 which I will assign a variable of ‘y’ to:

y (1 + 10%) = $110

To solve for y, all we need to do is move the factor of 1 + the tax rate and divide $110 by that:

y = $110/(1 + 10%)

Taking $110 and dividing by 1.1 will give us a value of $100. And so what our end result comes out to is essentially this:

invoice total / (1 + tax rate) = pre-tax amount

To calculate the tax, all that’s needed then is to take the total and subtract the pre-tax amount.

Now that the logic is set up, let’s convert this into an Excel formula:

Invoice calculation when the tax amount is included.

Similar to how multiplying by a factor of the pre-tax amount by 1.1 (when the tax rate is 10%) would get you to the invoice total, dividing the total by 1.1 would get you to the amount before taxes. If the tax rate were 5%, then you would use 1.05, etc.


If you liked this post on How to Calculate the Tax Amount When it Is Included in the Total, please give this site a like on Facebook and also be sure to check out some of the many templates that we have available for download. You can also follow us on Twitter and YouTube.

invoice.template

Invoice Generator Template

If you need to make an invoice and don’t want to spend money on some overpriced software, you can do so easily in Excel with this template. Not only can you customize it to how you want it to look and feel and produce a professional-looking invoice, but you can also track items, set prices based on customers and even have taxes calculated based on location codes.

Ultimately, it’s up to you how complex or simple you want it to be. Here’s how the template works:

The invoice itself

sample invoice in excel

Whether you want to add a logo, change the colors or add some information to the headers, you can have a lot of control over how your invoice looks. The key thing to remember here, however, is not to add or remove any columns or rows. If you need extra space, stretch out the rows or columns, but don’t add any new ones.

And if you need to move the invoice date and number fields, be sure to move them, not delete them or copy and paste. They’re named ranges and so it is important that they remain intact for the code to still work.

Setting up the invoice template

Before you get started and using the template, what you’ll want to do is to set up some items, customers, locations and rates. Unless you really want to start from scratch every time, which I wouldn’t recommend.

First up, start with the Locations tab. If you’re only selling to one part of the world, then just set up a generic location but you can add as many different ones as you need. This is key for ensuring that the correct tax amount is being calculated per customer.

Next up, go to the Customer tab where you’ll have a list of your different customers, including their addresses and location codes. It’s important to add the location codes first because on the customer tabs the locations are drop-down selections that are derived from the locations tab, this ensures that you only select from a location code that has already been created. This is important to ensure that you aren’t mapping to a location that hasn’t been set up, otherwise, you’ll get an error.

Set up all the customers you need. Then next, move over to the Rate tab. Here, you’ll want to set up your customers from columns F onward. On this tab, you will also create your different items and differentiate between products and services. You can create as many items as you want. There is a rate field (column D) when you specify your default rate.

In the columns for your different customers, you can specify a special rate per customer. For example, in the above example, ITEM-1 has a default price of $50. However, if Company A is selected as a customer, a rate of $25 will be applied. If Company B or C is selected, the default rate of $50 will apply since no special pricing has been made available for those customers.

Putting it all together – creating an invoice using the template

With all that set up, now you can go back to the invoice tab to create your own invoice.

First, start with selecting your customer under the Bill To section. Enter the invoice date and invoice number.

Then, it’s a matter of selecting the items in column D, the date in column E and Quantity in column F (if it’s a service item, the quantity won’t matter, a value of 1 will be assumed). The remaining fields should auto-populate. You can edit everything that is in yellow. Anything not in yellow means that it you should NOT modify it (Note: the actual template will not show this highlighting):

Once everything is good to go, you can click on the Generate Invoice button.

This will do two things:

  1. Create a PDF of the invoice you just created and save it to the location specified, and
  2. It will also add the invoice to the Invoice.List tab. This creates a ledger for you to track all the invoices that have been created. If an invoice number is already on there, it will not allow you to create a duplicate. It’s important that you do not delete the invoice number field if you’re changing the template around.

The Invoice.List tab will log all the relevant data from the invoice. This includes the number, date, when it was saved and by who, which folder, and even individual item sales.

Disclaimer

The goal of this template is to allow you to generate invoices as accurately as possible. It also helps you track all your invoices. However, it’s by no means a perfect solution as you could conceivably alter the data in the Invoice.List tab after the fact. What I’d recommend is password protecting the file or hiding the tab if it will be used by multiple users.

So if you choose to use this file, it’s just important to keep that in mind. By adding too many controls and preventing people from deleting or correcting items, it may end up being too much of a hassle. This template isn’t a substitute for accounting software and it’s intended to create and track invoices.

Please note it’s up to you to ensure that your invoice is accurate and correct. You should always double-check an invoice before sending it out.

Download

The invoice template is free to use although there is a limitation of 3 items per invoice. It will also have an ad in the ribbon. The full version is available here. It will remove the limitations, advertising, and the code for the VBA will be unlocked as well.

If you like this Blank Invoice Template, please give the site a like on Facebook. Also be sure to check out our templates section. You can also follow us on Twitter and YouTube.

accounts receivable template visual basic excel

Accounts Receivable Statement – Template Using VBA

Download Template

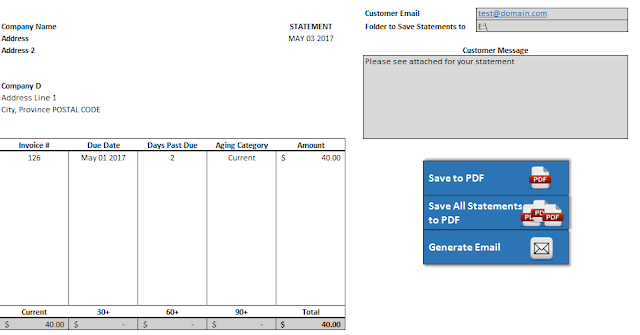
accounts receivable statement

This is an updated version of a prior post that generated a statement without VBA, but the limitation there was you had to save the pdf yourself. This updated version allows you to do the following:

– Save the current statement to PDF
– Cycle through all your customers and save all their statements to PDF
– Generate an email (but not send) to the customer with the attached statement.

It is important to note the customer name on the invoice data needs to match the name on the customer data tab otherwise the invoices will not pull on the statement correctly.

The template works in exactly the same way as the prior version – invoice data and customer data needs to be downloaded from your accounting software. You can customize your statement and include any images you like so that it will look consistent for every statement that you send out.

This template is setup to accommodate up to 150 invoices.

aged accounts receivable chart

Aged Accounts Receivable Chart

Download Template

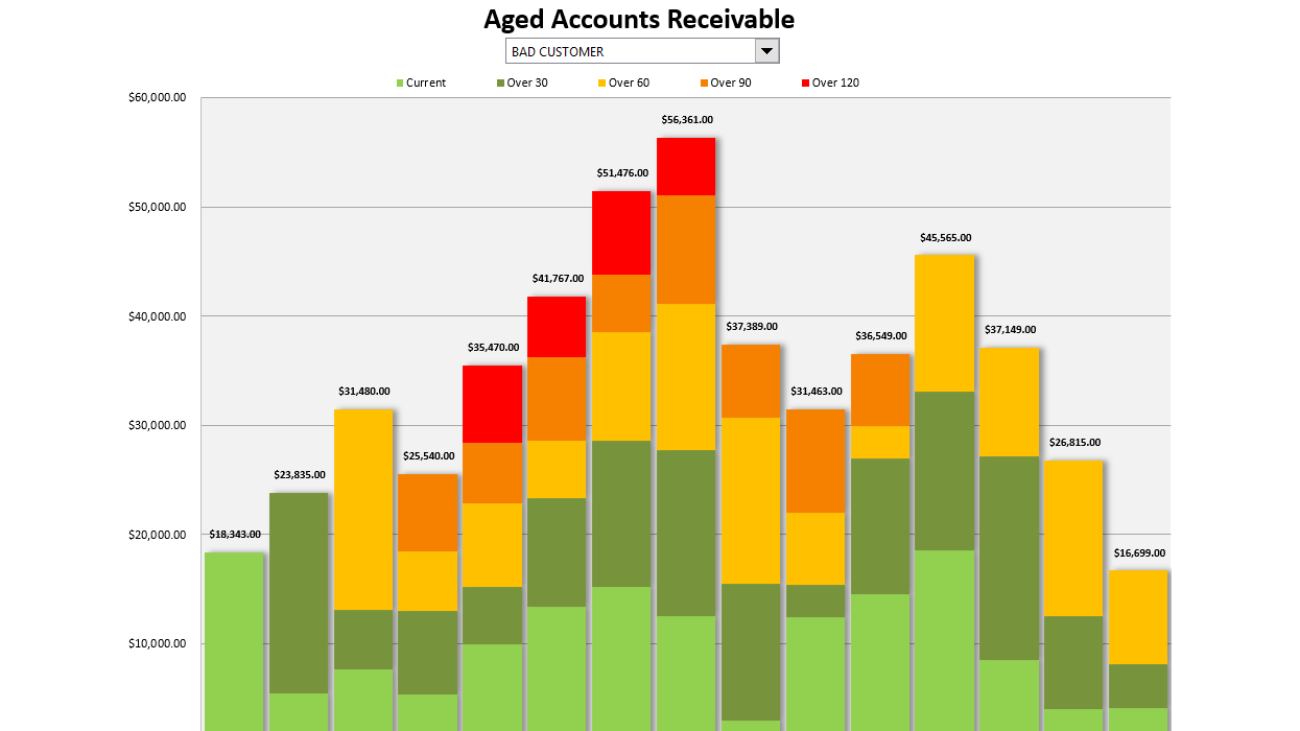
In this template you can generate a chart showing the history of a customer’s aged accounts receivable. This chart will show a breakdown by invoice age so it will be able to tell you a great deal in one picture: the customer’s total receivables by month, breakdown of the age of the receivables by month, how much sales is being done with the customer (this would be the current receivables), and whether the receivables are growing or declining. It could be a very useful tool in evaluating a customer’s credit worthiness and in helping detect potential problems.

The main input tab is the AllTransactions tab, columns A:E. Column D specifies the type of transaction and should either be PAYMENT or INVOICE. Column C (Date) relates to the date of the transaction – either  payment date or an invoice date. Columns F:H are formulas.

The other input is the Customers tab. You will need to enter all the customers onto here. The easiest way would be to copy the names from all transactions and just extracting unique value (see this post on how to do that). Note that the customer names here must match the names on the AllTransactions tab otherwise when you select a customer data may not populate correctly if the transaction data does not have a match for that customer name.

Once entered, you can go to the Aging Chart tab and select your customer from the drop-down menu and the chart will update:

It is a stacked column chart so in addition to just seeing overall receivables by month you can see their age makeup. This customer did not go past over 30 days so they don’t venture past the dark green shading. Now, my other customer, Bad Customer, has a lot more colour:

This customer has gone as high as 120+ so they have the full spectrum of the aging schedule on here. The closer the colour is to red, the older the receivable is. You can modify these colours to your liking.

The current period that I have the chart running for is from January 2016 until March 2017. You can change the starting period in cell B2 on the Summary tab and if you want to add more months then simply drag the last column’s cells from rows 1 to 8 into the next column so that the formulas will update.

Because there are no macros in this template, you will also need to update the chart range so that it includes the new months you have added. To do so, right-click on the chart and click select data and in the chart data range enter ChartData – this is a named range that will automatically select the furthest column.

 
After you hit OK the chart will update. If you delete columns you don’t need to re-size the chart, this step is only needed when adding additional columns and months