PLEASE NOTE THERE IS A NEWER VERSION OF THIS TEMPLATE AVAILABLE HERE
A bank reconciliation can be a time-consuming process but this template can help speed it up. By assigning categories and setup quick ways to match items, you can quickly accelerate the reconciliation process. With an easy interface to match transactions, this template should help speed up what can otherwise be a tedious process.
Download Options
This version has been discontinued. Instead, please refer either to the 2020 or 2023 versions.
Note on #NAME? Errors
If you see this error message in the spreadsheet it means you have not enabled macros when opening the file or the calculations have not been able to update. If you think macros have been enabled and updated calculations but don’t see the results updated, then just try re-opening the file and that should fix the issue.
How to Use This Template
This template allows you to easily reconcile your bank to your book by 1) categorizing transactions, and 2) reconciling any matches based on those categories.
Setting up Categories to Match Transactions
In order to categorize transactions, you will need to use the Setup tab to first create the rules that will find and identify categories. The setup tab has five columns: Category, Identifier, Key, Length of Key, and Gap.
The Category column is simply the name of the category (e.g. wire transfers, deposits, cheques).
The Identifier is what needs to be in your transaction description to be flagged as belonging to this category. For example, suppose the following description on your bank statement indicates cheque # 1234 was cashed:
C#1234
In the above example you would want to set C# as your identifier since that is how you can identify this is a cheque and should belong to the cheque category. The category can have multiple rules (for example, the way a cheque is indicated on your bank is likely not the same as on your general ledger)
The next column, the Key, is what should be used to try and match and reconcile these types of transactions. This is a drop-down selection as there are multiple options: use date, use letters after identifier, use numbers after identifier, and use alphanumeric string after identifier. You can also leave this blank if you don’t want the template to try and automatically reconcile these transactions or if there is no discernible key that can help identify the transaction.
To use the date will mean just the date is used, nothing else. In the case of a cheque this will not work since you might have multiple cheques deposited in a single day, so to just look at date will not correctly reconcile these types of transactions.
In the case of cheques you will want to select ‘Use numbers after identifier’ since that will pull only numbers and not any text. If you need text you can select the option for ‘Use letters after identifier’, or if you need both numbers and letters – ‘Use alphanumeric string after identifier’
The Length of Key column is how long you want the key to be. Suppose the following description:
C#12340000000
Although the cheque number is 1234 the description leaves trailing numbers afterward or might have some other detail afterward that doesn’t pertain to the cheque number. In this case you will not want every number, but just the first four.
The Gap column is used if you don’t want to start retrieving text or numbers after the identifier. For example:
C#001234
In the above example there are two zeros before the cheque number. In such a situation I would set the gap to 2. This would skip the first two characters after the identifier and then start pulling numbers or text after that.
In my example image above I set the identifier to C#, a key length of 4, and a gap of 2. Here is some sample data and how it extracts the key field based on the rules I set out above:

In the first row there was no space between the identifier and the cheque number, as a result, my key only pulled the last two numbers.
In the second row there was one space, so only three numbers were pulled.
In the third row there were two spaces and as a result all four numbers were correctly extracted into the key field.
In the fourth row I added trailing 0s after the cheque number but since my length is set to 4, it does not include those extra numbers.
In the fifth and six rows I show that whether it is numbers or letters before the cheque number is irrelevant since the gap is set to 2. Now in the case of row six, I would not need to set a gap because if I am only looking at numbers it would have skipped the letters anyway.
Note that these rules are not specific to either the book or bank tabs; any rules will be applied to both. However, in all likelihood you would need to setup rules for the same type of transaction multiple times since the way your book shows a type of transaction is probably not the same way your bank will.
If for whatever reason there is no consistency in how some of your transactions appear you could leave the details on the setup tab for the key as blank, that way you still can categorize the transactions (if there is an Identifier) but with nothing set for the key the template won’t match any of those transactions for you, which brings me to the next part: reconciling the data.
Matching Transactions
In order to reconcile that data you will of course need to download your transaction details into the ‘Bank’ and ‘Book’ tabs. Columns A:D are highlighted in yellow and those are the only ones you need to fill in. They include fields for Date, Description, Debit, and Credit. The Description field is the field that will be used for finding what category a transaction belongs to and extracting the key.
Columns E:H are formulas and are pulled from columns A:D.
In order for the template to match and reconcile items, it will look at the following:
– Are the categories the same?
– Do the keys match?
– Do the amounts match?
If all three criteria match, then the Status column will show a ‘-‘ indicating 0; that the amounts are reconciled. Otherwise it will show a value of ‘O/S’
There is also column I, Manual Override. If you mark an ‘X’ in this field, it will make transaction marked as reconciled, regardless of whether the template finds a match or not.
In the above screenshot the second row is reconciled once I enter an ‘X’ in the Manual Override column. Any reconciled items will highlight in green.
Alternative, you you can select a line item that has a status of O/S and click CTRL+SHIFT+X which will bring up the Reconciler window which will show you potential matches for the item you are looking to reconcile.
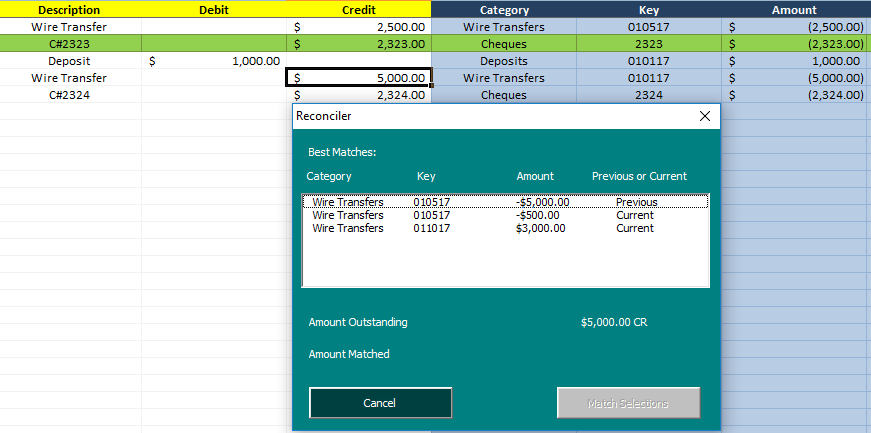
In the above example I pressed the shortcut keys while selecting the row with the $5,000 wire transfer. Since it is O/S it pulls up the Reconciler window. The Reconciler shows all the wire transfers from both the previous O/S tab as well as the Bank tab (in this example I was on the Book tab). Exact dollar matches show up at the top. Note the first result shows an amount of -$5,000 – the negative does not indicate a credit, it pulls the amount from the amount field which just shows the negative as being an outflow of cash. Because an outflow of cash on the bank is a debit, if I select the -$5,000 it will show $5,000 DR as being the amount matched, which is shown on the next screen:
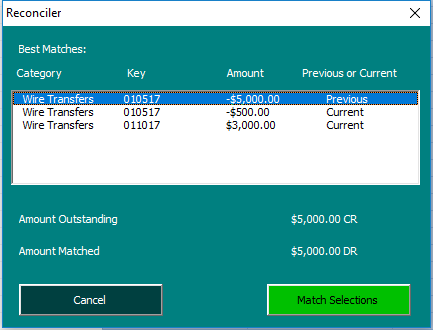
Because the debits match the credits, the Match Selections button has turned green and can now be pressed. Doing so will enter an ‘X’ in the manual override field for these amounts. You will only be able to match the selections if the debits and credits match. You can select multiple items if they add up to the total outstanding.
Completing the Bank Reconciliation
Once all the bank and book data are entered and you have finished matching which items you can, go to the Reconciliation tab where there you will see three buttons on the right hand side:
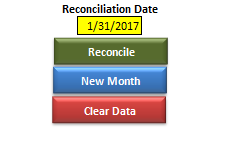
The Reconcile button will generate the reconciliation and show you which items are outstanding. It will group the outstanding items by category – refer to the screenshot at the beginning of the post. If the adjusted balances match and the amounts reconcile to 0 then it will highlight that line in green, otherwise it will be in red to indicate a variance. The reconciliation date you will need to enter in the yellow highlighted cell.
The New Month data will clear all your existing data but before doing so will put your existing O/S items into the Previous OS Items tab so on your next month’s reconciliation they can be used to match new transactions.
For example, if cheque #1111 does not clear this month it will be moved to that tab. If on next month’s transactions there is a transaction on the bank for this cheque number the template will be able to reconcile it automatically. Nothing extra needs to be done to do this, as when looking for matches, both the bank and book tabs look at the Previous OS Items tab to clear any items from there as well.
Lastly, the Clear Data button will do just that – get rid of everything from every tab.
The template at the top has some sample data so you can test out and see how it works.