H2EDayofWeek

Calculate the First Day and Last Day of the Week

Excel’s WEEKNUM function can return the specific week that a date falls in. But to do the reverse is a bit more challenging. In this post, I’ll show you how you can get the first and last day of a week (as well as anything in-between).

Setting up some variables

You can make this into a large and complex formula, but I’m going to make it a bit more organized by utilizing named ranges. The two names ranges I’m going to set up are for the day of the week (DAYNUMBER) that I want to calculate for, and the first day of the year (FIRSTDAY).

I’m going to use Monday as the day of the week my week starts on. On my regional settings, that is weekday #2. If you’re not sure about yours, you can use the WEEKDAY function on a day that is a Monday (or whichever day you wish to use) to determine the number associated with that.

Calculating the difference between the first day and your desired day of the week

The day the year begins on serves as an important starting point. This year began on a Saturday. If my desired day is Monday, then I need to calculate the difference between those days of the week. The formula for that would be as follows:

=DAYNUMBER - WEEKDAY(FIRSTDAY)

This returns a value of -5. If I wanted to know when the first Monday of the year was, I couldn’t just deduct 5 from the first day or I’d end up in the wrong year. What I need to do is to set up an IF function to say that if the difference is negative, I will add 7 to adjust for that fact. And if it isn’t negative, then I can just add to the starting date. Here is my formula thus far:

=IF(DAYNUMBER-WEEKDAY(FIRSTDAY)<0,DAYNUMBER-WEEKDAY(FIRSTDAY)+7,DAYNUMBER-WEEKDAY(FIRSTDAY))

To get to the right day, I need to add this to my starting date:

=FIRSTDAY+IF(DAYNUMBER-WEEKDAY(FIRSTDAY)<0,DAYNUMBER-WEEKDAY(FIRSTDAY)+7,DAYNUMBER-WEEKDAY(FIRSTDAY))

Using the above formula, Excel tells me that Jan. 3, 2022, was the first Monday of the year, which is correct. But I need to adjust the formula to ensure the calculation puts me in the correct week.

Adjusting for the week number

The above formula works if I want the first week. If I want it to be more flexible than that, I need to include the week number in my calculation. For that, I’m going to create a named range called WEEK. The key is in adjusting the +7 calculation. In the first argument of my formula, when it was negative, I added 7. If I want the second week, then I need to add it by another factor of 7. Here’s how that part of the formula would look:

WEEK-WEEKDAY(FIRSTDAY)+(7*WEEK)

I also need to add that part to the second argument, which currently doesn’t adjust for the week number:

WEEKDAY(FIRSTDAY)+(7*(WEEK-1))

The completed formula is as follows:

=FIRSTDAY+IF(DAYNUMBER-WEEKDAY(FIRSTDAY)<0,DAYNUMBER-WEEKDAY(FIRSTDAY)+(7*WEEK),DAYNUMBER-WEEKDAY(FIRSTDAY)+(7*(WEEK-1)))

Now I can adjust the calculation for different days of the week and different week numbers. And so whether you’re looking at the first day of the week or the last day of the week, you can just adjust the day number you’re looking for.

Here’s what the formula would look like without named ranges if the year was the current year and it was pulling the Monday of the 50th week of the year:

=(DATE(YEAR(NOW()),1,1)+IF(2-WEEKDAY(DATE(YEAR(NOW()),1,1))<0,2-WEEKDAY(DATE(YEAR(NOW()),1,1))+(7*50),2-WEEKDAY(DATE(YEAR(NOW()),1,1))+(7*(50-1))))

If you liked this post on How to Calculate the First Day and Last Day of the Week, please give this site a like on Facebook and also be sure to check out some of the many templates that we have available for download. You can also follow us on Twitter and YouTube.

H2EconvertMonthNumber

How to Convert Month Number to Month Name in Excel

Do you have a report in Excel that lists the months as the numbers 1 through 12 and you want to convert that into the actual month names? Below, I’ll show you how you convert a month number into a month name in Excel.

Here’s an example of data that shows monthly sales but it only lists the number as opposed to the name:

Sales by month with the month number showing in digits.

If you had the entire date in a cell you could format it so that it showed the month. For instance, what I could do is type in =TEXT(A1,”MMM”) which would convert the value in cell A1 into a three-letter abbreviation for the month. But the numbers 1 through 12 will return values of “Jan” as Excel will think that you are referring to the first month of the year.

However, that changes once you get to the number 32. Since there are only 31 days in January, the number 32 will return a value of “Feb” if you were to continue on with that formula. And so the trick is to multiply these values all by a factor of 28. Since that’s the minimum number of days every month will have, it ensures that jumping by 28 each time will put you into each month of the year. This is what my values will look like:

Month numbers multiplied by 28.

To prove this out, here is which dates those days of the year would correspond to:

Day of the year along with the corresponding date.

In month 12, we barely make it in December using this approach but that’s good enough. And even in a leap year, multiplying by 28 still works. In this example, I include 2024, the next year that February gets an extra day:

Day of the year along with the corresponding date, including a leap year.

So now that we’ve confirmed that those numbers will fall within the correct months, we can use the TEXT formula noted above to convert those numbers into month dates, and this is what we end up with:

Month numbers converted into month names.

You can also multiply by 29 and this logic will still work. But if you use 27 then your months will be wrong by the time you hit September and if you use a multiple of 30, then in non-leap years you will be jumping too quickly and you will have two dates in March.


If you liked this post on How to Convert Month Number to Month Name in Excel, please give this site a like on Facebook and also be sure to check out some of the many templates that we have available for download. You can also follow us on Twitter and YouTube.

calendar1

Excel Calendar Template

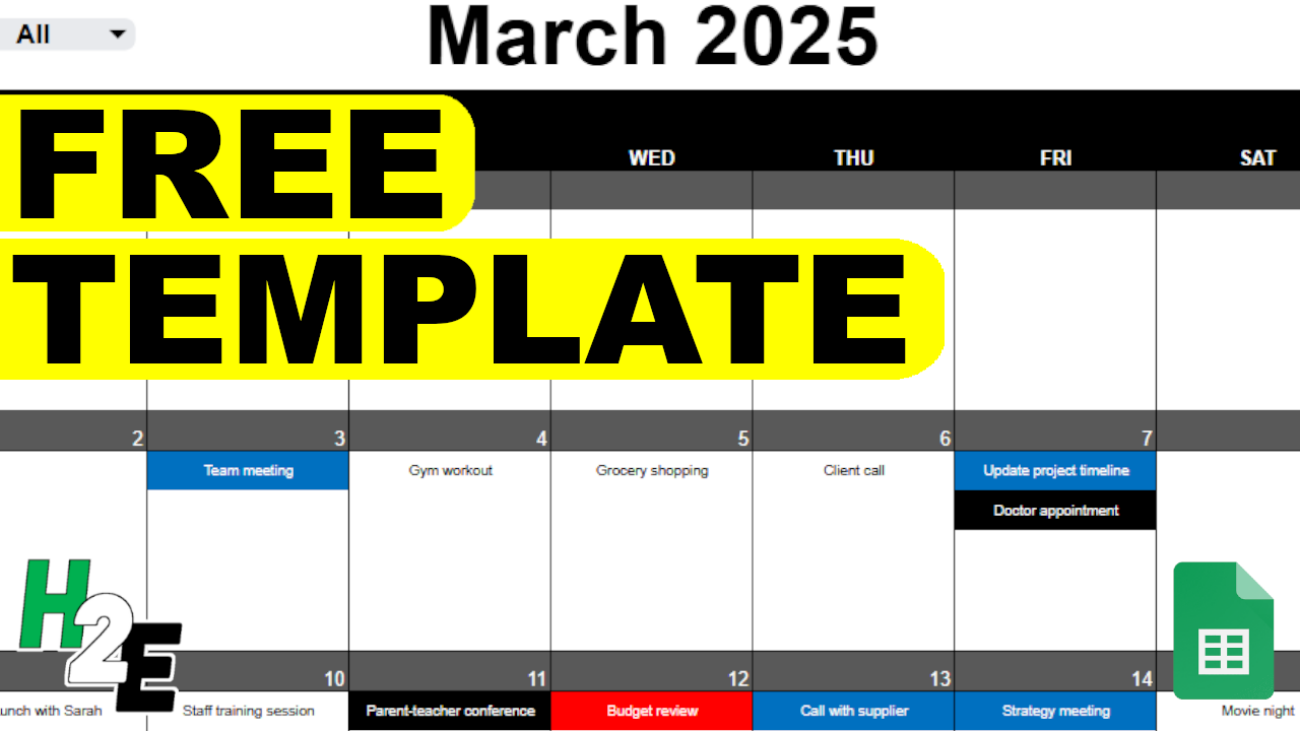
Do you need a calendar in Excel to quickly write down your tasks or keep track of deadlines and appointments? With this free template, you can create a calendar within seconds for the month and year that you want. You can copy multiple tabs and create multiple months in advance. The template will also allow you to specify whether you want the day of the week to start on a Sunday or a Monday. If you would like to try it out, you can download it here.

How the template works

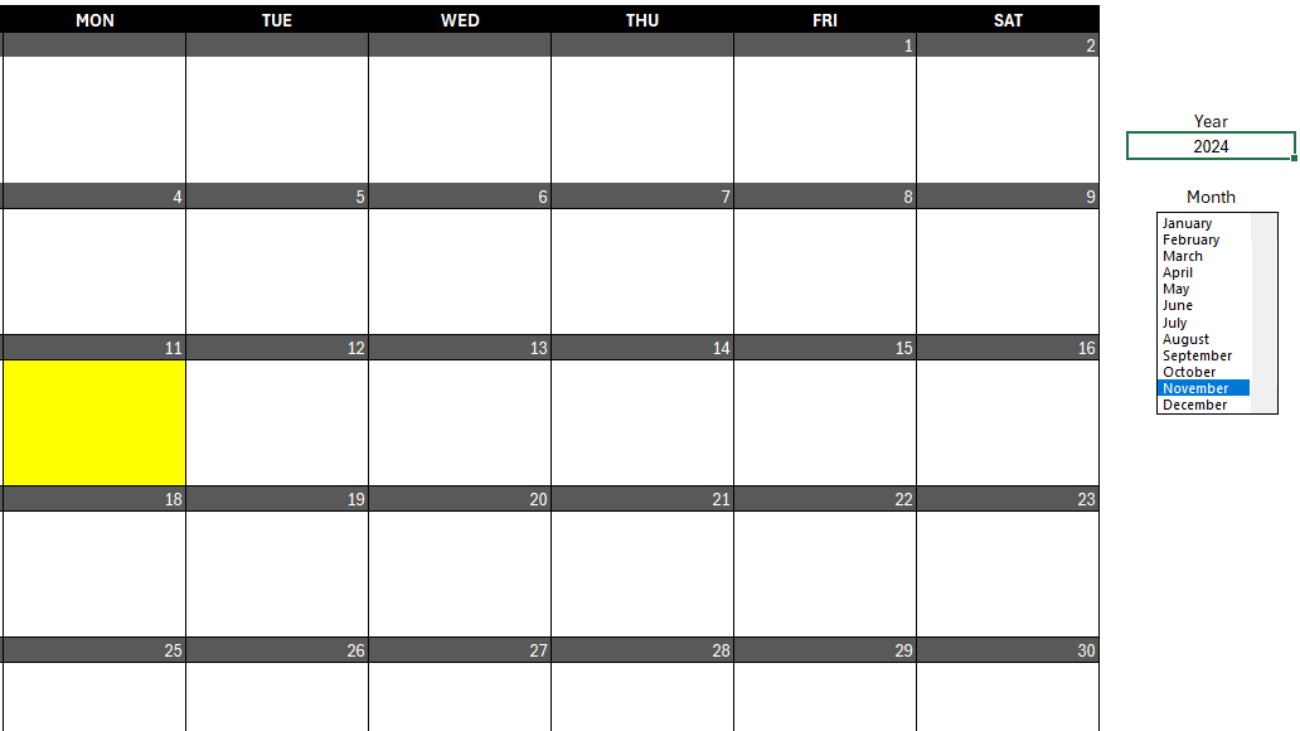
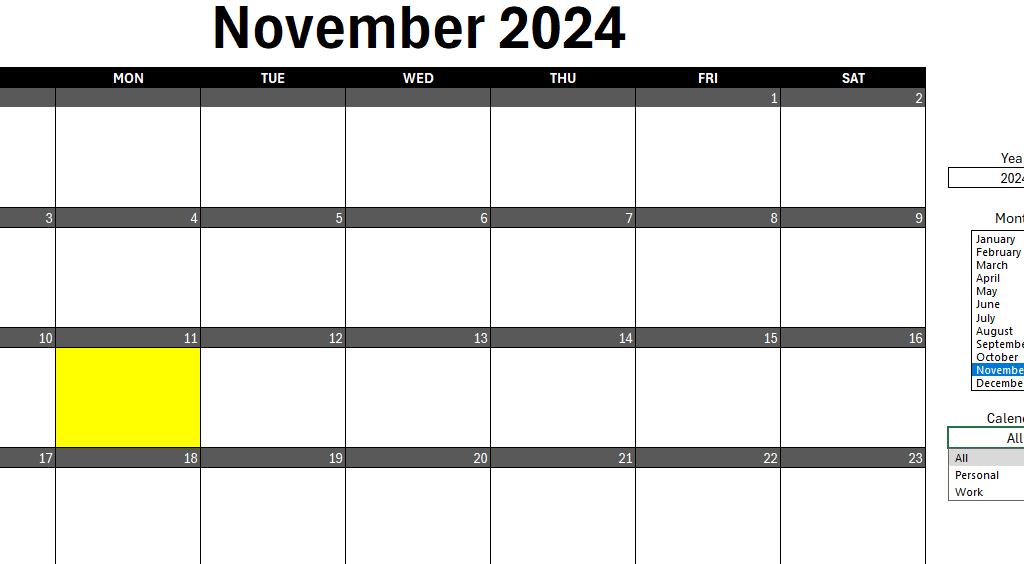
The template only has three areas where you need to make inputs. That includes the month, year, and when you want the week to start. To update the month, simply click on the dropdown in the month field, where you will be able to select from any of the 12 months in the year. You can also type in the month but if you make a typo, then you will get an error.

Dropdown selection for the month.

Next up, enter the year for the calendar, which is right next to the month. In this field, you can just enter in a number as a dropdown isn’t necessary here. Then, once you have selected a month and year, the calendar will automatically update based on your selections:

Calendar in Excel showing for January 2021.

By default, I have the calendar set up to start on a Sunday. But if you prefer for the week to start on a Monday, simply scroll over to the right-hand-side of the sheet where you will see a dropdown. There, you can change the selection and specify which day you want the week to start on:

A dropdown option determining which day of the week the calendar should start on.

If I change this to Monday, then my calendar will update again, this time shifting the dates:

The calendar adjusts after changing the day the week starts on.

If you need to create multiple months, you can simply copy the tab for the calendar over and make the selection for another month and year. Whether you need one, two, or a full 12 months, you can set this up easily with this template. This is a file that you can potentially use forever as you can simply adjust the month and year combinations as many times as you like. There are no limitations as to the number of times you can create, copy, or move tabs.

The template is also set up so that there are five cells for each day, one for each potential task or meeting that you need. If you need to squeeze more into there, what you can do is shrink the font down.

However, the sheet is locked down outside of areas where you can enter in data (including the inputs, and the cells below each day). This is simply to prevent people from accidentally overwriting formulas or otherwise causing the file not to function as intended.


If you liked this post and the free Excel calendar template, please give this site a like on Facebook and also be sure to check out some of the many templates that we have available for download. You can also follow us on Twitter and YouTube.

timeoff1

Time Off Tracker Template

If you need to track employee sick days and vacation, then the time off tracker template can help you. This template can also help you decide whether to approve or deny time-off requests as well. Below, I’ll go over the main features of the template and how it works.

Setting up the time off tracker

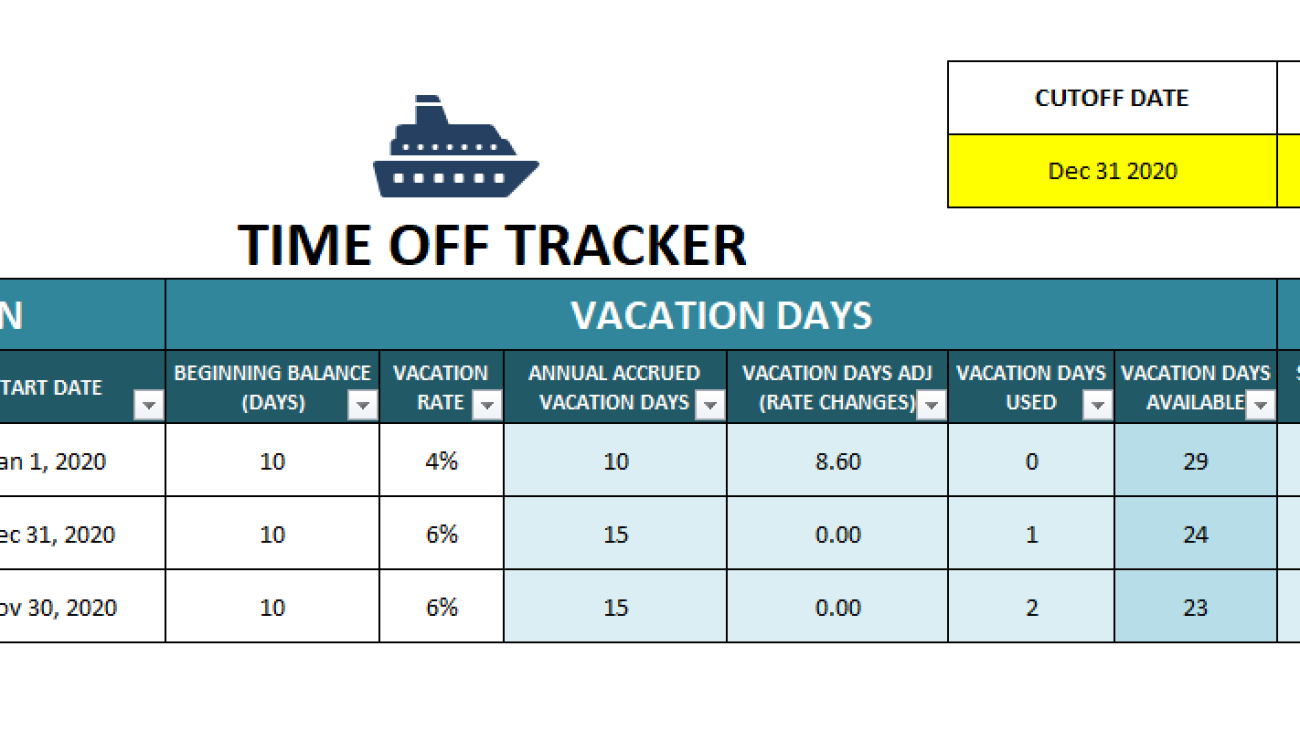
On the Summary tab, you’ll start with a list of all the employees you want to track. This will include their hourly wage, start date, their beginning balance for their vacation days, as well as their vacation rate. The time off tracker template will also track sick days as well.

You can enter the current year and the cutoff date if you want to see up to a certain point in time. The annual hours and vacation rate percentage will impact the annual vacation day accrual. Annual hours you’ll probably want to set to either 2,000 (50 weeks x 40 hours) or 2,080 (52 weeks x 40 hours).

For sick days, there is a section off to the right on the summary page where you can enter the number of sick days people are entitled to annually. You can also specify a maximum number of people that can be off at any one time. This is related to approving requests which I’ll cover further down.

You’ll also see a section for holidays and blackout days for when you don’t want people taking time off. These lists can be as long as you like.

Entering and requesting time off

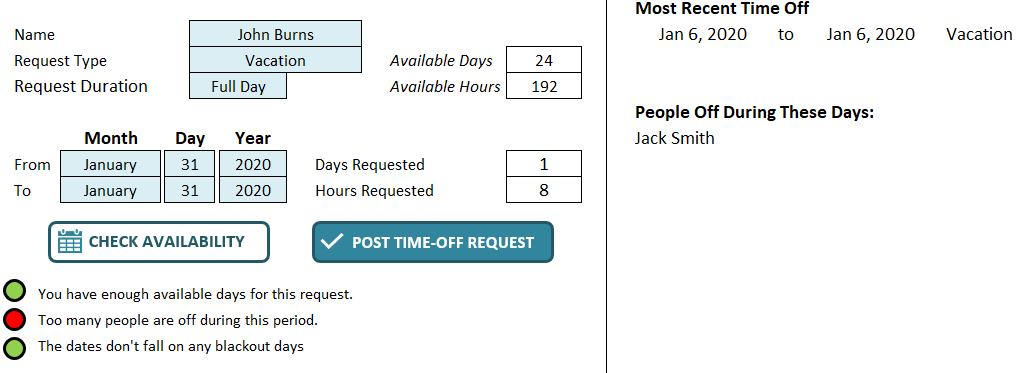
Whether you want to check if a person can book time off during a certain period or if you want to actually book it, you’ll do this through the Request.Form tab. Here, you can select the employee, the type of request (vacation or sick), and how long they will be off for. This template assumes employees do not work weekends. If the request includes a weekend, it will automatically account for that. Here’s a sample request for someone looking to take Jan. 24 – Jan. 31 off.

The available days, hours, days requested and hours requested will all automatically fill in once you enter all your selections. You’ll notice the days requested equals six, which isn’t counting Saturday and Sunday. It also assumes these are full days off and hence multiplies the days off by an eight-hour workday to get to 48 hours requested off.

If you want to see if this request complies with your policy (blackout rules, maximum people off) you can click on the Check Availability button. Then you will see the following summary:

The lights come up green for having sufficient time available and there being enough coverage. But it comes up red because the request includes a blackout day. Over on the right-hand side, you’ll see the person’s most recent time-off requests. It will also show any people who are off during this time.

You can still proceed and click the Post Time-Off Request button either way. It will post the information into the Timeoff tab:

If I double-click on any of the red boxes to the right, it will delete an entry. There is no data that needs to be entered on this tab, this is simply for record-keeping. The Timeoff tab is used to populate other areas of the spreadsheet.

If I were to go back and try and book another entry on Jan. 31 for a different employee, it will now tell me that someone is off during this time:

Note: you won’t be prevented from posting vacation if a person already has vacation booked for the same date. But if you make a mistake you can clear the duplicate entry from the Timeoff tab. You can also visually see who is off during a given period on the Calendar tab:

Blackout days are highlighted in black, vacation is dark blue, weekends are light blue and sick days are in yellow. In the above example it shows the one employee who took a vacation day during the blackout period. The color code for vacation overrides the blackout formatting. From this, you can also see that two employees were off on Jan. 31.

Entering in partial-day requests

If an employee is taking a half-day or only a certain amount of hours off rather than a full day, you can select the Partial Day option from the drop-down in the Request.Form tab. A new field will appear, allowing you to enter the hours per day:

In this example, this employee is requesting 5 hours off on both Jan. 30 and Jan. 31. The employee is requesting a total of 10 hours off, or 1.25 days. If you need to do a partial request, you can’t mix and match with full-day requests, you’ll need to do them separately. Even if the hours are different, multiple requests will be needed.

Whether an employee takes a full or a partial day off, it’ll look the same on the Calendar tab.

Adjusting for rate changes

One of the more complex calculations this time off tracker template factors in is if an employee moves to new pay rate or if their vacation rate changes during the year. This is where the Ratechanges tab comes into play. You select the employee, the date that the change is effective as well as the date it ends – this can be left blank if there’s no further rate change. The purpose of the end date is if there are multiple changes for an employee during the year.

Then, you enter the new hourly wage and vacation rate. Enter both numbers. For instance, if an employee now accrues 6% vacation rather than 4%, you’ll want to enter the new vacation rate but you’ll also want to enter in their hourly wage as well, even if it remains the same. This is important so that the formula calculates correctly.

This calculation will spit out a change in daily accrual as well as a total adjustment for the year based on the cut-off date. This adjustment will populate on the Summary tab under the Vacation Days Adj (Rate Changes) field.

As with any complex calculations, always be sure to double-check these numbers against your own. Especially when it comes to multiple rate changes a year, it’s important to ensure the data is entered correctly and that the correct number of days are being accrued. Although I’ve tested the spreadsheet, it’s impossible to factor in every possible situation and so I cannot guarantee 100% accuracy in all situations.

If you’d like to test out the template, you can download the free version here which is limited to tracking five employees. The full version has no limits and there are no ads and the code is fully unlocked.


If you liked this post on the time off tracker template, please give this site a like on Facebook and also be sure to check out some of the many templates that we have available for download. You can also follow us on Twitter and YouTube.

12-Month Calendar

Excel 12 Month Calendar Template

There are many Excel calendars online but with this template, you can customize it to suit your needs and use the calendar for more than just one year.

At a minimum, you can use the template to help generate a 12-month calendar for a specific year. However, it can do a whole lot more than that. If you want to use it for a custom fiscal year, you can use a different start date. You can also use custom accounting periods based on weeks, whether it’s the 4-4-5, 4-5-4, or 5-4-4. It can help make a template that will fit all of those needs.

And on top of that, you can also highlight holidays and deadlines on the calendar to make it easy to keep track of all your important dates.

How the template works

There are two tabs on the calendar template: calendar and setup. The only area to enter data is on the setup tab, and that’s where you will select the details relating to how you want your calendar to display.

variables to setup in the excel 12-month calendar template

The first item that you’ll want to enter is the start of the fiscal year. If you just want a regular calendar, then you can leave this as January 1. However, you’ll want to enter the year that you want the calendar for as well. This is the only cell where you’ll specify both the year for the calendar and the first day of the calendar as well.

On the following field, you can toggle between whether your week starts on Sunday or Monday. This will just impact how the calendar looks and will have no effect on anything else in the template.

If you just need a regular 12-month calendar, that’s all you need. If, however, you’re looking for a more customized format that accommodates a varying week schedule, then you will want to enter an ‘X’ in the Custom Quarterly Format field. If you do not enter an ‘X’ here, then the following values will be ignored and won’t have a bearing on the calendar.

The next three fields relate to how many weeks each period has. If you have fiscal periods that follow the 4-4-5 pattern where the third month of each quarter is a 5-week month, then you would enter ‘4’ for period 1 and period 2, and ‘5’ for period 3.

Those are all the variables that will relate to the structure of the calendar itself. You can go a bit further, however, and enter in holidays and other important dates as well.

Entering holidays and other dates

In column G you can enter the holidays or non-working days that you observe. Any dates in this column will be highlighted in yellow on the calendar. Columns H and I serve the same purpose, and that’s to highlight any important dates or deadlines. In column H, the dates will be highlighted in red while the ones in column I will be in green.

12-month calendar with holidays and important dates highlighted

There’s no restriction on what you can enter in these columns and these deadlines could be annual or monthly. You could even use various date functions to help create recurring deadlines here as well.

You can enter dates in for the entire column so they don’t even need to be for the current year. This is why you can reuse this template for future years, as you can just adjust the starting date for the year and update the holidays, and the template will automatically update based on what you have entered.

Download the 12-month excel calendar template

This template contains no macros and is free to use. You can download it here. It does have some ads and the calendar tab is locked to ensure nothing isn’t overwritten by accident. There is also an ad-free version available here that is completely unlocked. As always, I encourage you to always try the free version first to ensure it works how you expect it to and that it’s what you’re looking for.

Looking for a full-month calendar template?

This template is for a 12-month snapshot but if you’re looking for one that focuses on an individual month and that can allow you to enter tasks and deadlines, be sure to check out this template. It will give you even more options for managing your monthly tasks and deadlines.

And if you’re looking for a personal calendar that will help you manage different goals at once, then this goal tracker template could be what you’re looking for. But if you’re looking for something completely different, feel free to contact me and make a suggestion. I am always looking for new ideas and templates to add to the site.


If you liked this 12 Month Calendar Template, please give this site a like on Facebook and also be sure to check out some of the many templates that we have available for download. You can also follow us on Twitter and YouTube.

image-1

Monthly Goal Tracker Template in Excel

Whether you’re trying to lose weight or wanting to learn a new skill, sometimes it can be challenging to stay on top of those goals. One way to you can make that easier with this goal tracker template. It’ll allow you to keep a record of how you’ve done versus your goals and show you the progress you’ve been making. Just being able to see that progress can sometimes help encourage you to keep working at it, and this template will do just that.

The spreadsheet has two tabs: the calendar where you can select the month and year, and the data entry tab where you’ll enter your progress. Let’s start with the data entry since that is going to be where you make any changes and will serve as a starting point.

Setting Up Your Goals and Entering the Data

On the DATA.ENTRY tab, the first three rows are dedicated to the name of your goal, the frequency of it, and your desired target. The goal name is straightforward and doesn’t impact anything but what you’ll refer to it going forward. This can be changed at any point.

The second row is the frequency, and here you can enter either Weekly, Monthy or Daily. They’ll track your totals accordingly and which frequency you select will determine how the calendar will highlight your progress. As soon as you hit a goal that’s set to monthly, the spreadsheet will highlight the entire month in green to indicate that the goal has been met:

goal tracker template excel monthly

If it’s a weekly target, then only the week the goal was met will be highlighted:

goal tracker template excel weekly

Daily targets will only be highlighted one day at a time.

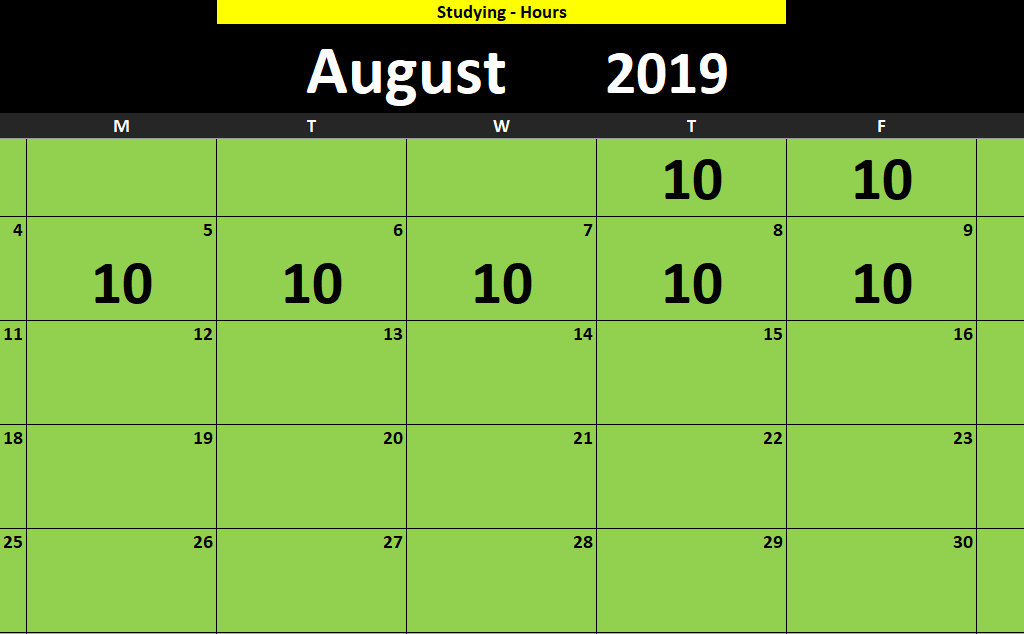
The third row on the data entry tab relates to the actual goal number itself. In my example, I’ve put 500 for the weekly amount of calories burned and 100 studying hours in a month. These are the metrics that will be tracked. They will reset each period as well so if 400 calories were burned in a week, that week won’t highlight in green. But if on the following week 500 are burned, then it will highlight that week.

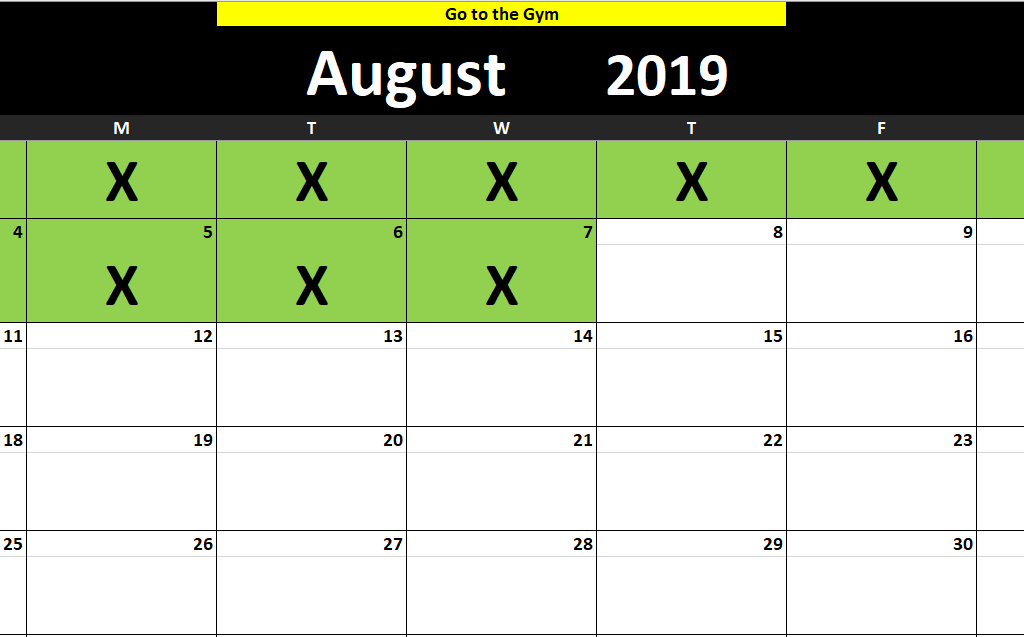
For daily goals, no goal amount needs to be entered. You’ve either met the goal or not for that day, and avoiding numerical totals here will allow you just to mark an ‘X’ on whether you were on track for that day. This can be useful if it relates to a task that might not have a numerical value. It’ll also allow you to create a chain of X’s like the method made popular by Jerry Seinfeld.

goal tracker template excel daily x jerry seinfeld

This way, you’re not limited to trying to assign a number to every goal. If you do have a numerical goal for every day, you can simply convert that into a weekly or monthly total. The only impact there will be when the cells will be highlighted.

There’s no limit to the number of goals that you can have so you can have a mix of monthly, weekly and daily goals to suit your needs.

For the actual data entry itself, I’ve pre-populated a date of July 28 but you can certainly change that to a different start date. The data entry tab will auto-populate the next 365 days for you. However, you can certainly extend beyond that as well.

Once you’ve got your start date, you can start entering in your data. Just look for the date and goal name (top row) to make sure you’re entering it in the correct cell. For daily goals, simply mark an ‘X’ to indicate they were met. For weekly and monthly targets, enter a number.

goal tracker template excel data entry

The Goal Tracker Calendar

Once you’ve got your goals set up and your data entered, you can switch over to the GOAL.CALENDAR tab. Here, you can change the month and year that you want to look at, and select the goal as well, from the yellow drop-down directly above the date.

Once you’ve selected the goal, it’ll highlight whatever progress you’ve made. For daily goals, it’ll show any X’s, which will automatically be highlighted in green. For other frequencies, you’ll see the actual numbers themselves so you’ll see how you’ve done on each day.

You’ll notice that the calendar for August won’t start on August 1 but on the first day of that week. The purpose of this is to track those weekly goals as otherwise part of the week will be cut off and could appear like a goal wasn’t reached.

You can download the template here.

If you like this Monthly Goal Tracker Template, please give this site a like on Facebook and also be sure to check out some of the many templates that we have available for download. You can also follow us on Twitter and YouTube.

calendar7

Task Manager Template: Stay on top of Your Deadlines

Whether you’re managing multiple deadlines, have a lot of tasks, or just have an odd schedule, this task manager template can help you manage all of that. Visually you can see what’s coming up and what still needs to be done. It’s a good way to organize and manage all your responsibilities.


How the Task Manager Template works

I’ve tried apps to track deadlines and tasks and none of them have ever done what I wanted them to do. And since I spend a lot of time in Excel, I thought I’d try to make a task manager template that can be a one-stop shop for managing all of that.

The task manager has four main tabs to it that I’ll go over in detail:

  • Calendar
  • Recurring Deadlines
  • Tasks
  • Team Calendar

Calendar

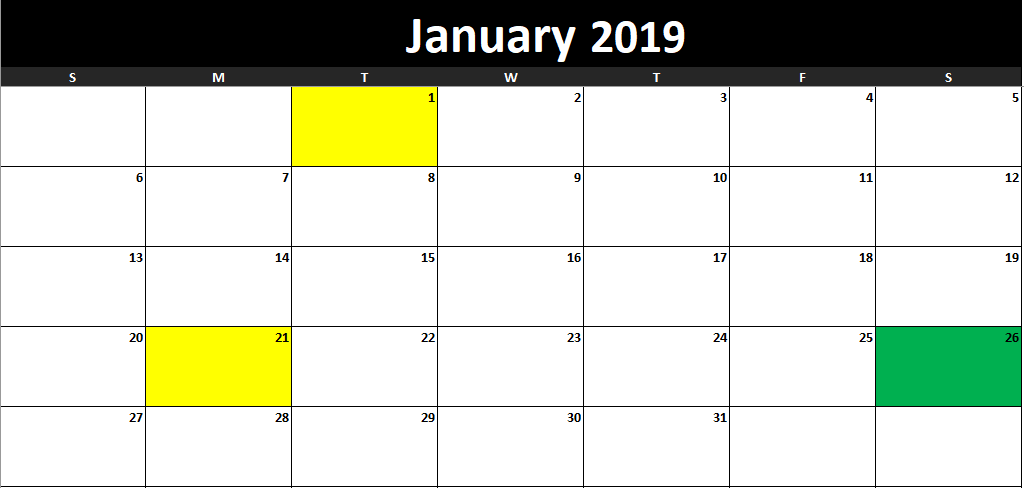
In its simplest form, you can use this tab to generate a calendar for whichever month and year you want just by changing the cell values. The calendar will highlight the current day as well as any holidays that you have specified.

task manager template calendar

It’s pretty simple, but once you start adding tasks and deadlines, it’ll look a whole lot different. I’ll refer back to the calendar as I go as it’ll change as I make updates to the other tabs.

Recurring Deadlines

There are multiple sections in this tab and it really acts as a setup tab, but the deadlines are definitely key.

In the left-hand-side of the page is the month-end schedule. Now, if you’re not an accountant and don’t have to deal with month end, you can probably skip this. However, for accountants that deal with a close process and have deadlines, you can change the month-end date.

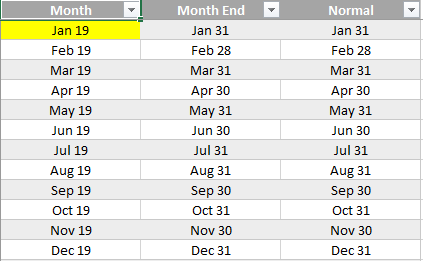
month end list

For example, I’m going to change the month-end date for January 2019 to February 12:

month end dates

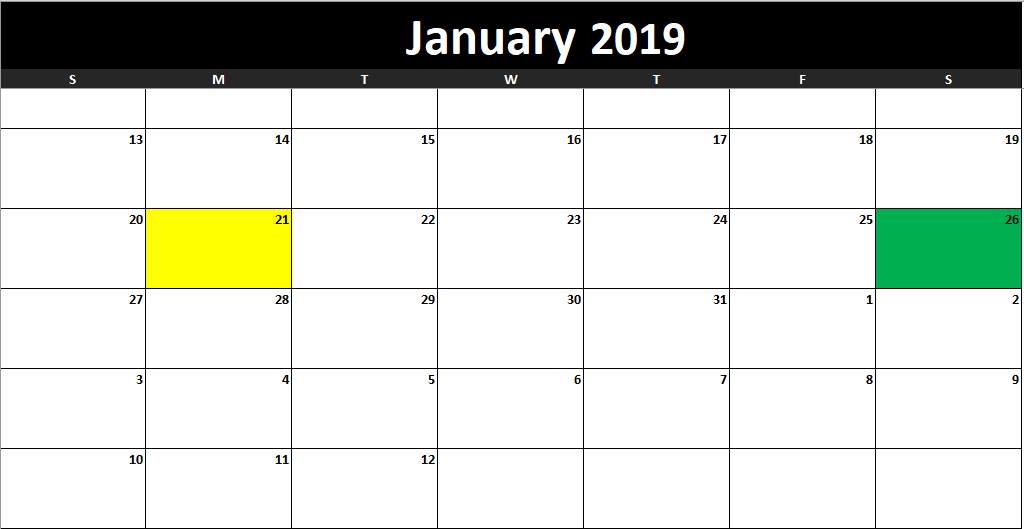
If I go back to the Calendar tab, even though I’ve selected January, the calendar will continue until February 12:

task manager calendar

You can enter the month-end values for each month so that way each month will cut off where you want it to. If you don’t need a custom end to the month, then the default values will suffice and you they will just end when the month does.

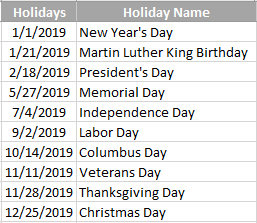
On the right side of the page there is a section for holidays. This is where you can put the non-working days in your part of the world. What you could also do is put any vacation days or time off that you have planned.

holidays

I’ve left a description of the holiday next to it but this is not necessary.

Now, if I go to the middle section of the tab, that’s where I see the recurring deadlines. There are five key fields here: description, occurrence, type of occurrence, day, and next date.

In the description field you’ll want to put in the name of the deadline. If you’ve got multiple deadlines on the same day you’ll want to combine them into one as they will only take up one line on the calendar anyway.

The occurrence and type of occurrence fields will go hand in hand. For example, if your deadline is the first business day of the month, then you’ll put a 1 in the occurrence field and Business Day in the type of occurrence.

If your deadline is the first Monday of the month, then enter a 1 in occurrence, Day of Week in the type of occurrence, and enter Monday in the day field (this is the only time you’ll need to use this field).

If your deadline is always the 1st calendar day of the month, then enter 1 for occurrence and Calendar Day in the type of occurrence field.

There’s an option to just enter a fixed date as well. If you always have a deadline on January 30th of every year, then enter the date in the occurrence field and Fixed Date on the occurrence type. This is helpful if you’ve got property taxes or annual deadlines that you can easily forget about. Of course, you’ll need to remember to update your deadlines.

Lastly, there is an occurrence type for Business Days Before Period End. Before your month end (whether custom or calendar), you can work backwards to compute your deadlines. Let’s say one business day before your cut off date you have to get a report submitted. In that case, you can enter a 1 for the occurrence and select Business Days Before Period End for the type.

Using the above scenarios, this is what my deadlines look like so far:

task manager recurring deadlines

The Next Date field automatically gets populated based on what you’ve entered in the three prior fields.

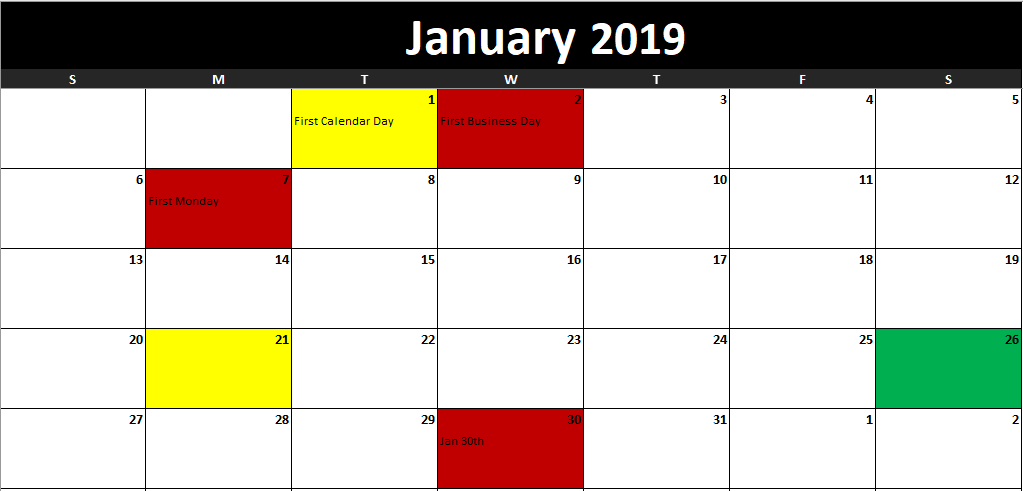
These deadlines now show up on my calendar:

task manager calendar

The deadlines are highlighted in red (except where there’s a holiday, as on Jan 1). The description of the deadline also shows in the first line for that particular day as well.

Tasks

On the tasks tab, you’ll be able to see your deadlines, to do list, and tasks. In the first section, you see the deadlines which we’ve already entered thus far:

task manager recurring deadlines

You can add any notes to this section as well as update the status of the deadline. If you haven’t completed deadlines that are in the past, the Days Until Deadline visual will show a zero. However, if I update the status to ‘Completed’ for all the tasks in the past, then my countdown will update to show many days until my next deadline:

task manager status

This now gives me an accurate countdown as to how many days away I’m showing until the next deadline.

The To Do List won’t show up on the calendar and is just a way for you to track items you’re working on now. It will also show another countdown and is similar to how the recurring deadlines work in this section:

to do list

The last section on this tab is the tasks section.

task manager

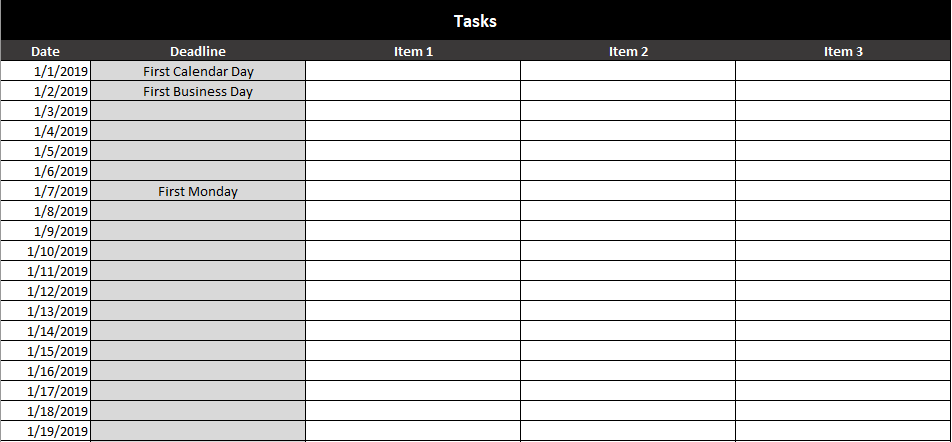
This section is important since this is what will show up on your calendar. The deadline column will automatically be the first item on the list. And so you have a limit of three tasks that will show up on your calendar (two if there is a deadline there).

For the first three days of the year, I’m going to put the same three tasks:

tasks

This is how the calendar now looks:

task manager calendar

Because the first two days of the year each had deadlines, only Task 1 and Task 2 made it onto those days. On the third day, all three tasks showed up.

Team Calendar

If you’re working on projects or teams, you might find it helpful to have a glimpse as to when people are off.

team calendar

On the left side of the page, you fill in the person’s name and the range of dates that they are off. You can enter in multiple ranges for the same person so the names can repeat.

Next to the actual dates, you’ll want to enter each person’s name that you wish to track (which I’d presume is everyone that is on the left side that you have entries for).

The date will automatically start at today and you’ll see the next 90 days of availability. Any holidays and weekends will be highlighted in light blue. Any time off outside of that will be highlighted in dark blue as in the above example.

Download the Task Manager Template

Free Version – Limit of 10 task and recurring deadlines, contains ads and sheets are locked.

Full Version – 30 recurring deadlines and to-do-list items. No ads and no sheets are locked.

acashflow

Cash Flow & Calendar Template

In this post I have attached a simple calendar template that will allow you to generate a new calendar by just changing the month name or year. In addition there is an empty space for each day that by default tracks cash flows (from the data tab). You can enter in dates and cash flows in the data tab and they will populate on the calendar for those days. Of course the formulas can be overridden to put other data in the calendar.

Below is what the template looks like with some sample cash flow numbers filled in

Cash Flow & Calendar Template