time-2676366_1280

Excel Automation: 10 Tasks You Can Automate Today!

Spreadsheets can allow you to analyze data and create reports efficiently. But sometimes the tasks that are involved can be difficult or appear to be time-consuming. The good news is that there’s a lot of automation you can achieve in Excel, and it isn’t always necessary to know how to code in order to do so. Below, I’ll show you 10 types of tasks that you can automate in Excel either on your own or with our help.

1. Cleaning and parsing data

One of the more challenging things in Excel is when you’re dealing with a dataset that may not be easy to manipulate. For instance, if you’ve got text mixed in with numbers or dates that aren’t in the right format, Excel may not interpret or recognize the data properly. But there are many formulas that can help you with that. Rather than manually fixing the data, you can use functions like TRIM, CLEAN, LEFT, MID, and RIGHT to extract what you need while also getting rid of extra, unnecessary spaces and other characters.

If you’re looking for more of a walkthrough of the process, there’s a detailed explanation in this post of how to parse data.

Through the use of formulas, you can save hours that you might otherwise spend trying to clean up your spreadsheet. And the best part is that once you’ve set it up, you can re-use the formulas as you add more data. You don’t need to use macros or complicated coding to clean up; a well-structured template can be enough to do the job for you.

2. Creating simple reports

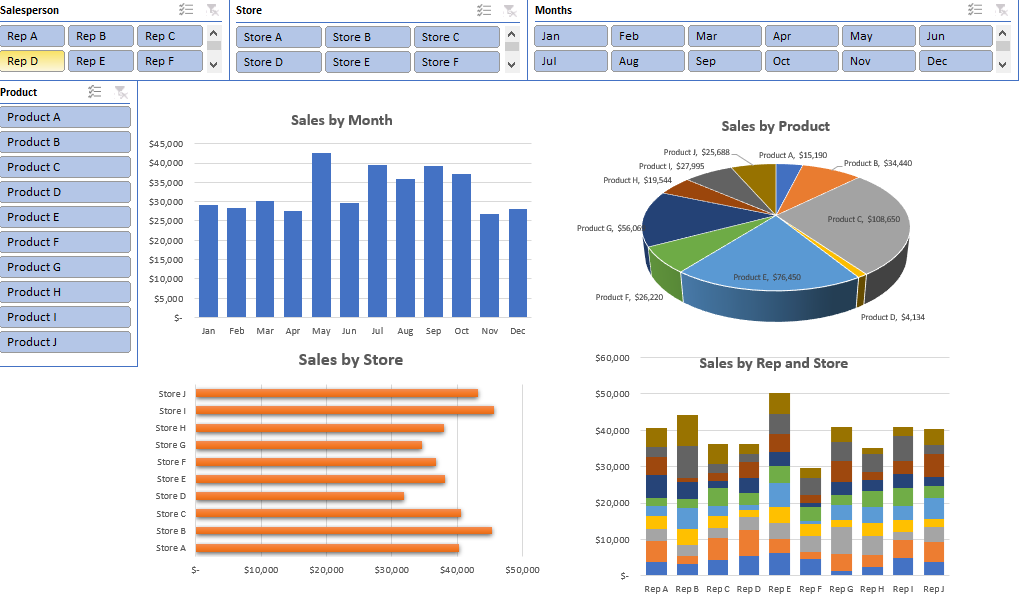
One of the best features of using Excel is that once you’ve entered data into a spreadsheet, it’s even easier to create a report from it. One example is through the use of a pivot table, where through just a few clicks you can easily summarize your data and split it along different categories. Slicers can make filtering and summarizing data even easier in pivot tables, especially for users who aren’t very familiar with Excel. Forget any manual work here; just a few clicks and you’ve got a report that can quickly summarize information in a table for you!

Alternatively, you can also insert charts easily and Excel will try and select the best one based on your data set. There’s also lots of formatting you can apply to charts so that they have the look and feel that you’re after. And once you’ve got a look that works, you can re-use it over and over again.

3. Creating dynamic dashboards

Dashboards are incredibly popular but they can be complex to set up. Then there’s also the challenge of updating it and making sure the data is up-to-date. It can easily take you hours every time to make sure the information is accurate.

However, in this post, I show you how to create a dynamic dashboard that not only won’t take you hours but that will automatically update as you add data to it. And then, you end up with a report that looks great to send to management to easily review and update.
4. Routine data entry

One of the biggest headaches people can face when using spreadsheets is when they hard-code calculations. A hard-coded calculation is where you don’t reference any cells and just put the result in the cell; it can make it nearly impossible to decipher how that number was calculated (especially if you’re not the person who entered the value). If you go to re-calculate it or update it, you could spend a lot of time just trying to figure out the calculation.

However, by using a formula, there’s no ambiguity as to how a value was calculated. Not only does that save you the time of entering in data but it also makes it easy to correct and update the figure. Ideally, you should minimize the number of places you’re manually entering data into. By doing that, you’ll have a much more robust template where your inputs are kept to a minimum which will eliminate the need for a lot of data entry and your other calculated fields will update automatically. This type of automation doesn’t require complex coding and just needs an Excel spreadsheet to be carefully constructed so that it is efficient and makes the most of formulas.

5. Conditional formatting

Oftentimes you’ll want to color-code your data to highlight things you should be paying attention to. If you’ve got an aged accounts receivable schedule, it is useful to highlight which accounts are more than 90 days overdue. You could manually filter the data and highlight all the cells or rows in red that are overdue, but you can just use conditional formatting to do that for you.

Through conditional formatting, you can create rules to determine when a cell or row should be highlighted in red, when you may want it to be in yellow, or when you may just want to hide the text so that you can easily skip over it. For example, hiding zero values can make it easy to focus on more important numbers.

You can apply many different formatting rules and can even put in a hierarchy to determine if you want to keep applying formatting rules or whether you want to stop if a specific criteria is met. Conditional formatting can be complex but it can be a huge time-saver by allowing you to focus on just the items that are important to you. And once you’ve set up the rules, you don’t need to worry about making changes every time you add new data.

Check out this post to learn about conditional formatting and how you can apply it to your spreadsheet.

6. Updating other workbooks and sheets

If you use multiple workbooks, then another area where you can avoid re-entering data is by linking both workbooks. There are numerous ways that you can do this. One approach involves just linking directly to another worksheet where data will automatically pull from another table.

You can also use the INDIRECT function to reference another worksheet or workbook. Just like with a template, once you set up these formulas and connections, they are there to stay and you can avoid having to manually make changes by yourself.

7. Audit tracking by logging changes

One of the neat features of many Office products is they allow you to track changes that are made. This is normally when you share a workbook with other users. However, through the use of macros, you can have a separate sheet that can tell you which values were changed, when, and by who.

Rather than manually noting these changes or relying on people to make the updates themselves, it doesn’t take much effort through a macro to create a log of what’s been changed.

8. Generating PDFs

One thing many advanced Excel users like to do is to use automation to export reports into PDFs. While there is a way to print to PDF, and it’s particularly easy on the newer versions of Excel, it can be a time-consuming process especially when you need to print out multiple sheets. Here again, with a simple macro, you can auto-generate PDFs and save them in a predefined folder all with the click of a button.

9. Sending emails

Another feature many users like is the ability to use automation to send out emails right from Excel. Through the use of macros, this is also possible. You can create a macro that will enter in the email of the recipient, attach a file, enter the body of the message, and even send the email itself. This can be even set up on a large scale, such as sending out invoices to dozens or hundreds of customers, a process that could easily save you hours worth of work.

10. Just about anything else with VBA

The power of programming in Excel can unlock many different possibilities with what you can automate. Whether it’s using automation to help import data and then manipulating it, creating custom reports, or following a series of complicated steps, there are many tasks in Excel that can be expedited with a few clicks of a button. As long as there’s some logic to the process that you can break into steps, then you can also build that into the code and automate it.

Don’t know where to start? Contact us!

There is significant potential in Excel but not everyone knows how to use automation to make the most of it and to make a spreadsheet as efficient as it can be. You can contact us if you have a certain Excel issue that you need help with or if one of the tasks above has perked your interest and you’d like to learn more. We can help create solutions for you that work efficiently and that can save you many hours, perhaps even days every month.


If you liked this post on 10 Tasks You Can Automate Today, please give this site a like on Facebook and also be sure to check out some of the many templates that we have available for download. You can also follow us on Twitter and YouTube.

convertsummary

Convert a Summary Table in Excel Into a Pivot Table

Often times, when you download a data table from somewhere it’s not in the format you need it to be. Tables are often in a summary format where you have months going down and years going across, or vice versa. It’s the end result of what you want a pivot table to look like, but you can’t easily turn that into a pivot table itself. Below, I’ll show you how to turn a summary table in Excel that looks like this:

Summary table.

Into this:

Data in tabular format in Excel.

This format is much more Excel-friendly and one that you can easily convert into a pivot table.

Converting the table

The data I’m using is the same one that I used in an earlier post that went over transposing data. Transposing data, unfortunately, isn’t enough to make data workable if you want to convert it into a pivot table. You’ll want data to be in a tabular format so that there’s a header for the month, year, and value.

You could manually transpose one year at a time and copy the data one by one. But of course, that isn’t optimal at all. The good news is I’ve got a macro that can help you flip that data in one click. It will go through the painstaking process of reorganizing the data for you.

Here’s the code for the macro. You can just put it into a module (I’ll leave a template to download below if you aren’t comfortable doing this step yourself):

Sub flipdata()

Dim cl, nxtcl As Range
Dim lastcol, lastrow, firstcol, firstrow As Integer


'get total number of rows and columns in range
lastcol = Selection.End(xlToRight).Column
lastrow = Selection.End(xlDown).Row

'get first column and row
firstcol = Selection.Column
firstrow = Selection.Row

'assign output starting point
Set nxtcl = Cells(lastrow + 2, firstcol)

nxtcl = "Header 1"
nxtcl.Offset(0, 1) = "Header 2"
nxtcl.Offset(0, 2) = "Value"

Set nxtcl = nxtcl.Offset(1, 0)


'cycle through data

For yr = (firstrow + 1) To lastrow

    For mth = (firstcol + 1) To lastcol

        nxtcl = Cells(firstrow, mth)
        nxtcl.Offset(0, 1) = Cells(yr, firstcol)
        nxtcl.Offset(0, 2) = Cells(yr, mth)
        Set nxtcl = nxtcl.Offset(1, 0)

    Next mth

Next yr

End Sub

It will output the data a couple of rows below where your data ends. It’s important to select the entire range of data before running the macro since it will go through the range that you’ve selected, nothing else. And if there’s data below your selection, it will overwrite that.

After you’ve selected the data, then you run the macro. In my template, I’ve got a button that you can press that will do the job for you and then you’ll get something that looks like this:

Data in tabular form.

Once in this format, you can easily create a pivot table:

Pivot table.

If you’d like to download the file that contains the macro, it’s available here.


If you liked this post on how to convert a summary table in Excel into a pivot table, please give this site a like on Facebook and also be sure to check out some of the many templates that we have available for download. You can also follow us on Twitter and YouTube.

countdowntimer

How to Make a Countdown Timer in Excel

A countdown timer can help you track how much time there’s left to do a task or until a deadline comes due. Below, I’ll show you how you can make a countdown timer in Excel that can track days, hours, minutes, and seconds. In order to make it work, we’ll need to use some VBA code, but it won’t be much. And if all else fails, you can just download my free template at the end of the post and repurpose it for your needs.

Let’s get right into it and start with the first step:

Calculating the difference in days,

To calculate the difference between two dates is easy, as all you’re doing is subtracting the current date and time from when you’re counting down to.

The start date is just going to be today, right this very second. And Excel has a convenient function just for that, called NOW. It doesn’t require any arguments and all you need to do is enter the following formula:

=NOW()

Entering the date and time you’re counting down to is a bit trickier. As long as you enter it correctly, then calculating the differences will be a breeze. However, this may involve a little bit of trial and error since it’ll depend on how your regional settings are setup. For the countdown date, I’m going to set it to the end of the year. Let’s say 11:00 PM on New Year’s Eve. Here’s how I input that into my spreadsheet:

2020-12-11 11:00 PM

The key things to remember here are that there should be a space between the time and the AM/PM indicator (if you use it) and there should be two spaces between the date and the time. Then, it’s just a matter of whether you’ve got the right order of date, month, and year. This is where you may need to do some testing on your end to ensure you’ve got the correct order.

Now that the dates are set up, we can calculate the difference in days. To do this, we can just calculate the difference and use the ROUNDDOWN function to ensure we aren’t adding partial days:

There are 222 days left until the end of the year. By using the NOW function, the formula will automatically update and tomorrow the days remaining will change to 221, and so on. If your output’s looking a little different, make sure to check the formatting and that it’s set to days.

Calculating the difference in hours, minutes, and seconds

There’s not a whole lot of complexity when it comes to calculating the difference in hours, minutes, or seconds. We’re still subtracting the current date from the deadline. The only difference is that now we’re just going to change the formatting. If I do a simple subtraction, I end up with a fraction, which isn’t really usable in its current format:

Counting down the hours, minutes, and seconds left.

The trick here is to change the format of this cell so that it shows me hours, minutes, and seconds. And that’s an easy fix. If I just click on cell C10 and click CTRL+1, this will get me to the Format Cells menu. In here, I’ll want to select a Custom format so that the cells just shows hours, minutes ,and seconds:

Applying a custom format.

Here’s what the countdown timer looks like after the format changes:

Countdown timer.

It’s important to include a date in the calculation even though we’re just doing a difference between hours, minutes, and seconds. Otherwise, the formula wouldn’t correctly calculate in all situations, such as when the deadline hour is earlier than our current hour.

Putting it all together

Now that all the calculations are entered in, now it’s just a matter of formatting the data. We can create a countdown clock that separates days remaining, from hours, minutes, and seconds remaining.

One cell can have the difference in days, while another will have the difference in hours, minutes, and seconds. This goes back to just modifying the formatting and applying a custom format. Here’s how mine looks:

Full countdown timer.

Although we’ve gotten to this point, the challenge is that this countdown timer still doesn’t update on its own. Unless you want to click on the delete button all the time, the countdown isn’t going to move unless there’s something to trigger a calculation in Excel. That’s why we’re going to need to add a macro to help us do that, which bring us to the important last step of this process:

Adding a macro to refresh every second

We need a macro to update the file. Whether it’s every second, every five seconds, it’s up to you. While the countdown timer will update when someone enters data or does something in Excel, that’s not much of a countdown. This is where VBA can help us. If you’re not familiar with VBA, don’t worry, you can just follow the steps below and copy the code.

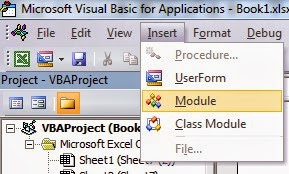
To get into VBA, click on ALT+F11. From the menu. Once you’re there, click on the Insert button on the menu and select Module:

Creating a new module in VBA.

Over to the right, you’ll see some blank space where you can enter in some code. Copy and paste the following there:

Sub RunTimer()

    If Range("C10") <> 0 Then
        Interval = Now + TimeValue("00:00:01")
        Application.Calculate
        Application.OnTime Interval, "RunTimer"

    End If
End Sub

One thing you may to change is the reference I made to cell C10. Change that to where you have your countdown timer. As long as there’s a value in the cell, the macro will continue running. All it does is check if there’s a value there, and if there is, it updates the worksheet every second. And by doing that calculation, your countdown timer will update even if you’re not making any changes to the spreadsheet.

You can also change the interval which currently updates every second, as noted by the 00:00:01. You can change this to five seconds, 10 seconds, however often you want it to update.

But there still needs to be something that triggers the macro to start running. You can assign a button or shortcut key to do that.

However, in this example I’ll activate it when the sheet is selected. Inside VBA, you should see a list of worksheets. Double-click on the one that contains your countdown timer:

Worksheets in VBA.

You’ll again see blank space to the right where you can enter code. And you’ll also see a couple of drop-downs near the top that you’ll want to look for. By default, the first one should say (General). Change this to Worksheet:

Selecting the Worksheet object.

Next, change the other drop-down which will probably say SelectionChange. Change it to Activate. Then you should see something like this:

Selecting the worksheet activate event in VBA.

Copy the following code into there to call the macro we created above:

RunTimer

Now when you switch to another worksheet and come back to the current one you’ll notice your countdown timer is updating on its own. If you want it to stop it, just clear the cell that has the timer. Otherwise, the macro will continue running every second.

The Countdown Timer Template

If you’d rather just use a template, then you can download one that I’ve made here. You don’t have to worry about macros and instead you just need to enter the end time; the time that you’re counting down towards.

I’ve also got a start/stop button that you can toggle to get the countdown timer going and that will pause it:

Countdown timer.

You can move the button as well as the time your counting down to onto another sheet if you don’t want someone altering it. If you have any questions or comments about this template, please send me an email at [email protected]


If you liked this post on how to make a countdown timer in Excel, please give this site a like on Facebook and also be sure to check out some of the many templates that we have available for download. You can also follow us on Twitter and YouTube.

reconciler1100x620

Bank Reconciliation Template With Side-by-Side Matching and Automatic Matches

UPDATED VERSION: Check out the new 2023 version of this bank reconciliation template

This bank reconciliation template is an update from an earlier file that was made three years ago. It offers many of the same features with some notable improvements, and I’ll go over both in this post. I’ll start off by highlighting the key features and how it can help improve the bank reconciliation process for you.

Matching transactions is easier than ever in this new bank reconciliation template

In the earlier version, the bank reconciliation template looked at the total of transactions for a day or that matched criteria and so it didn’t make match individual items. It can be a mixed bag since some people prefer one way of matching (e.g. multiple cash transactions on a book entry matching up to one large bank deposit amount versus having one deposit for each entry). This template tries to make both methods a bit easier.

The auto-matching feature takes care of the latter approach where each line is effectively given a unique id that will be used to match against other transactions. This is ideal for one-to-one matches where you don’t want to look at just the totals.

If you’ve used the earlier version of this file, you’ll know that in this template, you can set up categories and keys associated with them. For example, if a check transaction shows up on your accounting system as CK#1234 you can create a rule in this template to say anything with CK in the description is categorized as a check and that the numbers that follow the number sign form the key, or the unique identifier. You can create these rules in the Setup tab.

Here are a couple of examples as to how this looks:

setting up categories and keys on the bank reconciliation template

The Category is just the name of the category and the Identifier is what Excel will be looking for in the item description to see if it falls into that category or not. For checks, I’ve used the use numbers after identifier to say that what comes after CK# is what should be the key or the criteria that the template will be looking for when auto-matching. If there is no criteria, you can leave this blank and it’ll simply look at the amount and the category. However, this can be less accurate depending on if you have duplicates and similar data in your bank and book downloads.

You can also cap the length of the key, which is what I did in the above example, setting the Length of Key to 4. What this does is say that only the first four numbers will be pulled after the identifier. You can leave this blank and everything will be included. There is also a section for Gap if you don’t want it to immediately start pulling numbers after it finds the key. For instance, if I used CK as the identifier rather than CK#, then I’d want to set the Gap field to 1, to ensure that it skips over the next character, which in this case would be the # sign. But if you want to immediately pull data after the identifier, you can leave the Gap blank.

Alternatively, you can also just use the date as your key but that will not be very precise. The template and auto-matching will only be as strong as the rules that you put into place.

Manually matching transaction is easy, too

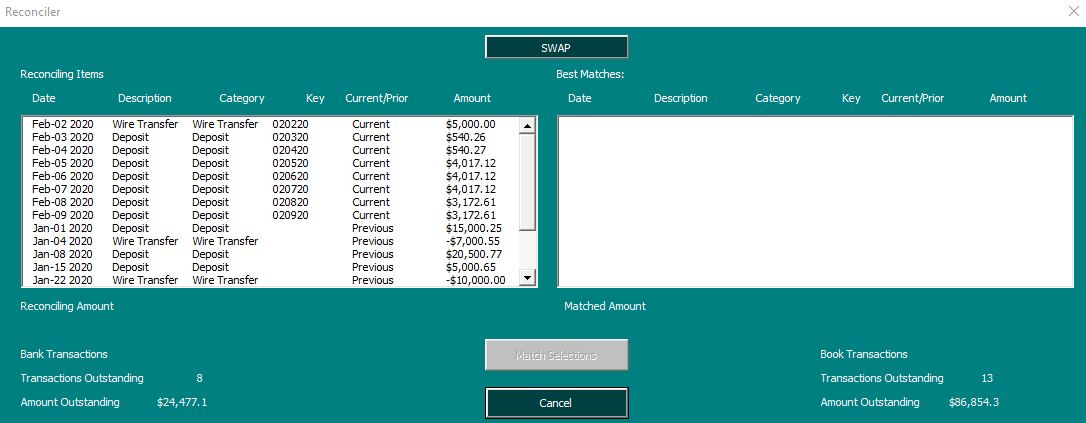
Even if you can’t auto-match all your transactions, I’ve tried to make this template as easy as possible to bulk match transactions as well. While the auto-matching is designed to help one-to-one matches, it’s also possible to match multiple transactions to one. This can be done using the Reconciler, which can be accessed via the Ribbon:

Ribbon buttons on the bank reconciliation file.

In the previous version, these buttons were within the file. Now, they’re on the home tab within the Ribbon, making it easy to access from anywhere in the file. Select a transaction from either the Book or Bank tabs and click the Reconciler button and you’ll have an interface where you can easily match transactions side-by-side:

In the previous version, side-by-side matching was not possible in the Reconciler and this allows you to easily do your matching within this interface. If I select the first transaction, which is a wire transfer, it will show me all the possible wire transfers I can match it to:

However, the ability to match the transactions won’t appear until I have the credits and debits matching an equal amount on both sides, to prevent running into a situation where I’ve matched an unequal amount:

By default, there will be no warning to pop-up when you’re matching transactions. However, if you prefer there to be one, you can change this in the Setup tab where there’s an option to toggle the confirmation from ‘No’ to ‘Yes.’

With it set to off, you can continue going through and matching transactions to ensure that you don’t have to click boxes before moving on to the next item to match. As it’s set up, you can match multiple items to one amount. However, you can’t match multiple-to-multiple and if you want to match multiple to one, then select the one transaction that will be matched to multiple items when launching the Reconciler. In the above screenshot, any transactions on the left-hand-side can be matched to multiple transactions on the right-hand-side, but not vice versa.

However, there is a SWAP button at the top of the form, which is also new, which can allow you to easily switch between the two views.

On both the Book and Bank tabs, there is a column for Manual Override and if you want to match an item manually you just need to enter a value in here. And that’s what the Reconciler does when you’re matching transactions. This is also where the next key feature comes into play: auditing and correcting your matches.

Audit trail from the Reconciler makes it easy to see which transactions are matched to one another

In the transaction that I matched above, it posted this in the Manual Override section:

You’ll notice that it says Previous BOOK Row 6. What this tells me is that the transaction was reconciled on the Previous OS Items tab, which includes transactions carried over from the previous period. It also tells me the row it was on and that it came from the book side. If the entry were to say Current, then it would be from the current transactions and that it would just be from the Book tab rather than the Previous OS Items tab.

If I wanted to undo this match, I could just press delete and clear the data in the Manual Override column. However, if you do this, be sure to clear off the other entry or entries related to it. Otherwise, you can be out of balance if you only cleared out one side of what was matched.

Reconciling the month

Once you’re done with your reconciliation and you want to see a list of your outstanding items, you can click on the Reconcile Month button in the Ribbon. This will spit out the outstanding items and group them by category. This process is similar to how the older version of the file worked.

When you’re finished and ready to start a new month or period, you can click on the New Month button which will clear the Book and Bank tabs and move any outstanding items over to the Previous OS Items tab. You’ll now be able to start a new month or period.

You can also use the Clear Data tab if you just want to remove everything and start completely from scratch

Testing out the file

If you want to give this file a try, please download the bank reconciliation template for free here. You can test out all the functions. There is a limit of just 25 transactions on the Bank and Book tabs. If you want the full version of the product, including with the code unlocked, please visit the product page here.


If you liked this post on the new bank reconciliation template, please give this site a like on Facebook and also be sure to check out some of the many templates that we have available for download. You can also follow us on Twitter and YouTube.

person fixing a computer

This Macro Converts Your QuickBooks Export Into a Table-Friendly Format

QuickBooks does a good job when it comes to recording sales and doing day-to-day accounting tasks. You may be content with the reports that come out of QuickBooks, too. But if you’re looking for some more in-depth analysis to do of your own or to make your own reports, you’re likely going to want to move that data into Excel. And, unfortunately, the QuickBooks export into Excel can be less than optimal.

With many spaces, subtotals, and a non-tabular format, it’s not a very practical output to use in Excel. If you want to run a pivot table and do some serious analysis in Excel, you first have to clean up the data before being able to use it, and that can be a very tedious and tiresome process.

For example, this is what your QuickBooks report might look like when you’re pulling a simple summary of your customer sales:

quickbooks export into excel

There are a lot of things that need to be adjusted for this report to be useable in Excel, including getting rid of the blank spaces and ensuring that the customer information is repeated in the first column, as opposed to just in the first line and in the last line’s total. From afar, it’s a bit of a painful process to have to go in and clean this up. And while it’s not impossible, it’s not going to be quick, either.

That’s where a macro can help you make the task much quicker and it will save you a lot of time if you have to go through these steps often. Click the button on the ribbon and your data will convert into a more table-friendly format! Here’s how it works:

Using the macro to fix the QuickBooks export

Before running the macro, you’ll need to specify the columns where your customer names and dates are:

Then, run the Covert Data button:

Excel button to modify data exported from Quickbooks

Downloading the file

The free version of the QuickBooks macro will allow you to run the conversion if it doesn’t go past 100 rows. However, if you decide to purchase the full version please ensure that the macro and file works as expected. There’s no guarantee the QuickBooks export hasn’t changed or won’t change in the future. If there are changes that need to be made to the macro, please feel free to contact me so that I can make the necessary adjustments. Whether you prefer the add-In or the actual Excel spreadsheet itself, both versions are available both here and in the paid version as well.

Here is the download link for the add-in as well as the Excel file. For the paid versions, please visit the product page.

If you have another program or software that you’d like a similar add-in for, I can help with that as well.


If you liked this post, please give this site a like on Facebook and also be sure to check out some of the many templates that we have available for download. You can also follow us on Twitter and YouTube.

addina

Free Excel Add-In: 20+ Macros to Automate Tasks and Make You More Efficient


This add-in is completely free and includes over 20 macros that I have worked on myself and that I hope will help you. Any feedback is welcome, as well as any suggestions for other macros you would like to see added.

Disclaimer
These macros have not been tested exhaustively so I don’t offer any guarantees that they will work under every possible scenario. However, if you run into any issues please let me know and I will work to correct them. When using macros you should always save your work before executing them, as there is no undo button if something doesn’t go as expected.

If you understand and accept these risks, please feel free to download the file here

Below is an overview of all the different macros in the file.

Toggling Workbook and Worksheet Calculations

For those that work on large spreadsheets, this can make it easy for you to not only turn off and on calculations for a workbook, but for individual worksheets. It will also allow you to see whether or not they are set to on or off.

One of the things people sometimes don’t realize is if you turn off calculations in Excel at the workbook level, that disables it for all other workbooks. The danger is if you switch to another file you’re working on you may not realize calculations are still off, by seeing the toggle and whether it is set to on or off can help prevent that.

If you only need an individual worksheet to be off, you can do that as well. However, note that if the workbook calculations are set to off, then all the worksheet calculations will be off as well, regardless of whether or not they say on or off. Workbook settings will supersede any worksheet settings.

Very Hidden Tabs


Hiding tabs in Excel may seem pointless since even an average user would know that you can right-click and select un-hide. However, not many know that you can set them to be ‘very hidden’ and where right-clicking won’t do anything.

I’ve covered this in a post before here, and in this add-in I’ve made it so that you can easily both hide and unhide very hidden tabs.


Removing Excess Spaces


This macro will delete any trailing, leading, or extra spaces in a cell and will help to clean up your data.

Converting Formulas to Values

In some instances you may want to get rid of your formulas and replace them with their results (values), this macro will do that for you. Just select the cells and click the button and the formulas will be gone.

Converting Numbers to/from Text and Changing Signs

These buttons will allow you to choose whether you want to convert numbers that are stored as text into numbers, switch numbers back into text, or just flip the signs from positive to negative or vice versa.

Filtering Out Zero Values From Tables


If you’ve got a table or pivot table that has a lot of zero values in it that you don’t want to see, this will filter them out. This won’t get rid of errors, just zeros, and for it to work in a table, it assumes that the table will start in column A, otherwise it won’t filter the right column for you. The zero values will be removed from the column where your active cell is, so you have to make sure you’ve got the right cell selected before clicking this button.


Multiplying and Dividing by a Factor of 1,000

This is pretty straightforward and is mainly here since dividing can be helpful if you’re dealing with financials and want to cut down the number of placeholders. Multiplying will simply undo those changes.

Combining Columns

If you have data across multiple columns and want to combine it, you can do that with this macro. You don’t have to select entire columns, it can just be a selection. The columns don’t even have to be right next to one another.


Cycling Through Errors


If you want to find all the errors on the worksheet you’re on, this macro will cycle through all of them for you. You can correct an error, and click the Next button to go onto the next error in the sheet.


Removing Merged Cells

When you’re trying to do data analysis, merged cells can be a nightmare, and this will unmerge the cells and put the value into each of the cells as well.


Protecting Your Data


This will help convert your sensitive data into a random number preceded by a series of X’s. There’s a post here detailing how that process works.


Filtering Pivot Tables

If you’ve got a pivot table and want to select multiple items, it can be a tedious process. This macro will allow you to select what selections you want to filter by and apply them for you. But the first cell in the selection needs to match the field name in the pivot table.


Adjusting the Default Pivot Table Format

One of the more annoying things in Excel is that when you create a pivot table, it defaults to a format that isn’t very useful. This is what the macro will help you do:


Quickly Formatting Pivot Table Fields

If you’ve ever needed to change how fields are formatted in a pivot table you know that simply selecting the column and changing the format is a temporary fix. You need to actually go into the field settings. This macro will do that for you, and will set the settings to either comma or accounting format.

Quickly Extracting Unique Values


There are plenty of ways you can get unique values, but I thought an even easier way would be to select the cells and specify where you want those unique values to be output.

Counting Unique Values

If you just want to quickly count how many unique values are in your selection, this macro will do that for you.

Do a Reverse Lookup

Everyone knows how to do a VLOOKUP, but doing the reverse is another story. Take for example a credit card statement. You could have a lot of detail in the string, but only a certain few characters relate to the actual vendor or detail you want:

Using this lookup function the cells you select will be compared against a list you have specified, and if there are any matches, the corresponding field will be returned:


The result:


If you’re doing this with a lot of cells and have a big list, it could be time consuming, and that’s why I added a progress bar to this macro.

Comparing Sheets

This macro essentially looks at two sheets and tells you what is different, and will highlight the differences in them.


Updating Links

If you want to update the link for a cell, it’s not an easy process and involves you right-clicking on the cell and putting the link in there. This macro will do that step, and for the link it will put the cell’s value there, so if you put in the url you want in the cell and then run the macro on those cells, the links will be updated.

Adding the Location to the Footer

Clicking this button will add the path to the workbook you’re working on into the footer so when you
print it out it’s easy to see where the file is saved.

Macro to Replace Cell References with Formulas

When creating a complex formula sometimes you use multiple cells to get to a desired result. Then at the end you may want to join all those cells into one large formula. You can do this by copying formulas to replace the cell references but it’s not as easy as it should be.
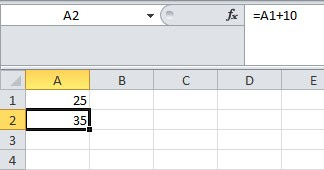
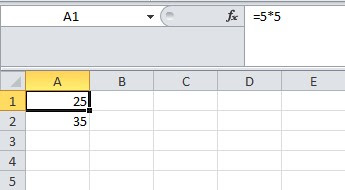
The macro below does exactly that – it will replace the cell references with the formula in the referenced cell. For example, in cell A1 I have a simple formula of =5*5. 
In cell A2 the formula is =A1+10. 

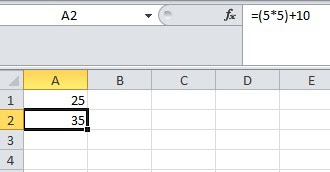
What I do next is to select cell A1 and run the macro. It will look in the spreadsheet to see everywhere that cell A1 is referenced and replace it with the formula in A1. Below is the result in cell A2 after the macro has been run:

You’ll notice I added parentheses to make sure that the result would not get altered – not applicable in this example since order of operations would ensure the calculation is correct but in a more complex example it might not be the case.
Below is the code for this macro:
Sub copyformula()

Dim whattocopy As String
Dim whattoreplace As String

whattoreplace = Replace(ActiveCell.Address, “$”, “”)
whattocopy = “(” & Replace(ActiveCell.Formula, “=”, “”) & “)”

   Cells.Replace What:=whattoreplace, Replacement:=whattocopy, LookAt:=xlPart, _
       SearchOrder:=xlByRows, MatchCase:=False, SearchFormat:=False, _
       ReplaceFormat:=False
    
   Cells.Replace What:=ActiveCell.Address, Replacement:=whattocopy, LookAt:=xlPart, _
       SearchOrder:=xlByRows, MatchCase:=False, SearchFormat:=False, _
       ReplaceFormat:=False

End Sub

Cleaning up data – getting rid of blank or 0 values in Excel

This function is designed to help clean up a spreadsheet if you want to either delete or hide cells that have 0 or empty values. How this works:

I select a range of data that I want to get 0s and blank cells out of (it doesn’t have to be a column) and run the macro.

The macro will hide everything that is a blank cell or a zero value in my range:

What if I only wanted 0s, or blank cells only? What if I wanted to delete the entire row that has that cell?

In the code below, you can change these options based on what you want the function to do. I have created two variables called option1 and option2. Their values are bolded in red.

If I change option1 from 1 to 2, then only 0 value cells will be affected, a value of 3 will mean only blank cells are.

For option 2 I can choose to hide the entire row (1), hide the entire column (2), delete the row (3), delete the column (4), clear the cells (5), delete the specific cells and shift cells up (6), or delete the cells and shift left (7).

Changing the values in red allows you to make any of the above changes.

The code for the macro is below. I suggest assigning a shortcut for this macro to run it quickly.
———————————————————————————————————————–

Sub cleanupdata()

Dim option1, option2 As Integer

option1 = 1
‘Option1
‘1 = blanks and 0s
‘2 = 0s only
‘3 = blanks only

option2 = 1
‘Option2
‘1 = hide row
‘2 = hide column
‘3 = delete row
‘4 = delete column
‘5 = clear cells
‘6 = delete cell, shift up
‘7 = delete cell, shift left

Dim activerange As Range
Dim cl As Range
Dim selectedcells As Collection
Dim numberofitems As Integer
Set selectedcells = New Collection

Set activerange = Selection

For Each cl In activerange

Select Case option1

    Case Is = 1 ‘Blanks and 0s
            If Len(cl) = 0 Or (Len(cl) > 0 And cl = 0) Then
                selectedcells.Add cl
               
            End If
           
    Case Is = 2 ‘0s only
            If Len(cl) > 0 And cl = 0 Then
                selectedcells.Add cl
            End If
                     
    Case Is = 3 ‘Blanks only
            If Len(cl) = 0 Then
                selectedcells.Add cl
            End If
           
End Select
Next cl

numberofitems = selectedcells.Count

On Error Resume Next
Select Case option2
    Case Is = 1
        For counter = 1 To numberofitems
        selectedcells.Item(counter).EntireRow.Hidden = True
        Next counter
    Case Is = 2
        For counter = 1 To numberofitems
        selectedcells.Item(counter).EntireColumn.Hidden = True
        Next counter
    Case Is = 3
        For counter = 1 To numberofitems
        selectedcells.Item(counter).EntireRow.Delete
        Next counter
    Case Is = 4
        For counter = 1 To numberofitems
        selectedcells.Item(counter).EntireColumn.Delete
        Next counter
    Case Is = 5
        For counter = 1 To numberofitems
        selectedcells.Item(counter).Delete
        Next counter
    Case Is = 6
        For counter = 1 To numberofitems
        selectedcells.Item(counter).Select
        Selection.Delete shift:=xlUp
        Next counter
    Case Is = 7
        For counter = 1 To numberofitems
        selectedcells.Item(counter).Select
        Selection.Delete shift:=xlToLeft
        Next counter
End Select

End Sub

———————————————————————————————————————–

Brief Intro to Macros and VBA

If you do a lot of repetitive tasks (and even if you don’t), macros can help save lots of time. In some cases you can be talking hours worth of work in one macro.

Recording a Macro

Now, if you’re not familiar with macros or VBA at all, a good way to learn is through the macro recorder tool (this is under the View tab in the ribbon). When you record your macro, you can see what was created on the VBA side by pressing ALT+F11 – you can also edit your macro here. You can do much more in VBA by coding straight from that screen, as the macro recorder is limited (e.g. it can’t create variables or other complex codes). But the macro recorder helps you learn how to reference different items.

When you create a macro – whether directly from VBA or the macro recorder, you can assign a shortcut (or a button to it) to it, saving you time in executing it.

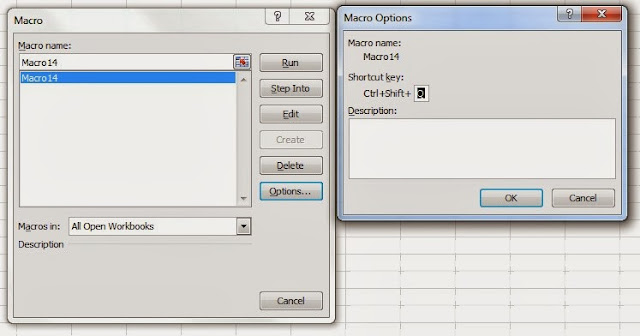
To assign a shortcut: select the view macros option under the view tab and then select options for the macro you want. There it will allow you to assign a shortcut (see below)

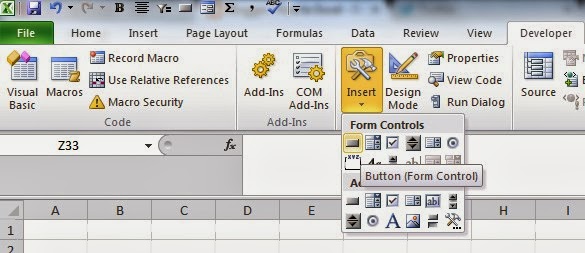
For a button, you will need the developer tab enabled. If you don’t have it, go under Excel options and under ribbon options you will see an option to enable it.

Once enabled, under the developer tab you will see an insert controls button where you can insert a button (see below)

Once you do that you will create the size of the button, and when you are done it will ask you to assign a macro to it. And now when you click on that button your macro will run.

Inserting VBA Code

If you run across VBA code that you want to copy into your spreadsheet, you want to make sure it is put in the proper section.

If it is a custom function, you want to make sure that is put in a module to work properly. If you do not see a module section in VBA, you will need to add one from the Insert menu.

If it is just a macro (denoted by ‘Sub’ and then the name of the procedure) it can be put in a module, the worksheets, or the workbook section. If you want the macro to work in all worksheets, then I would recommend putting it in the workbook rather than the individual sheets.