15ExcelAccounting

15 Excel Functions Accountants Should Know

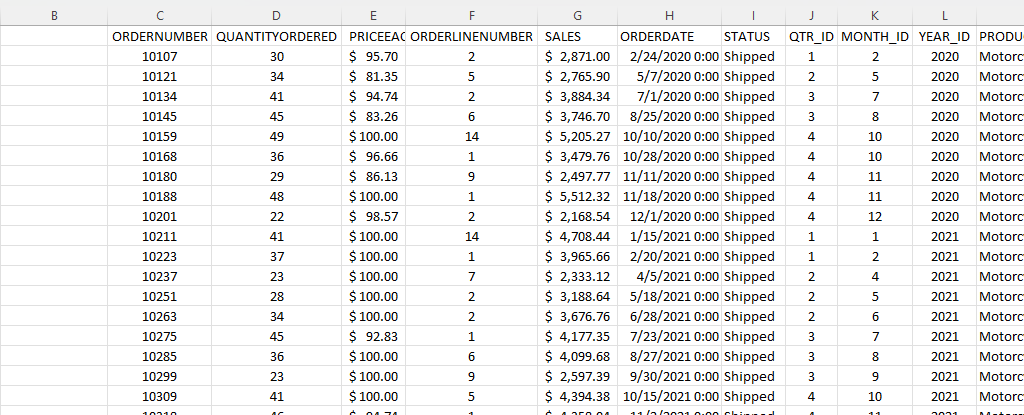
If you’re an accountant, you know that working with large amounts of data can be a daunting task. But with Excel, that work can get a whole lot easier and more efficient. Understanding Excel’s advanced features and functions can improve productivity, reduce errors, make your work more accurate, and most importantly — save you time. Below, I’ll go over some of the most important Excel functions that accountants should know, and provide examples of how to use them. For this example, I’ll use the following spreadsheet. Feel free to download it and follow along with the calculations.
1. SUM

The SUM function is a basic but essential function in Excel. It allows you to add up a range of values, which is helpful when calculating totals, such as revenue, expenses, and profits. Suppose you have a spreadsheet with sales data. In the above example, the total sales are in column G. If you wanted to sum up the entire column, the formula would be as follows: =SUM(G:G)

2. AVERAGE

The AVERAGE function calculates the average of a range of values. It is useful when analyzing data and preparing financial statements. In the above example, suppose you wanted to calculate what the average sale was. To do this, you can just use the AVERAGE function on column G, similar to the SUM function before. Here’s the formula: =AVERAGE(G:G)

3. IF

The IF function allows you to test a condition and return one value if the condition is true and another value if the condition is false. This can be useful because it can send your formulas to the next level. By knowing to use the IF function, you could also use SUMIF, AVERAGEIF, and many other functions that involve an if statement. In the above example, let’s say you only wanted to know if a value in cell M2 was part of the Motorcycles product line. The formula would be as follows: =IF(M2=”Motorcycles”,1,2). If it is part of Motorcycles, you would have a value of 1, otherwise, it would be 2.

4. SUMIF

By knowing the SUM and IF functions, you can combine them together with SUMIF, which is an incredibly popular function. It gives you a quick way to tally up the totals that meet a criteria. For example, let’s say you want all sales that relate to the Motorcycles category. The formula for that would be as follows: =SUMIF(M:M,”Motorcycles”,G:G). If the criteria is met in column M, then the formula will sum up the corresponding values in column G. There’s also the super-powered SUMIFS function, which allows you to combine multiple criteria.

5. EOMONTH

The EOMONTH function calculates the last day of the month for a specified number of months in the future or past. It is useful when working with data that is organized by date. For accountants, this can be useful when you’re calculating when something is due. Let’s say in this example, we need to calculate the date orders need to go out on, and that needs to be the end of the next month. Using the ORDERDATE field in column H, here’s how that calculation would look in the first cell, which would then be copied down for the rest: =EOMONTH(H2,1)

6. TODAY

The TODAY function is helpful for accountants in calculating deadlines and knowing how many days are remaining or past a certain date. Suppose that you wanted to know how many days have past since the ORDER DUE DATE that was calculated in the previous example. Rather than entering in a static date that every day you would need to change, you can just use the TODAY function. Here’s how a formula calculating the days since the deadline for the first cell would look like, assuming the due date is in column N: =TODAY()-N2. The next day you open up the workbook, the calculations will update to reflect the current date; there’s no need to make any changes. There are many more date calculations you can do in Excel.

7. FV

The FV function calculates the future value of an investment based on a fixed interest rate and a regular payment schedule. You can use it to calculate the future value of an investment or savings account. Let’s say that you wanted to save $10,000 per year and expect to earn a return of 5% per year on that investment. Using the FV calculation, you can do that with the following formula: =FV(0.05,5,-10000). If you don’t enter a negative for the payment amount, the formula will result in a negative value. You can also specify whether payments happen at the beginning of a period (1) or end (0 — this is the default) with the last argument in the function.

8. PV

The PV function lets you do the opposite and work backwards from a future value to the present. Knowing that the calculation in example 7 returns a value of $55,256.31, that can be used in the PV calculation to check our work: =PV(0.05,5,10000,-55256.31). The formula returns a value of 0, which is correct, as there was no starting value in the FV calculation.

9. PMT

The PMT function calculates the periodic payment required to pay off a loan with a fixed interest rate over a specified period. It is helpful when determining the monthly payments required to pay off a loan or mortgage. Let’s take the example of a mortgage payment where you need to pay down $500,000 over the period of 30 years, in monthly payments. At a 5% interest rate, here’s what the payment calculation would be: =PMT(0.05/12,12*30,-500000,0). Here again the ending value needs to be a negative to avoid a negative value in the result. And since the payments are monthly, the periods need to be multiplied by 12 and the interest rate is dividend by 12.

10. VLOOKUP

The VLOOKUP function allows you to search for a value in a table and return a corresponding value from another column in the same row. It’s one of the most common Excel functions because of how useful and easy to use it is. It is helpful when working with large data sets and performing data analysis. Let’s suppose in this example that you want to find the sales related to order number 10318. The formula for that calculation might look like this: =VLOOKUP(10318,C:G,5,FALSE). In a VLOOKUP function, you need to specify the column number you want to extract from, which is what the 5 represents. If you’re using Office 365, you can also use the newer, flashier XLOOKUP function. I put VLOOKUP on this list because it’ll work on older versions of Excel — XLOOKUP won’t.

11. INDEX

The INDEX function allows you to return a value from a data set by specifying the row and column number. It’s also helpful if you just want to return data from a single row or column. For example, the sales column is in column G. If I know the order number is on row 20 (which relates to order number 10318), this formula would do the same job as the VLOOKUP in the previous example: =INDEX(G:G,20,1).

12. MATCH

The MATCH function allows you to find the position of a value within a range of cells. Oftentimes, Excel users deploy a combination of INDEX and MATCH instead of VLOOKUP due to its limitation (e.g. VLOOKUP can’t extract values to the left of the lookup field). In the previous example, you had to specify the row belonging to the order number. But if you didn’t know it, you could use the MATCH function within the INDEX function. The MATCH function would look like this: =MATCH(10318,C:C,0). Placed within an INDEX function, it can replace the argument where in the previous example, we set a value of 20: =INDEX(G:G,MATCH(10318,C:C,0),1). By doing this, you have a more flexible version of the VLOOKUP function. You can also create dynamic formulas using INDEX and MATCH that use lookups for both the column and row.

13. COUNTIF

The COUNTIF function allows you to count the number of cells in a range that meet a specified condition. Let’s count the number of values in the data set that are Motorcycles. To do this, you would enter the following formula: =COUNTIF(M:M,”Motorcycles”).

14. COUNTA

The COUNTA function is similar to the previous function, except it only counts the number of non-empty cells. With no criteria, it is helpful to just the total number of values within a range. To calculate how many cells are in this data set, you can use the following formula: =COUNTA(C:C). If there are no gaps in data, then the result should be the same regardless of which column is used. And when combined with the UNIQUE function, you can have an easy way to count the number of unique values.

15. UNIQUE

The UNIQUE function returns a list of unique values within a range, and it’s a much easier method than the old-school way of extracting unique values. If you wanted to extract all the unique product lines in column M, you would enter the following formula: =UNIQUE(M:M). If, however, you just wanted to count the number of unique values, you could embed it within the COUNTA function as follows: =COUNTA(UNIQUE(M:M)). You can adjust your range if you don’t want to include the header.

This is just a sample of some of the useful Excel functions that accountants can utilize. If you are familiar with them, you’ll put yourself in a great position to improve the efficiency of your workflow and make your spreadsheets easier to use. Plus, you can confidently say that you are highly competent with Excel, which can make your resume more attractive and make you better suited for accounting jobs that require advanced Excel skills — and there are many of them that do!.


If you liked this post on 15 Excel Functions Accountants Should Know, please give this site a like on Facebook and also be sure to check out some of the many templates that we have available for download. You can also follow me on Twitter and YouTube. Also, please consider buying me a coffee if you find my website helpful and would like to support it.

H2ESubtotals

When to Use Subtotals In Excel

Doing a simple summation in Excel is as easy as clicking on the AutoSum button or just using the SUM function. But in some cases, you don’t want to be summing up everything within a range. In those situations, you may want to use the SUBTOTAL function instead. In this post, I’ll go over how that function works, and illustrate the differences between it and SUM function.

What’s the difference between SUM and SUBTOTAL in Excel?

Suppose you have the following data set, which sows airport delays by carriers at different airports:

Table showing airport delays by airlines.

Using the SUM function on column header for carrier_delay, the total value comes out to 133,453,066. Even if you were to filter the data based on a single airport (in this example, JFK), the total value would remain the same:

Filtering a table in Excel by the airport.

If you were to use the SUBTOTAL function, however, then it would only perform a calculation on the cells that are visible and filtered. If you’re using SUBTOTAL, you just need to specify the type of calculation you want to perform:

Selecting the argument for the SUBTOTAL function in Excel.

To do a summation, you just enter 9 for the first argument. As you can see, there are options to do COUNT, COUNTA, MAX, MIN, PRODUCT, AVERAGE, PRODUCT, standard deviation, and variance calculations. Once you specify the first argument, all you need to do after that is select the range as you would in a normal SUM formula. Here’s what the SUBTOTAL formula looks like in my spreadsheet, where I am adding up the values in column Q:

=SUBTOTAL(9,Q7:Q500000)

Now, there’s a difference between the SUM and SUBTOTAL formulas in their results:

Table with SUM and SUBTOTAL formulas showing different values.

If you were to change your filters and selections, the SUBTOTAL value would change while the SUM value would remain the same.


If you liked this post on When to Use Subtotals In Excel, please give this site a like on Facebook and also be sure to check out some of the many templates that we have available for download. You can also follow us on Twitter and YouTube.

H2Ecalcstreaks

How to Calculate Streaks in Excel

Do you want to calculate how long a team’s winning streak is, or how many cells in a row meet certain criteria? In this post, I’ll show you how you can calculate streaks in Excel. Unlike a simple count function, this will require being able to reset your count and go back to zero. I’ll show how this can be done using an easy approach that involves a helper column, and a more challenging way that doesn’t require one.

The easy way to calculate streaks

Here are some results, showing wins (W), losses (L), and ties (T).

Game results on a spreadsheet showing wins, losses, and ties.

The helper column I’m going to create will evaluate the criteria. And the criteria, in this case, will be whether the result is a win. For this, all that’s required is a simple IF statement checking if the value is a W:

=IF(A2="W",1,0)

If the result is a W, the formula will return a value of 1, otherwise, it will be 0:

Criteria column showing a 1 value for W and 0 for L.

Next to that column, I will create another one for the actual streak. This formula will look at the criteria column, and if it equals 0, then the streak is 0. If it’s a value of 1, then it will add on to the previous value in the streak column, and thus, add on to it. The formula is as follows:

=IF(B2=0,0,B2+C3)

And that results in the following calculations:

Result, Criteria, and Streak columns for calculating streaks in Excel.

The assumption here is that the earlier results are at the bottom and the most recent games are at the top.

If you wanted to calculate how many games were either won or tied in a row, and thus, an undefeated streak, all you need to do here is to adjust the criteria column. The updated formula would be this:

=IF(OR(A2="W",A2="T"),1,0)

And now the streak values change:

Calculating an undefeated streak in Excel with a helper column.

The difficult approach, without helper columns

If you don’t want to use a helper column, calculating streaks is a bit more challenging. You will be using an IF function and checking for criteria, but this time you’ll need to always adjust your starting point (i.e where the streak is 0). And that will need to be within a SUM function to ensure that the values are added. The key to making this work is using the INDIRECT function so that you have control over the exact range you want to include.

Inside that function, I’ll start with column A and use the current row the cell is on, which can be done using the ROW function. Here’s how it starts:

INDIRECT("A"&ROW(B2)&":A"

B2 reflects the first cell in the streak calculation, and it will return a value of 2. The last cell needs to be the last time the streak was broken — when the team recorded a loss. This involves using the MATCH function and searching for an “L”. That formula is as follows:

MATCH("L",INDIRECT("A"&ROW(B2)&":A15"),0)

Here again, I use the ROW function and as my ending cell, I put A15, which is the last cell in the range. This could be adjusted to use a MAX function to make it variable. Since the MATCH function will return a number corresponding to its position within the range (e.g. it won’t return the actual row), I will adjust for the row number immediately above the first cell to be searched. In this case, since I’m searching cells A2:A15, I need to add 1 to ensure I get the row number and adjust for the fact that the MATCH function doesn’t begin from the very first row. I will add all this together into my earlier formula:

INDIRECT("A"&ROW(B2)&":A"&MATCH("L",INDIRECT("A"&ROW(B2)&":A15"),0)+ROW(B1))

Now I have to enclose this within the IF function and check to see if the result is a W:

IF(INDIRECT("A"&ROW(B2)&":A"&MATCH("L",INDIRECT("A"&ROW(B2)&":A15"),0)+ROW(B1))="W",1,0)

Then, I put that all within a SUM function:

SUM(IF(INDIRECT("A"&ROW(B2)&":A"&MATCH("L",INDIRECT("A"&ROW(B2)&":A15"),0)+ROW(B1))="W",1,0))

The one last adjustment that’s necessary is to account for if there is no loss found and the team starts on a winning streak. For this, I’ll add an IFERROR function just before the MATCH function so that if it evaluates to a 0 (after adding the 1), then it will default to the last row (15):

IFERROR(MATCH("L",INDIRECT("A"&ROW(B2)&":A15"),0)+ROW(B1),15)

The full formula for calculating the win streak is the following:

=SUM(IF(INDIRECT("A"&ROW(B2)&":A"&IFERROR(MATCH("L",INDIRECT("A"&ROW(B2)&":A15"),0)+ROW(B1),15))="W",1,0))

Given how complex this formula is, it can get messy if you create too many conditions in it. And if you do have multiple criteria you’re dealing with, then the first approach may be the more practical one to use in that case.


If you liked this post on How to Calculate Streaks in Excel, please give this site a like on Facebook and also be sure to check out some of the many templates that we have available for download. You can also follow us on Twitter and YouTube.

H2Etags

How to Use Tags in Excel

Did you know that you can group numbers in Excel using tags? By just listing all the categories an item should belong to, you can make it easier to group them. In this post, I’ll show you how you can use tags in Excel to efficiently summarize different categories.

Creating tags

Suppose you wanted to list all the possible streaming services you might subscribe to. You might have a list that looks something like this:

List of streaming services.

This is fine if you want to compare them or even tally them all up. But what if you wanted to look at different scenarios, such as what if you select some of these services, but not all of them? This is where tags can be really helpful. Let’s say I want to create the following categories:

  • Basic
  • Kids
  • Tier 1
  • Tier 2
  • Tier 3

Each category will have a different mix of services. Here’s how I can use tags to make that happen. I’ll create another column next to the price where I specify all the categories a service will fall under:

Streaming services grouped by tags.

In the above example, Netflix is included in every package but HBO Max is only included in Tier 3. Next, what I’m going to do is create columns for each one of these tags, such as follows:

Streaming services grouped by tags.

Without using tags, you might be tempted to put a checkmark to determine which service belongs in which category. But that’s not necessary here. Instead, I’m going to use a function to determine whether to pull in the price or not.

Using a formula to determine if a tag is found

The key to making this work is the SEARCH function. This will look within the tag values to see if there is a match. If there is, then the price will be populated within the corresponding category. To check if the ‘basic’ keyword is found within the tags related to Netflix (assume this is cell C2), this is how that formula would look:

=SEARCH(“basic”,C2,1)

This will return a value of 1, indicating that the term is found at the very start of the string. If you use the function to look for the word ‘kids’ then it would return a value of 8 as that comes after ‘basic in my example.’ Of key importance here is that there is a number. If there isn’t a number and instead there is an error, that means that the tag wasn’t found. I will adjust the formula as follows to check if there is a number:

=ISNUMBER(SEARCH(“basic”,C2,1))

This will return a value of either TRUE or FALSE. But the formula needs to go further than just identifying if the tag was found. It needs to pull in the corresponding value. To do this, I’ll need an IF statement to extract the value from column B:

=IF(ISNUMBER(SEARCH(“basic”,C2,1)),B2,0)

By freezing the formulas and copying this across the other categories, this formula will now allow me to pull in the amounts correctly based on the tags:

Summary of streaming services based on tags.

But let’s say you don’t even want to do this, you just want to quickly group the totals without these extra columns. You can also do that with the help of tags.

Summarizing the totals by category

You don’t need to create a column for each group if you don’t want to. You summarize the total in just an array formula. Simply use the formula referenced earlier and include it within a SUM function, while referencing the entire range:

=SUM(IF(ISNUMBER(SEARCH(“basic”,C2:C6,1)),B2:B6,0))

This is the same logic as before, except this time the values will be totaled together. On older versions of Excel, you may need to use CTRL+SHIFT+ENTER after entering this formula for it to correctly compute as an array. But if you’re using a newer version, you don’t need to. If you copy the formula to the other categories, you’ll be able to sum the values by without the need for additional columns:

Summary of streaming services based on tags.

If you liked this post on Using Tags in Excel, please give this site a like on Facebook and also be sure to check out some of the many templates that we have available for download. You can also follow us on Twitter and YouTube.

ArrayFormula1

Use an Excel Array Formula to Do Multiple Calculations at Once

Array formulas can be challenging to understand but they’re worth learning as they can create significant efficiencies for your spreadsheets. Below, I’ll show you how you can do two calculations within a single array formula in Excel.

Using an array to categorize and sum data

To demonstrate how to do multiple calculations, I’m going to use credit card transactions as an example:

Credit card transactions showing descriptions and amounts.

Suppose in column A you have the first letter indicating whether it’s a Visa, Mastercard, or Amex. The numbers afterward could be authorization codes. And then in column B, you have the total dollar amount of the transaction. Without the use of an array, what you might end up doing is creating another column that would use the description in column A to determine the card type. Then, you could use a SUMIF function to calculate the sales volume by card type. Here’s how that might look:

Summarizing credit card transactions using a SUMIF function.

This is an approach I’d expect most people to use. It’s perfectly fine but if you’re not able to add an extra column or need to make your formula more efficient, that’s where an array can be helpful.

Through the use of an array, you don’t have to create that extra column. You can determine the card type and also sum the data all in one cell. Let’s start by calculating all the Visa transactions.

First, we’ll start by determining the card type — this process would have been the same regardless of whether you’re using an array or a SUMIF calculation. And to do this, we need to use the LEFT function to grab the first letter and determine if it is a ‘V’ to indicate Visa. This is how the formula looks like:

LEFT(A2:A30,1)=”V”

Right now, we can’t really use this on its own, it’ll just return TRUE or FALSE values. What we can do is put this formula inside of an IF function and using it as the first argument:

=IF(LEFT(A2:A30,1)=”V”

In the second IF argument, we’ll want to return the values in case the condition is true, and that V is the first character of the corresponding value in column A. In such a case, we just want to return the values that are in column B:

=IF(LEFT(A2:A30,1)=”V”,B2:B30

And if the value in column A doesn’t start with a V, then, in that case, we just want the value to be blank:

=IF(LEFT(A2:A30,1)=”V”,B2:B30,””)

I use blanks rather than a 0 value because it’s cleaner, and you’ll see why that is when I evaluate the formula further down.

The formula will now return a list of values, ignoring those which don’t start with a V in column A. All that’s left now is to sum those values. To do that, we’ll simply wrap the function above inside the SUM function and freeze the cells:

=SUM(IF(LEFT($A$2:$A$30,1)=”V”,$B$2:$B$30,””))

And here’s the result:

Summarizing credit card transactions through the use of an array formula.

If you’re using an older version of Excel, you may need to use CTRL+SHIFT+ENTER to turn this into an array formula. But on newer versions, it’s no longer necessary. I didn’t need to in my case, and I can show you that it still calculates as an array. If I run the EVALUATE FORMULA button on the Formulas tab, you’ll see that it is evaluating each cell and pulling the first letter from each of the values in column A:

Evaluating the first part of the array formula.

Then it converts that into a series of TRUE or FALSE depending on whether those values are equal to ‘V’:

Evaluating the second part of the array formula.

And then it returns the corresponding values if they are TRUE, and “” if they are FALSE:

Evaluating the third part of the array formula.

Notice how easy it is to separate the numbers out from the blank cells. Had I used zeros rather than blanks, it would be a bit more difficult to discern which were Visa transactions and which were not. Anytime you can hide zero values, your data is always a lot cleaner.

The last step of this formula involves just summing all the values, which gives us our total. This is a much simpler approach than having to create another column for determining the card type. You can also use this with other functions. If we wanted to get the average Visa transaction, we could just sub out the SUM function with the AVERAGE function. Arrays are very powerful and can do some incredible things.


If you liked this post on how to use an Excel array formula to do multiple calculations at once, please give this site a like on Facebook and also be sure to check out some of the many templates that we have available for download. You can also follow us on Twitter and YouTube.

lasvegas1

How to Calculate Cumulative and Year-to-Date Totals in Excel

Whether you’re tracking sales or costs in excel, it’s important to capture not just your monthly totals but your cumulative year-to-date amounts as well. And to do that in excel, you’ll need to calculate a cumulative sum. Ideally, you’ll want to see a current month’s total alongside the year-to-date figure. Below, I’ll show you how to do that as well as how to make cumulative totals work with multiple years.

Calculating the current month and cumulative sums

First thing’s first, let’s start with a data set. This time around, I’m going to pull the monthly tourist information for Las Vegas. This year, that could prove to be interesting given the impact of COVID-19 on tourism in the city. Here are what the numbers looked like for 2019:

Las Vegas visitor data in Excel.

If we wanted to calculate the total visitor volume it would be as simple as the following formula:

=SUM(B:B)

However, if we want the cumulative totals then we can’t just grab the entire column. Instead, we’ll need to add another column that has the cumulative amounts for each month. The formulas will still involve the SUM function but they will need to be from January up until the current row. Here’s what the formulas look like:

Las Vegas visitor volume cumulative sum totals.

The formulas for column C are shown in column D. The key here is freezing the first cell (B2) so that as you copy the formula down in C2, it won’t move while the other cells will.

Calculating cumulative values isn’t too complicated, but it’s a bit trickier when your data set spans multiple years.

Calculating the cumulative sum when working with multiple years

The above scenario works well if you have just one year. But it won’t work if you decide to add next year’s data without resetting the formula. Here’s how it would look if we added the 2020 data:

Las Vegas visitor volume cumulative sum totals for multiple years.

As you can see, it just keeps on adding on to the previous year’s data, which is not what we want.

There are multiple ways that you can calculate the cumulative sum per year and so that the calculation resets on its own. Let’s start with the easiest route: adding an extra column for the year. Using the YEAR function we can extra what the year is in column A. Then, rather than using the SUM function, we will use the SUMIF function to do the cumulative count, but only if the year is the same:

Las Vegas visitor volume cumulative sum totals for multiple years with a sumif function.

The logic similar to the earlier formula, we’ve just added a condition where the year in column C has to match the year that specific row belongs to. That’s why once we hit 2020, it resets. For this to work, we still need the months to be in order.

Another way that you can calculate the cumulative total without a helper column is by using an array:

Las Vegas visitor volume cumulative sum totals for multiple years with an array.

We need to evaluate every cell to see if it relates to the correct year, and if it does, it gets included in the range to sum. The array allows us to do two calculations in one: an IF calculation embedded within a SUM calculation which doesn’t require the helper column.

A big advantage of having multiple years on your data set rather than separating them out is then you can put them into a pivot table and create a pivot chart that helps plot both of them:

Las Vegas visitor volume shown on a chart.

From this, we can see that there was a sharp drop off in March due to the outbreak of COVID-19 and that the cumulative figures are now well under 2019’s numbers. By having both cumulative and monthly totals available, we can display them both on one chart that helps to summarize the information quickly and easily.


If you liked this post on How to Calculate Cumulative and Year-to-Date Totals in Excel, please give this site a like on Facebook and also be sure to check out some of the many templates that we have available for download. You can also follow us on Twitter and YouTube.

Calculating and Tracking Streaks with a Custom Function

With the stocks markets tanking earlier this month, I thought it’d be interesting to track their historical performance and put into perspective just how badly things have been going lately. For those that don’t know, one of my side jobs is writing articles for the Motley Fool Canada and so naturally this example attracted my interest.

However, there’s not an easy way to calculate this in Excel, and so I decided to go the route of a custom function.

What I’m going to be looking to accomplish is a way to to track how many consecutive trading days that a stock has been up or down, and then also calculate the cumulative value of those gains and losses.

If you’d like to follow along with my example, you can download the file I used here (you’ll have to save the file, open it in Excel and enable content, otherwise you’ll see NAME? errors)

Setting Up the Variables


I want the calculation to start from the bottom (the current cell) and work its way back up, since the latest results will be at the bottom. To do this I create a ‘bottom’ variable that looks like this:

————————————————————————————————————–

bottom = selection.Count + selection.Row – 1

————————————————————————————————————–

I want the user to be able to select what range they want the calculation to apply to, rather than selecting everything.

I also setup a variable for the column, which I named as offsetnum:

————————————————————————————————————–

offsetnum = selection.Column

————————————————————————————————————–

These two variables allow me to set my starting point for my calculation.

Determining if I’m Counting Negatives or Positives

The value of the starting cell will determine if I am going to be looking for positive numbers (gains) or negatives (losses), and so I setup an if statement to determine whether the first value is a gain or loss:

————————————————————————————————————–

If Cells(bottom, offsetnum) < 0 Then
    posneg = “negative”
Else
    posneg = “positive”
End If

————————————————————————————————————–

Start counting


The final step involves counting the values depending on whether I’m looking for positives or negatives:

————————————————————————————————————–

For counter = bottom To 1 Step -1

    If posneg = “negative” Then
 
            If Cells(counter, offsetnum) < 0 Then
                streak = streak – 1
            Else
                Exit For
            End If
         
      Else
   
            If Cells(counter, offsetnum) >= 0 Then
                streak = streak + 1
            Else
                Exit For
            End If
         
        End If
     

Next counter

————————————————————————————————————–

My complete function looks as follows:

————————————————————————————————————–

Function streak(selection As Range)

Application.Volatile
Application.Calculate

Dim bottom, offsetnum As Integer
Dim posneg As String

bottom = selection.Count + selection.Row – 1
offsetnum = selection.Column

‘Determine first value
If Cells(bottom, offsetnum) < 0 Then
    posneg = “negative”
Else
    posneg = “positive”
End If

For counter = bottom To 1 Step -1

    If posneg = “negative” Then
 
            If Cells(counter, offsetnum) < 0 Then
                streak = streak – 1
            Else
                Exit For
            End If
         
      Else
   
            If Cells(counter, offsetnum) >= 0 Then
                streak = streak + 1
            Else
                Exit For
            End If
         
        End If
     

Next counter

End Function

————————————————————————————————————–

Calculating consecutive points gains and losses


Now that I have a function to tell me the current winning or losing streak, I can calculate the cumulative gains and losses.
To do this, I am going to sum as far as the streak goes. And so far starters, I’m going to start with the SUM function. I am also going to use the OFFSET function because I need to determine how many rows up I need to add. The OFFSET will start from the current position and determine how far back I need to go to add up the totals in the current streak.

However, because some streaks are negative, I’ll need to also use the ABS function to just grab the number, regardless of if it is positive or negative. My formula looks like this so far:

=SUM(OFFSET(H2,1-ABS(I2), 0

Column H is where my gain or loss value is, while column I is the streak value. Since I want to sum the cumulative gains, I need to reference column H as my starting point.

I added the 1- before the ABS function because that will ensure the number is a negative, meaning that my formula will calculate upward, rather than downward if the number were positive. I also have to decrease the number of cells to offset because I don’t want to include the current cell, otherwise the formula will go too far.

Since I’m not offsetting any columns I set the next argument to 0.

The last argument I need to enter is the height of the offset function, otherwise the formula will just offset by the number specified in the second argument and pull that value, rather than pulling all the values that fall within the range.

This actually involves just copying the same argument again, but this time for the height. My completed formula looks as follows:

=SUM(OFFSET(H2,1-ABS(I2),0,ABS(I2)))

Note

Sometimes with custom functions you might notice that your calculations hang or stop computing correctly. What that means is you just need to recalculate using either F9 or you can edit in the cell and click enter, which will normally trigger a recalculation as well.

Alternatively what you could do is after running the formulas for the dataset, copy them over as values to ensure that they don’t change, since in this case you likely wouldn’t need to recalculate the streak value again.

sum calculation

Using Summation Formulas (SUM, SUMIF(S), SUBTOTAL)

I have saved this sample file here if you would like to look at the data set and have a closer look at how the formulas work.

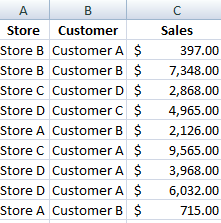
In this post I will cover some simple summation formulas and when best to use them. I have a sample data set that has stores, customers, and total sales.

sum calculation

Summing Total Sales


If I just wanted to total all the sales then the SUM function would accommodate this easily. There is even a summation button on the Excel ribbon to easily do this.

sum ribbon button

It is on the right hand side of the Home tab in the Editing group. It will try to determine which cells you want to sum but you can change this range to what you need.

Since my values are in column C my formula would be as follows:

=SUM(C:C)

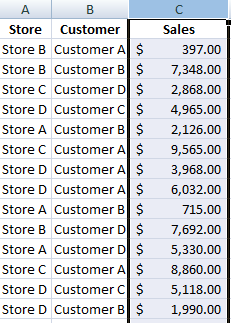
Pretty straightforward, all you need is the column that you want to sum (or specific range if you don’t want everything in the column). This returns the grand total of $256,129 from my data set. Another way I could find out the total is if I just highlight the entire column.

sum column

The sum will show in the bottom right corner of my screen in the status bar.

sum status bar

If I right click on any of this area I get the following menu:

customize status bar

If you didn’t see the sum in your status bar this is where you can add it. In my example I could select Minimum and Maximum and then those values would also be calculated for any range that I highlight and show up in the status bar. This makes it easier if you quickly want to see an average, total, min or max by just highlighting a range without having to type a formula each time.

Summing Single Store Sales

But now suppose I just wanted to know the sales of Store A. I could filter the data set, select the column, and see the total in the status bar. But that is a bit tedious to repeat each time if I wanted to see sales by each store. In this case, I could use the SUMIF function.

My formula would look like this:

=SUMIF(A:A,”Store A”,C:C)
      

The first argument, column A, specifies what range I want to look at; the second argument, “Store A”, is what criteria I am looking for; and column C is the final argument, where I want to pull the values from. This formula is saying to look in column A for a value of Store A and add only those related amounts in column C.

Instead of a static reference for Store A I could reference a cell instead, and that would make it easier to apply this formula to multiple stores without having to change the name manually each time.

In the above example assume my store name is in cell E6. If I have the store names going from cell E6:I6 then I could use the following formula:

 =SUMIF($A:$A,E6,$C:$C)

You will notice I have frozen some of the cells as well. This will allow me to move my formula across without the ranges changing. Below are what my results look like:

sumif calculation function

Summing Sales by Customer and Store

Now, consider a scenario where I wanted to do a summary of sales by stores and customers. Here I can use the SUMIFS function (only available to Excel 2007 and newer versions). In the formula below I have stores in cells G12:J12 and customers in cells F13:F16:

 =SUMIFS($C:$C,$A:$A,E$12,$B:$B,$F13)

I can copy this formula and it will be updated based on what store and customer intersect at that point. The summary will look as below:

sumifs formula calculation

Unlike with the SUMIF function, the first argument here is the range I want to sum, which is column C. The next argument is the range for my first criteria to look up, column A, followed by the criteria I want to match, which in the first formula is cell E12 (Store A). The next two arguments relate to the next criteria range which is column B for the customers and the customer to be matched which in the formula is cell F13 (Customer A).

With the SUMIFS function you can add more criteria than just two. Simply just add another comma and in the next argument specify the range, followed by the criteria. You can keep adding to it as you need.

How the SUBTOTAL Function Works

Unlike the SUM function, the SUBTOTAL function will perform a calculation based on the filters you have applied (if you have none, it will perform a calculation on all the data in the range). The SUBTOTAL function also has an added argument to tell it what type of calculation it should do:

subtotal functions

In the below formula, I am going to total column C again, as I did in the SUM formula initially. However, the additional argument I need in the SUBTOTAL function is defining the calculation. Since I am going to just do a sum, I will set the argument to 9. My formula looks as below:

 =SUBTOTAL(9,C:C)

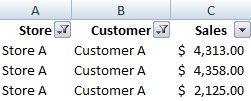
Now, if I were to use filters to show only Store A and Customer A, the SUBTOTAL formula would return the same result as the SUMIFS function did for the intersection of Store A and Customer A.

subtotal filters

My formula returns a value of $10,796 with the above filters, which matches the result from the SUMIFS formula. The SUBTOTAL function is useful when you are always using filters since it will take those filters into account as opposed to the SUM function which will ignore them. If you don’t use filters then it won’t make a difference.