15ExcelAccounting

15 Excel Functions Accountants Should Know

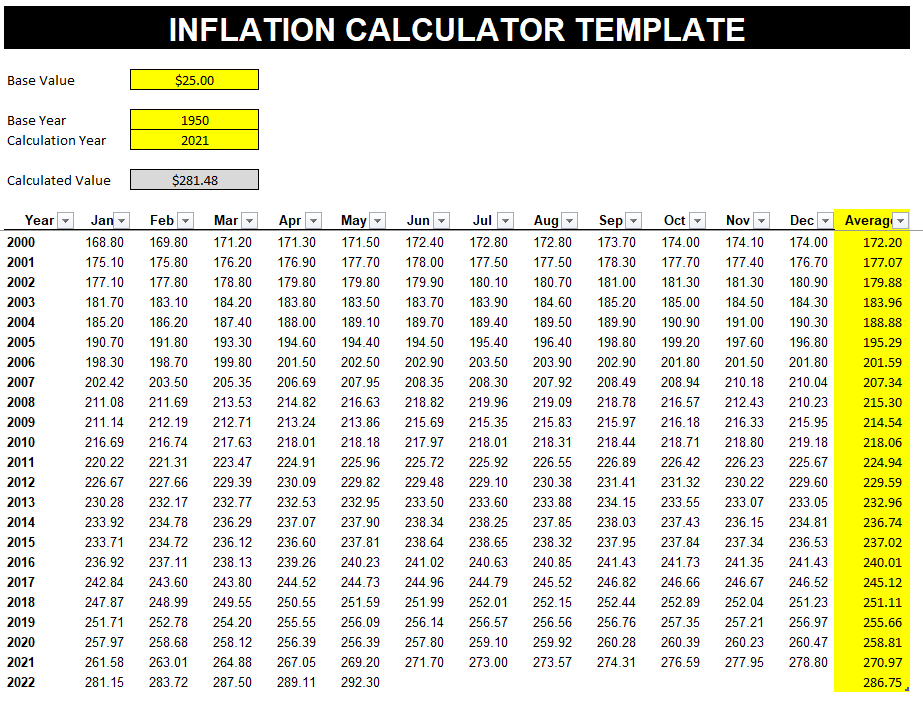
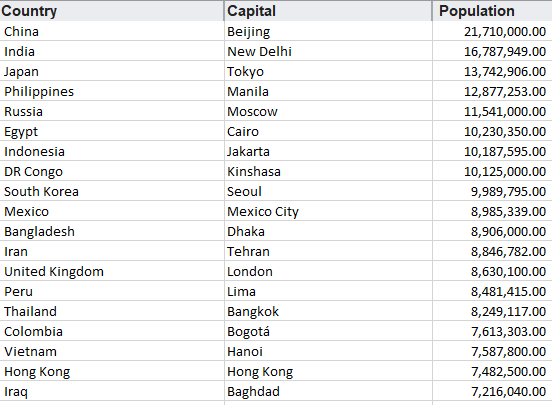
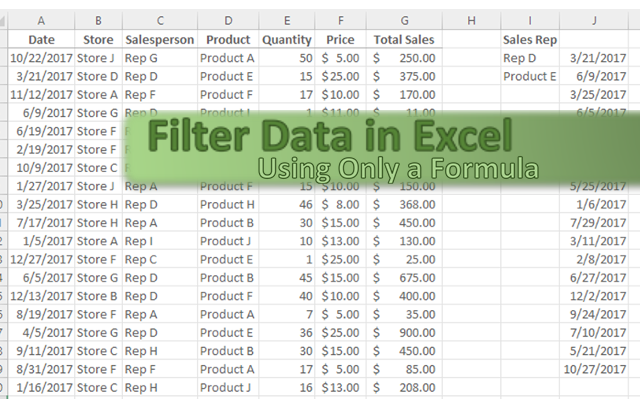
If you’re an accountant, you know that working with large amounts of data can be a daunting task. But with Excel, that work can get a whole lot easier and more efficient. Understanding Excel’s advanced features and functions can improve productivity, reduce errors, make your work more accurate, and most importantly — save you time. Below, I’ll go over some of the most important Excel functions that accountants should know, and provide examples of how to use them. For this example, I’ll use the following spreadsheet. Feel free to download it and follow along with the calculations.

1. SUM

The SUM function is a basic but essential function in Excel. It allows you to add up a range of values, which is helpful when calculating totals, such as revenue, expenses, and profits. Suppose you have a spreadsheet with sales data. In the above example, the total sales are in column G. If you wanted to sum up the entire column, the formula would be as follows: =SUM(G:G)

2. AVERAGE

The AVERAGE function calculates the average of a range of values. It is useful when analyzing data and preparing financial statements. In the above example, suppose you wanted to calculate what the average sale was. To do this, you can just use the AVERAGE function on column G, similar to the SUM function before. Here’s the formula: =AVERAGE(G:G)

3. IF

The IF function allows you to test a condition and return one value if the condition is true and another value if the condition is false. This can be useful because it can send your formulas to the next level. By knowing to use the IF function, you could also use SUMIF, AVERAGEIF, and many other functions that involve an if statement. In the above example, let’s say you only wanted to know if a value in cell M2 was part of the Motorcycles product line. The formula would be as follows: =IF(M2=”Motorcycles”,1,2). If it is part of Motorcycles, you would have a value of 1, otherwise, it would be 2.

4. SUMIF

By knowing the SUM and IF functions, you can combine them together with SUMIF, which is an incredibly popular function. It gives you a quick way to tally up the totals that meet a criteria. For example, let’s say you want all sales that relate to the Motorcycles category. The formula for that would be as follows: =SUMIF(M:M,”Motorcycles”,G:G). If the criteria is met in column M, then the formula will sum up the corresponding values in column G. There’s also the super-powered SUMIFS function, which allows you to combine multiple criteria.

5. EOMONTH

The EOMONTH function calculates the last day of the month for a specified number of months in the future or past. It is useful when working with data that is organized by date. For accountants, this can be useful when you’re calculating when something is due. Let’s say in this example, we need to calculate the date orders need to go out on, and that needs to be the end of the next month. Using the ORDERDATE field in column H, here’s how that calculation would look in the first cell, which would then be copied down for the rest: =EOMONTH(H2,1)

6. TODAY

The TODAY function is helpful for accountants in calculating deadlines and knowing how many days are remaining or past a certain date. Suppose that you wanted to know how many days have past since the ORDER DUE DATE that was calculated in the previous example. Rather than entering in a static date that every day you would need to change, you can just use the TODAY function. Here’s how a formula calculating the days since the deadline for the first cell would look like, assuming the due date is in column N: =TODAY()-N2. The next day you open up the workbook, the calculations will update to reflect the current date; there’s no need to make any changes. There are many more date calculations you can do in Excel.

7. FV

The FV function calculates the future value of an investment based on a fixed interest rate and a regular payment schedule. You can use it to calculate the future value of an investment or savings account. Let’s say that you wanted to save $10,000 per year and expect to earn a return of 5% per year on that investment. Using the FV calculation, you can do that with the following formula: =FV(0.05,5,-10000). If you don’t enter a negative for the payment amount, the formula will result in a negative value. You can also specify whether payments happen at the beginning of a period (1) or end (0 — this is the default) with the last argument in the function.

8. PV

The PV function lets you do the opposite and work backwards from a future value to the present. Knowing that the calculation in example 7 returns a value of $55,256.31, that can be used in the PV calculation to check our work: =PV(0.05,5,10000,-55256.31). The formula returns a value of 0, which is correct, as there was no starting value in the FV calculation.

9. PMT

The PMT function calculates the periodic payment required to pay off a loan with a fixed interest rate over a specified period. It is helpful when determining the monthly payments required to pay off a loan or mortgage. Let’s take the example of a mortgage payment where you need to pay down $500,000 over the period of 30 years, in monthly payments. At a 5% interest rate, here’s what the payment calculation would be: =PMT(0.05/12,12*30,-500000,0). Here again the ending value needs to be a negative to avoid a negative value in the result. And since the payments are monthly, the periods need to be multiplied by 12 and the interest rate is dividend by 12.

10. VLOOKUP

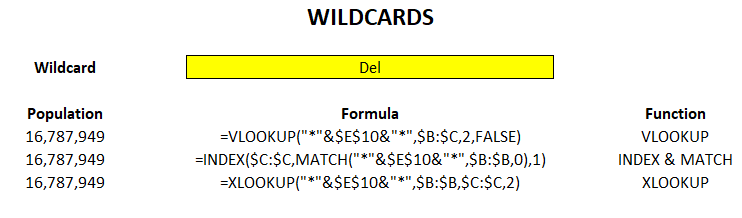
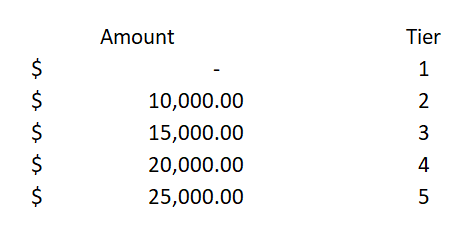
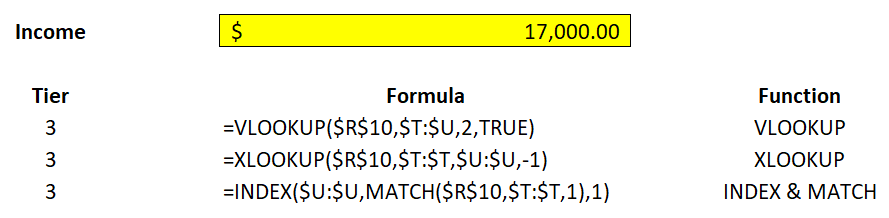
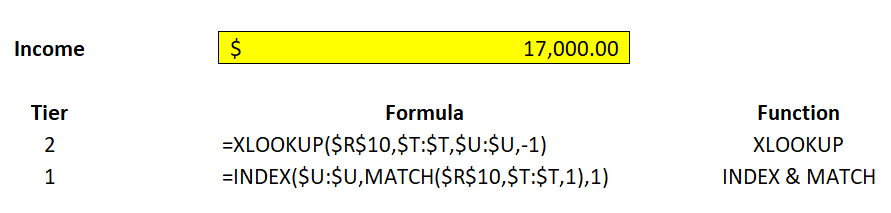
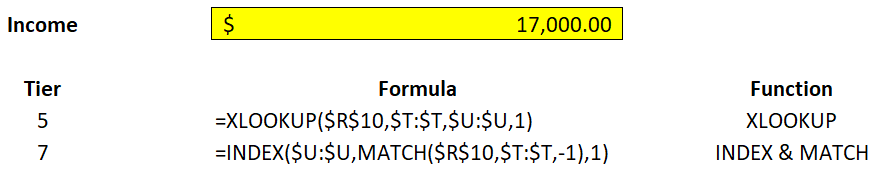
The VLOOKUP function allows you to search for a value in a table and return a corresponding value from another column in the same row. It’s one of the most common Excel functions because of how useful and easy to use it is. It is helpful when working with large data sets and performing data analysis. Let’s suppose in this example that you want to find the sales related to order number 10318. The formula for that calculation might look like this: =VLOOKUP(10318,C:G,5,FALSE). In a VLOOKUP function, you need to specify the column number you want to extract from, which is what the 5 represents. If you’re using Office 365, you can also use the newer, flashier XLOOKUP function. I put VLOOKUP on this list because it’ll work on older versions of Excel — XLOOKUP won’t.

11. INDEX

The INDEX function allows you to return a value from a data set by specifying the row and column number. It’s also helpful if you just want to return data from a single row or column. For example, the sales column is in column G. If I know the order number is on row 20 (which relates to order number 10318), this formula would do the same job as the VLOOKUP in the previous example: =INDEX(G:G,20,1).

12. MATCH

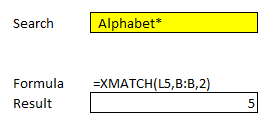
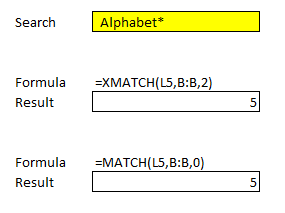
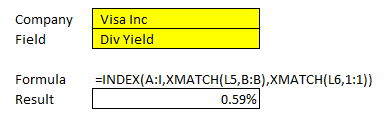
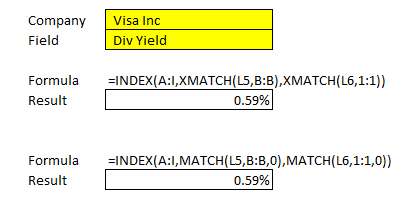
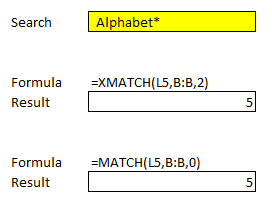
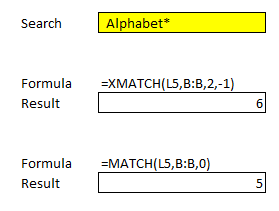
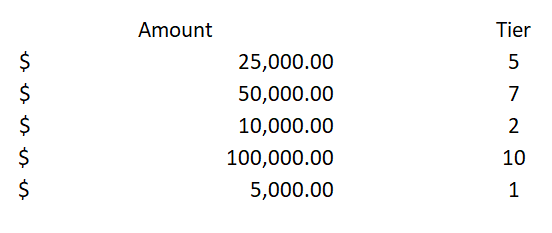
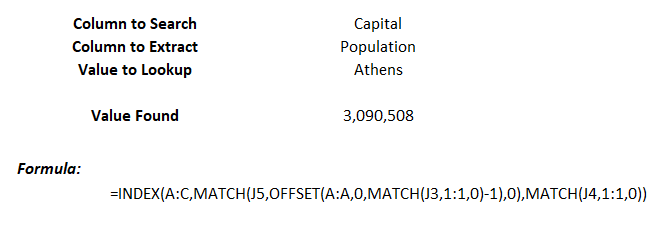
The MATCH function allows you to find the position of a value within a range of cells. Oftentimes, Excel users deploy a combination of INDEX and MATCH instead of VLOOKUP due to its limitation (e.g. VLOOKUP can’t extract values to the left of the lookup field). In the previous example, you had to specify the row belonging to the order number. But if you didn’t know it, you could use the MATCH function within the INDEX function. The MATCH function would look like this: =MATCH(10318,C:C,0). Placed within an INDEX function, it can replace the argument where in the previous example, we set a value of 20: =INDEX(G:G,MATCH(10318,C:C,0),1). By doing this, you have a more flexible version of the VLOOKUP function. You can also create dynamic formulas using INDEX and MATCH that use lookups for both the column and row.

13. COUNTIF

The COUNTIF function allows you to count the number of cells in a range that meet a specified condition. Let’s count the number of values in the data set that are Motorcycles. To do this, you would enter the following formula: =COUNTIF(M:M,”Motorcycles”).

14. COUNTA

The COUNTA function is similar to the previous function, except it only counts the number of non-empty cells. With no criteria, it is helpful to just the total number of values within a range. To calculate how many cells are in this data set, you can use the following formula: =COUNTA(C:C). If there are no gaps in data, then the result should be the same regardless of which column is used. And when combined with the UNIQUE function, you can have an easy way to count the number of unique values.
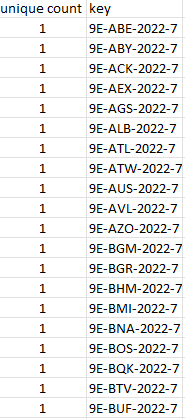
15. UNIQUE

The UNIQUE function returns a list of unique values within a range, and it’s a much easier method than the old-school way of extracting unique values. If you wanted to extract all the unique product lines in column M, you would enter the following formula: =UNIQUE(M:M). If, however, you just wanted to count the number of unique values, you could embed it within the COUNTA function as follows: =COUNTA(UNIQUE(M:M)). You can adjust your range if you don’t want to include the header.

This is just a sample of some of the useful Excel functions that accountants can utilize. If you are familiar with them, you’ll put yourself in a great position to improve the efficiency of your workflow and make your spreadsheets easier to use. Plus, you can confidently say that you are highly competent with Excel, which can make your resume more attractive and make you better suited for accounting jobs that require advanced Excel skills — and there are many of them that do!.


If you liked this post on 15 Excel Functions Accountants Should Know, please give this site a like on Facebook and also be sure to check out some of the many templates that we have available for download. You can also follow me on Twitter and YouTube. Also, please consider buying me a coffee if you find my website helpful and would like to support it.

FlipData

Flip Your Data in Excel Without Sorting

Want to show your data in reverse order, and want to do so without having to sort it? Using just a formula, you can change the way your data looks. Instead of going from oldest to newest, you can display it from newest to oldest. And you don’t have to alter your existing data set to do it. In this post, I’ll show you can how can flip your data through just a single formula.

In the below example, I have data going in descending order by year.

Annual revenue in descending order by year.

If I wanted to change the order so that it’s in ascending order, I could use the sort button. But what if you needed to keep the data the way it is and I just wanted to put in different order, say for the sake of a chart or report. I can accomplish this using the functions INDEX, ROW, and COUNTA. Here’s how it works.

Creating the formula to flip data

The first function I’m going to use is the INDEX function. This is important because this function will include all the data that I need. Since my data is in the range A1:B6, I’ll start with a formula to get the years in column A and reverse them. The formula will start as follows

=INDEX(A$1:A$6

I’m freezing the row numbers because I want to ultimately copy this formula over to the revenue column, and flip those values as well. In the next part of my formula, I will need to grab a count of the values in my range. This can be achieved by using the COUNTA function:

=INDEX(A$1:A$6,COUNTA(A$1:A$6)

The above formula would grab the last value in the range. And while that’s technically what I want, the formula wouldn’t work if I were to copy it down. Thus, I need to add a 1 to it and I also need a way to also deduct 1 — for the first instance, anyway. To make it dynamic, I’m going to use the ROW function.

=INDEX(A$1:A$6,COUNTA(A$1:A$6)+1-ROW(A1))

How this works is that the formula will grab a count of the rows in the data set. Then the formula will add 1 but it will also deduct 1 using the ROW function. In this first formula, my value will be 6 — the same as the count of cells. However, if I drag it down, the formula for the next cell will be as follows:

=INDEX(A$1:A$6,COUNTA(A$1:A$6)+1-ROW(A2))

In the above formula, I’ll now be deducting 2 since the row value of A2 is 2. In this case, the row value I will be extracting is 5. The COUNTA function returns value of 6, then 1 is added, and the ROW function deducts 2. By dragging this formula down, it will now continue going backwards and so that the last value will be the first row. If I also copy this over to column B for revenue, I will now have both columns flipped and going in the opposite direction:

Data flipped in reverse order in Excel.

If you liked this post on How to Flip Your Data in Excel Without Sorting, please give this site a like on Facebook and also be sure to check out some of the many templates that we have available for download. You can also follow us on Twitter and YouTube.

H2Emultiplecriteria

How to Do a Lookup with Multiple Criteria in Excel

Most Excel users likely know how to do a simple VLOOKUP and pull in data where a single field is matched. But what about when you need to match multiple fields? That can be a bit more challenging to pull off and below I’ll show you a couple of ways you can achieve this.

In the following data set, there is information on airports and delay times by specific carriers. Given that there are so many fields here, a simple lookup wouldn’t be helpful here as you need to factor in multiple criteria.

Data showing carrier delays at airports across the world.

Using a consolidated unique key

If you are able to create an additional column in your data set, then one option you have available is to create a unique identifier. For example, if I concatenate the carrier code, airport code, month, and year, I can have a key that I could use in a lookup formula. Here’s how that key could look:

Creating a unique key for a data set.

The important thing to remember here is that your key should be unique enough so that there is only a single match. For example, if I didn’t include the year and my data includes multiple years, I could potentially have multiple matches for a combination of month, carrier, and airport code.

One way you can test for this is by using the COUNTIF function. This will tell you if there is more than 1 instance of a value. If my key is in column B, here is how that COUNTIF function could look:

=COUNTIF(B2,B:B)

If any of the formulas return a value of more than 1, then that will tell you there is a duplicate value:

Using the COUNTIF function to determine if a key is unique.

You can use filters to see if there are any values greater than 1 on this list. If there are, then you know you need to adjust your key to add additional criteria so that there are no duplicates. Once you have this accomplished, then you can use this within a VLOOKUP or a combination of INDEX & MATCH. You would just need to use a search criteria that follows the same construct.

Using multiple criteria in a SUMIFS function

Another way you can lookup multiple fields is by using SUMIFS. You can sum the data but you don’t have to. After all, if your criteria is unique, a SUMIFS function would only be summing a single value. And in that sense, it can work similar to a lookup. Using this approach, you don’t have to create any additional columns to make it work.

Here’s how a formula in my data set would look like if I wanted to extract the carrier_delay value for Delta Air Lines (carrier code DL) at the Atlanta airport (airport code ATL), for July 2022:

=SUMIFS(Q:Q,A:A,2022,B:B,7,C:C,"DL",E:E,"ATL")

Q is the value I’m extracting, column A relates to the year, column B to the month, column C to the carrier code, and column E to the airport code. Since there is only one corresponding value when filtering for all these combinations, I know my SUMIFS function is only pulling in a single value, and thus, working effectively as a lookup function.

With this approach there is some risk if you don’t first vet your criteria and to check for duplicates. And just to be safe, you’ll probably want to do a check for that before relying on this calculation.


If you like this post on How to Do a Lookup with Multiple Criteria in Excel, please give this site a like on Facebook and also be sure to check out some of the many templates that we have available for download. You can also follow us on Twitter and YouTube.

InflationCalculator

How to Create an Inflation Calculator in Excel

Want to know how much something was worth decades ago? Or how much something costs in today’s dollars? Using inflation data, you can estimate that. And in this post, I’ll show you how you can create your own inflation calculator template in Excel. I’ll also provide you with my free template.

Getting the data

You can get inflation data going back to 1913 from the U.S. bureau of Labor Statistics. There’s an xlsx file there that I’m going use that will be the source for my calculations.

Once in Excel, you’ll see the data is neatly formatted by both year and month:

Inflation data going back to 1913.

This data will get updated so over time you may want to get the latest figures so that your calculations are as accurate as they can be. The data has 1st half and 2nd half numbers but one thing I will do is also add the 12-month average. I’ll add a new column so that it just averages the values. In most cases, you’re probably just going to want to compare data from one year to another.

Next, I’ll convert the data into a table. To do this, click anywhere on the data set and under the Insert tab, click on the Table button. Excel should auto-detect the range but if it doesn’t, you can adjust it. In my template, I’ve named this table tblInflation. It includes the average, which will auto-update as new data is included.

Setting up the calculations

The next step involves creating the inputs, doing the lookups, and then calculating the value. There are three inputs I’ll set up: the base value, base year, and the calculation year. The base year and value will act as the starting points and will convert to a calculated value based on what the calculation year is.

To determine the impact of inflation, I’ll use the base and calculation years to find their respective index values. To do that, I’m going to use a formula that includes INDEX & MATCH. Here’s what it looks like for the base year:

=INDEX(tblInflation[Average],MATCH(BaseYear,tblInflation[Year],0),1)

In the table, I’m extracting the value from the Average column and I will be matching the BaseYear (the named range for my input) against the values in the Year column. I’ll use a similar formula to extract the index value for the calculation year. I’ve put these index values next to my inputs but will hide them later:

In 1913, the index average was 9.9 and for 2022 it was around 286.8 (based on the data that’s available thus far). If I take the index value from the calculation year and divide it by the index value from the base year, that tells me the prices are approximately 29 times what they were back then. That comes out to a percentage change of 2,797%. This leads me to the next part of the equation: determining the new price, or as I’ve referred to it in my template, the ‘Calculated Value.’ The formula for this output is as follows:

=CalculationIndex/BaseIndex*BaseValue

In the case of the above inputs, it’s doing the following calculation:

=9.88/286.75*100

This gives me a value of $2,901.40. That means something that was worth $100 in 1913 would be worth $2,901.40 in 2022. I can also do the reverse calculation. I can work backward and answer the question of how much would something in today’s dollars be worth back then. To do that, I would enter the following inputs:

The calculated value is the $100 that I started with in the previous calculation.

My templates is complete and all that’s left at this point is just to add a header and modify some formatting:

Inflation calculator template.

You can download the inflation calculator template here.


If you liked this post on How to Create an Inflation Calculator in Excel, please give this site a like on Facebook and also be sure to check out some of the many templates that we have available for download. You can also follow us on Twitter and YouTube.

H2Edynamic

Creating Dynamic Formulas With Index & Match

When you create a formula in Excel, your goal should always be to minimize how much you hardcode of it. By doing that, you can make your formula more dynamic and easy to update, without having to change it. Below, I’m going to show you can create dynamic formulas in Excel, using a combination of INDEX & MATCH as an example.

For this, I’m going to use Las Vegas visitor statistics. The goal is going to be to pull in certain values based on the combination of field and month. Here’s how the Excel download looks like to start with:

Excel download of Las Vegas tourist data.

If I wanted to use lookup the visitor volume for a given month, I could use the following formula (assume the data above is in columns A:N):

=INDEX(B:B,MATCH(“Visitor Volume”,A:A,0),1)

Column B is where the January data is. And in column A, where the fields are, I’m searching for ‘Visitor Volume’. My formula returns a value of 1,294,100. That is the correct result. However, the way the formula is set up right now isn’t flexible; I hardcoded the field I was looking for and I also indicated which column I wanted to pull the results from. Ideally, I should be able to have the field set up to be dynamic, and the date as well.

Using a named range for the field

I’ll begin by making the field dynamic. Rather than type in ‘Visitor Volume’, I can just reference a named range, as such:

Index and Match formula referencing a named range.

In the above example, I entered the field I wanted to lookup and created a named range for it, called ‘lookupfield’. Now, I can just reference the lookupfield. And if I change its value to another field, it will return a different value, all without needing to change the formula itself:

Index and Match formula referencing a named range.

The only thing that changed here was the value I was looking up.

Using a named range for the month

Next up, I’ll adjust the formula so that the month I’ll return values from is also dynamic. This part is a bit trickier because I need to actually move the entire column. In the current formula, I’m referencing column B (which relates to the January values). But if I want to get the values for February, then it needs to change to column D, and to column F if I want March’s data, and so on.

Using the OFFSET function can be useful here. Rather than picking a specific range, I just start with the first column (A). The second argument in the OFFSET function pertains to the number of rows to move. Since I don’t want to my move my range up or down, I leave this as 0. The next argument is the number of columns I want to move. This is going to depend on where the month value is. Here again, I’ll create a named range. This time, I’ll call it ‘lookupmonth’, where I will specify the month I want to look at. In this spreadsheet, the months are just the first days of the month (e.g. Jan 2021 is 1/1/2021). I will need to use the MATCH function again, this time searching for this value within the row that contains the months (this is row 7 in my Excel sheet). Here’s what my formula will look like, fully dynamic:

=INDEX(OFFSET(A:A,0,MATCH(lookupmonth,7:7,0)-1),MATCH(lookupfield,A:A,0),1)

I add the -1 at the end of the columns argument because I’m already starting at the first column and it should be removed from the number of columns I want to move to the right. Here’s how the formula looks like with the two named ranges (highlighted in yellow):

Index and Match formula referencing two named ranges.

Now, I can change both the field and the month, and my formula will automatically update:

Index and Match formula referencing two named ranges.

The important thing to note here is that the named ranges need to be exact matches for the MATCH functions to work properly. Even an extra space will result in the formula not returning the correct value. One thing you may want to consider is creating a drop-down list for the available options to prevent the chance of someone making a typo and entering an invalid option.


If you liked this post on Creating Dynamic Formulas With Index & Match, please give this site a like on Facebook and also be sure to check out some of the many templates that we have available for download. You can also follow us on Twitter and YouTube.

vlookup1

3 Reasons You Should Still Use VLOOKUP

Many people will tell you that you should use INDEX/MATCH instead of VLOOKUP or that you should use a new function like XLOOKUP instead. But you shouldn’t be so quick to ditch arguably the most popular function on Excel as it’s still very useful. Below are just three reasons why VLOOKUP is still incredibly valuable:

1. It’s really quick to set up

If you’re using a combination of INDEX/MATCH, you’re going to have to use two functions, correctly set them up and nest one inside the other. Especially if you’re not used to it, it can take some time to set it up. Sure, it’s not like it’s going to take hours or even minutes to do, but if you need a quick lookup and VLOOKUP can do the job, why not just use it? Here’s how quickly it takes to set it up:

In the above example, I do a VLOOKUP in about five seconds. If you’re setting up INDEX/MATCH, you might still be trying to figure out which column to use for your MATCH argument. Being able to do VLOOKUP without almost thinking is what makes it such a great function, its speed is through the roof. Since you know the first column of your range is where you’re looking up values, it simplifies the process of selecting the columns and then you’re just counting how many columns over you’re extracting data from.

A couple of ways I expedited the formula above is by not typing out the entire function name (just entering VL and then tab to autocomplete the name), using 0/1 instead of typing out True/False and by not closing the last “)” as Excel will automatically do this for you.

Sure, it won’t work in all scenarios such as if you need to go left, that’s a well-known limitation of VLOOKUP. But as long as that’s not the case, there’s really no reason you need to bother with INDEX/MATCH when VLOOKUP will do the job. I’ve been using Excel for decades and I still love to use it when I can because it’s so easy to set up.

2. VLOOKUP is very versatile and will work on old versions of Excel

VLOOKUP may not be able to go left, but it can do wildcard searches and it can work if you need to pull the closest value — this is really useful if you’re dealing with tax brackets or anywhere that you’re looking for the closest value without going over (e.g. where you set the last argument to TRUE to look for approximate matches). While many people may use it strictly for exact matches, VLOOKUP is much more powerful.

And here again, using VLOOKUP in these situations is likely going to be no more difficult than the alternatives. While the temptation may be to use an exciting new function like XLOOKUP, the one big disadvantage is that it’s not available on older versions of Excel. With VLOOKUP, even if you’re working on a version that’s 20 years old you won’t have to worry about whether the formula will work.

3. Ease of use makes it ideal for training novice users and making templates with

Not only is VLOOKUP easy to set up, but it’s easy to understand compared to other, more complicated functions. If you’re making a template or need to train users, you don’t want to worry about them knowing complex formulas, especially when it involves nesting functions. Or telling them about a formula that may not work on their version of Excel. VLOOKUP’s also a good stepping stone for beginners to get them accustomed to how Excel formulas work.

Complex formulas are easy to break and harder for inexperienced users to fix. That’s why VLOOKUP’s ease of use is a key reason it’s worth using. If you’ve ever had to fix someone else’s formulas, you can definitely appreciate that keeping formulas as simple as they need to be can go a long way in making it easy to maintain and fix a spreadsheet.


If you liked this post on why you should still use VLOOKUP, please give this site a like on Facebook and also be sure to check out some of the many templates that we have available for download. You can also follow us on Twitter and YouTube.

failing grade

Why You Shouldn’t Bother With Excel’s New XMATCH Function

Last year, Excel released some updates including the unveiling of XLOOKUP as well as XMATCH. In this post, I’ll show you how to use the XMATCH function and also why you may not have a need for it.

For this example, I’m going to use a list of the stocks with the largest market caps on the U.S. exchanges as of Feb.7, 2020. Here’s what my data looks like:

Top stocks listed on the NYSE and NASDAQ as sorted by market cap.

XMATCH can achieve the same results as MATCH does when looking for data, but if you wanted the same functionality you could just use MATCH. Instead, let’s start by looking at some of the other things that Microsoft claims XMATCH can do.

XMATCH is not a suitable COUNTIF replacement

One of the things that XMATCH can supposedly do is when you’re looking up numbers, it will count the number of times that values fall above or below a threshold. For this example, we will look at the number of stocks on this list with market caps of more than $1 trillion.

To do this, you would use $1,000,000,000,000 as your lookup value and set the third argument of the function, called match mode, to 1, which looks at an exact match or the next larger item. Here’s how the formula looks like:

Using XMATCH to do a COUNTIF.

Where L6 is the cell that has the number that XMATCH will search for (1,000,000). This formula correctly gives me five matches that are more than $1 trillion that appear on the list. However, if I include the header, the results change:

Using XMATCH to do a COUNTIF.

This leads me to believe that it’s still looking for the closest match and not really counting the number of values that meet the criteria. And indeed, when I changed some of the market cap numbers so that they were more than $1 trillion, XMATCH didn’t compute them correctly since they weren’t in descending order. I’m assuming what Microsoft is implying with XMATCH is that if your data is sorted in ascending order, it would be able to tell you where the smallest value is that meets your criteria. For example, The sixth row in the data set was $1.02 trillion and that was the lowest entry that was more than $1 trillion. Technically, if the data was in descending order then everything above that will be more than $1 trillion.

However, that’s very different from actually counting the numbers over that threshold. And that’s why COUNTIF is still vastly superior to XMATCH. Here’s how the two functions worked when I added four additional entries (not in order) of more than $1 trillion, bringing my tally to nine:

XMATCH vs COUNTIF.

In the COUNTIF function, it still correctly counted nine instances where there was more than $1 trillion on the list. XMATCH, meanwhile, continued to point to the sixth row.

These issues are confirmed when we look at the number of values below $1 trillion:

XMATCH vs COUNTIF.

The -1 argument in match mode is the opposite of 1, and it looks at the exact match or next smaller item. However, the results, as you can see, were very different and not what I would have expected. It appeared to point me to the closest number to $1 trillion without going over. COUNTIF, meanwhile, continued to correctly count the number of items that were below $1 trillion. And with 1,000 items in my data set, it makes sense that 991 were below if nine were above the threshold. Unfortunately, that same logic doesn’t work with XMATCH.

As a replacement for COUNTIF, XMATCH gets a fail as it’s clear that it’s not really counting the number of instances. Only under very specific circumstances would the function do that, such as if the data was in descending order. And even then, you’d still need to do a calculation for the header or if you’re looking at the number of items below a threshold. It’s more trouble than it’s worth and COUNTIF has the benefit of also being available in older versions of Excel, even going back to Excel 2000. That’s important if you’ll ever need to work on an older version of Excel.

Using XMATCH to search for text is not any better than using MATCH

If you’re using XMATCH for matching text, it won’t be able to count the instances but you can use it to find the first instance of it. Some companies trade under multiple tickers and you’ll notice Google’s parent company Alphabet shows up twice in this list. Here’s what happens when I try to use the XMATCH function to find the first instance:

XMATCH for a text search.

I’m using a question mark after the text as that’s what Microsoft instructs users to do when looking for partial matches. However, if I ignore that advice and use an asterisk and specify I’m using a wildcard match, then it appears to fix the issue:

XMATCH for a text search.

You may be wondering how the regular MATCH function did:

XMATCH vs MATCH.

Besides changing the last argument, the functions are nearly identical in how they’re used to find partial matches.

Let’s compare how the functions work when we’re looking at exact matches. For this example, I renamed the multiple Alphabet names so that they only spell out Alphabet with no mention of share classes, e.g. so they’re exactly the same. Here’s how XMATCH does on a simple match calculation:

Comparing MATCH to XMATCH on exact matches.

Here again, there’s little distinction between the two functions.

Microsoft also advertises that XMATCH can be used in an INDEX/MATCH combination, but even that seems kind of pointless.

Using XMATCH with INDEX makes little sense

Let’s use these functions to grab the intersect between the company name and its dividend yield. The name is in column B while the dividend yield is in column G. All the headers are in the first row. Here’s how the formula looks like with the use of XMATCH:

Using XMATCH with INDEX.

In this example, XMATCH correctly pulled the right percentage for Visa’s dividend yield of 0.59%.

That would be really, really cool if the MATCH function didn’t already do the exact same thing. By getting rid of the X in the XMATCH function, thus making it just a MATCH function, and adding a 0 for the third argument, I get the same exact result:

XMATCH vs MATCH when used with INDEX.

XMATCH doesn’t improve upon anything when it involves the INDEX and MATCH combination. We’re talking a slight change to the syntax, that’s about it. And again, from a functionality point of view, there’s just no reason to swap a new function in when the existing one works just as well, especially since there’s no backwards compatibility on older versions of Excel for XMATCH.

What XMATCH can do well

Everything that the MATCH function can do, XMATCH can do as well. That’s the good news. There is, however, one thing that XMATCH can do better, and that’s look for data in the reverse order. Here’s a simple example of how both functions work when we’re looking for the first value that contains the word Alphabet:

XMATCH versus MATCH.

Both functions correctly yield the same results. Again, the change here is mainly to do with syntax. Under the new XMATCH, if I set the third argument (match mode) to 0 and look for an exact match, I’ll get an error. But if I set it to 2, which is wildcard character match, it will produce the correct result: Alphabet, which first shows up on the fifth row. However, it’s easy to see how this will confuse users who are familiar with MATCH and just use 0 for the third argument, which will also produce the correct result in this case. This is another example of where the syntax has gotten more complicated and not given the user any additional advantage.

The one exception to that, however, is if you want to do a search in the reverse order. MATCH currently will go from the first row and work its way down. Once there’s a match, it will stop there. Here’s how the XMATCH function performs when we’re doing a last-to-first search, as indicated in the fourth argument where the value is -1:

Doing a reverse search on XMATCH.

This time XMATCH does correctly pull the sixth row, which is where Alphabet would first show up if we were looking from the bottom and moving up. MATCH, unfortunately, doesn’t have the option to do that and a user would have to rearrange their data to get the same result.

The reverse-order search is the only advantage I can see from testing out XMATCH. Unfortunately, the new function doesn’t add anything significantly new and at worse, it can lead to incorrect results, especially if you’re planning to use it to replace COUNTIF.

Why learning new functions may not be worthwhile, at least not initially

It’s possible that in future updates the XMATCH function will work better but for now, there’s not a whole lot of reason to use it. One of the biggest disadvantages of new functions is that they won’t be helpful to you if you’re working on an older file. It’s not uncommon for people to be working on Excel versions that are more than 10 years old. Not everyone needs the latest-and-greatest version, and mastering a new function may not prove to be worthwhile, especially when older functions work just as well, if not better.


If you liked this post on how to use XMATCH, please give this site a like on Facebook and also be sure to check out some of the many templates that we have available for download. You can also follow us on Twitter and YouTube.

excel-1771393_640

How to Use the New XLOOKUP Function

Forget using VLOOKUP or even INDEX and MATCH, Excel users can now use XLOOKUP!

Knowing how to use VLOOKUP has become almost a basic skill for Excel users. If you’re an intermediate or advanced user, you probably use INDEX & MATCH because of the limitations that are inherent with just using VLOOKUP. Since VLOOKUP can only return values to the right of what the value that you’ve found, it’s a less-than-optimal formula. You can either re-arrange your data, or you can use INDEX & MATCH. It’s a more flexible solution, but it’s also not ideal. After all, you’re now combining multiple Excel functions into one.

Enter: XLOOKUP

XLOOKUP is the solution that Excel users have been looking for…for decades. What the function does is allow you to do what was possible with INDEX & MATCH all in one simple formula.

Let’s go over it with some sample data on the world’s largest cities:

list of the largest cities in the world
Data courtesy of Wikipedia

Doing a regular lookup vs XLOOKUP

Here’s how my formulas would look like if I wanted to return the Country using a value from the City field:

vlookup and index match doing a regular lookup

In the above example, E5 refers to the capital city value. While the INDEX & MATCH combination works, it may not be the easiest for novice users who aren’t comfortable with nesting functions. Here’s how the same calculation would look using XLOOKUP:

xlookup doing a lookup

It’s a much simpler solution. The first argument takes the value you want to look for, followed by the range where you want to search for it, and then the range that you want to extract the corresponding value from. There’s no need to enter a column number the way you do with VLOOKUP, nor is there a need to add another function.

There are optional arguments you can use including how you want to match (see the next section). You can also choose the direction that the lookup goes, in case you don’t want to look in the same order as your data:

xlookup argument to search data

Using wildcards in XLOOKUP

Like with the other functions, you can also incorporate wildcards into XLOOKUP as well. Wildcards work similarly among all three formulas, but the key difference is that XLOOKUP has multiple arguments for its fourth (optional) argument which dictates how you want the data extracted. Entering ‘2’ will tell the function that you want to use a wildcard. Below are the options for the match_mode argument (optional):

  • 0: exact match
  • -1: exact match or next smaller item
  • 1: exact match or next larger item
  • 2: wildcard character match

Here’s a comparison of how you’d get the same result using all three functions using a wildcard:

using wildcards in xlookup vlookup and index match

The logic is the same in the sense that you’ll want to use a wildcard character like * around the term you’re trying to find a match of. In the above example, I used the * around the entire wildcard, and it returned the population for New Delhi in that example.

XLOOKUP here is actually a bit more complicated as with the other functions you didn’t need to specify that you were using a wildcard. Taking out the ‘2’ from the argument would result in XLOOKUP yielding an #N/A error. However, it could be that doing this will make it more efficient.

Finding the closest matches

One of the other options for the matches mentioned above were finding the next smaller or next larger matching items if an exact one wasn’t found. A good example of this is where you’re looking for something like a tax rate where you won’t find every possible income level that someone might enter and you need to ensure that it falls into the correct range.

Here are some sample categories:

sample tax categories and tiers

If I entered an amount of $17,000, it should put me in Tier 3, since that would be the threshold I would have reached under this hierarchy. Here’s an example of how this would be calculated in the three functions:

doing a lookup for tax brackets using xlookup vlookup and index match

All three formulas were able to return the same tier correctly, however, INDEX & MATCH is a bit more cumbersome again due to having multiple functions within it.

The advantage that XLOOKUP has here is that I can select the category that’s either directly below or above the amount I enter, effectively rounding up or down, simply by changing the fourth argument between a ‘1’ (exact or next largest item) to a ‘-1’ (exact or next smallest item).

This is not possible with VLOOKUP, and in order for this to be able to work with INDEX & MATCH, I’d have to change the order from ascending to descending. But what’s impressive is that XLOOKUP is able to find the correct category even if the values are not in any sort of order at all.

Have a look at what happens when I try to completely destroy any sort of hierarchy:

tax brackets sorted into tiers

This is an absolutely dreadful hierarchy that’s not consistent in any way possible. Do the formulas have any chance of getting it right? Here’s how the results looked:

xlookup index and match doing a lookup for next smallest category

Both the INDEX & MATCH as well as the XLOOKUP formulas were looking for the closest matches. INDEX & MATCH returned the lowest tier, which technically was incorrect since $17,000 came in higher than $10,000, which was Tier 2. And XLOOKUP, despite the mess of a hierarchy, was still able to pull out the correct group.

Ultimately, you never want to organize your data in such a horrible way, but this helps demonstrate just how strong XLOOKUP is, to be able to still come out with the correct calculation.

And just for fun, let’s flip the formulas around, this time looking for an exact match or the next largest category:

xlookup index and match doing a lookup for next largest category

There wasn’t a Tier 3 in my incomplete table, but XLOOKUP still found the next largest Tier which was at $25,000 – Tier 5. INDEX & Match found its way into Tier 7.

Creating a dynamic formula

One of the great things about INDEX & MATCH is that you can index an entire database and then dynamically change which column you want to extract from based on a selection and not have to update the range in the formula. For example:

creating a dynamic formula using index match

Why would you want to do this? The beauty of it is that you can change what value you extract based on your selection. Since you’re doing a match, it will look for that field and adjust the column accordingly using the OFFSET function:

You can do this in XLOOKUP as well, and here’s how that formula would compare to index and match:

xlookup index match doing dynamic formulas

The XLOOKUP formula is a bit more complicated as it needs two ranges, and thus, two OFFSET functions are needed. In the INDEX & MATCH combination, only one OFFSET function is needed as it only requires a column number for one of its arguments. Either way, you still need to be familiar with using OFFSET so it’s probably not a dealbreaker if XLOOKUP is a bit longer.

Great, so how do I get XLOOKUP?

There are two things you need to be able to get access to XLOOKUP:

  • Office 365
  • Enrollment in the Office 365 Insiders Program

It’s not an exclusive club or anything, all you have to do is to follow the steps outlined here. By selecting the ‘Insider’ option rather than Monthly, you’ll get more frequent updates and changes. Once you’ve got it set up, then it’s just a matter of waiting for the updates to roll out to you. There’s, unfortunately, no notification, I’d just suggest checking every now and then to see if XLOOKUP shows up in your functions list.

Caveat

One of the things you should remember, however, is that while it may be great to use XLOOKUP, old versions of Excel won’t have access to this flashy new function. And so it’s important to still be familiar with using VLOOKUP and INDEX and MATCH.


If you liked this post on How to Use the New XLOOKUP Function, please give the site a like on Facebook. Also be sure to check out our templates section. You can also follow us on Twitter and YouTube.

howtofilterdataformulas.png

Dynamically Filter Data Using Only a Formula

In my previous post I went over advanced filters in Excel. This time around I’ll go over how to achieve the same result using just a formula. No macros, no VBA, just through a not-so-simple formula that can dynamically update based on your selections.

I’m again going to use my sample database file for this example. Here’s an excerpt of what that looks like:

Filtering based on one criteria


I’m going to start by filtering all that entries for a specific sales rep.

First, I’m going to use the INDEX function to select the range from where I’m pulling data from.

=INDEX(SampleDatabase!$A$1:$G$1000

For my results, I’m going to want them to show up in the order they appear in the database. For example, in the excerpt above Rep D shows up on lines 3 and 5, and I want that same order to stay intact.

In order to do this, I’m going to use the IF, SMALL and ROW functions, which will be inserted in the INDEX function.

SMALL(IF(SampleDatabase!$C$1:$C$1000=$I$2,ROW(SampleDatabase!$A$1:$A$1000),””),ROW(A1)),1)

$C$1:$C$1000=$I$2 : In this argument, assume that $I$2 is where I have my sales rep name, in this case it would be Rep D. Because I’m only interested in rows that relate to Rep D, this is the main argument that I want to evaluate.

ROW(SampleDatabase!$A$1:$A$1000), “”) : This will return the row number if the above argument is true. It doesn’t matter whether I reference column A, B, C or any other since I’m only pulling the row number. If it isn’t a match, the result will be a blank value.

ROW(A1) : This returns a value of 1, and what this will accomplish is that it will pull the smallest row number from the above list. For instance, for Rep D we know that lines 3 and 5 will be a match, but the smallest number, or the first time that there is a match, is 3. As I drag this formula onto subsequent lines, the row number, because it isn’t frozen, will change and on line 2 it will pull the second smallest row number, on the third line it will be the third smallest, and so on.

The last argument is which column you want to extract. I left it as 1, and that will return the date since that is the first column in my INDEX argument. However, if I wanted to pull the total sales, I could change that to 7, since that would indicate column G, which is the seventh column in the data set that I specified.

The completed formula will look as follows:

=INDEX(SampleDatabase!$A$1:$G$1000,SMALL(IF(SampleDatabase!$C$1:$C$1000=$I$2,ROW(SampleDatabase!$A$1:$A$1000),””),ROW(A1)),1)

This formula will need to be entered as an array, so be sure to hit CTRL+SHIFT+ENTER.

The first five results look as follows:

The one caveat is that if you don’t know how many entries you’ll have and copy the formula down too far, you’ll inevitably end up with #NUM! errors because the formula has not found any more matches. What you can do in this case is use the IFERROR function and include it in the formula:

=IFERROR(INDEX(SampleDatabase!$A$1:$G$1000,SMALL(IF(SampleDatabase!$C$1:$C$1000=$I$2,ROW(SampleDatabase!$A$1:$A$1000),””),ROW(A1)),1),””)

What this will do is now show a blank value if there are no more matches.

Filtering for multiple criteria


While it’s nice to be able to filter for just one criteria, what if you wanted to look for the entries with multiple conditions? Although this makes our already long formula even longer, it is still possible.
Much of the formula stays the same, and the key to making it work is by changing the first argument in the IF statement. Previously, It was only looking for the Sales Rep to be a match:
$C$1:$C$1000=$I$2

I’ll add another criteria, this time for records that include Product E, and I’ll put the product criteria in the cell below in I3. I will add the following to the formula:
$D$1:$D$1000=$I$3
How I combine the two arguments is by multiplying them by one another:
($C$1:$C$1000=$I$2)*($D$1:$D$1000=$I$3)=1

I add the =1 at the end because if both conditions are true then they will result in a 1 value for that line. For example, in the first condition it will look at whether the sales rep is a match, if it is the value will be true (or 1), and if not, it will be false (or 0). The same will happen if the product matches. 
Therefore, if either one of those conditions is false then a 0 will be returned and the two conditions multiplied against one another will not equal 1.
Below is how the new formula looks:
=IFERROR(INDEX(SampleDatabase!$A$1:$G$1000,SMALL(IF(($C$1:$C$1000=$I$2)*($D$1:$D$1000=$I$3)=1,ROW(SampleDatabase!$A$1:$A$1000),””),ROW(A1)),1),””)
You’ll notice much fewer matches in column L (multiple criteria) than in column J where I was only looking for the sales rep to be a match.
If you go back to the original excerpt I showed, you’ll see that for the 3/21/2017 entry, it was for both Rep D and Product E. If I change the values in column I then my calculations will adjust accordingly.

RAND Functions

Use Excel’s Random Number Generators to Populate Sample Data

Excel has random number generator functions which are useful if you need to test a template or create some sample / dummy data.

The RAND function returns a number between 0 and 1. You could multiply this by a factor of 10 or 100 to get a much larger number if you need it. Once you are happy with the data that has been populated then you will want to copy and paste it as values otherwise the numbers will change every time a recalculation occurs. This is true of any random number function in Excel.
Similarly, the RANDBETWEEN function will return a random  number between a range that you specify. In the below example I use 1 and 100:
RAND Functions
If I used the RAND function and just multiplied by 100 I could get similar results to RANDBETWEEN. The latter just saves you that extra step by being able to specify your parameters right in the formula. It allows you also to be more specific (say for example I wanted a random number between 1 and 35, the RANDBETWEEN function would certainly be easier to use)
If you do not like the random numbers you have generated, you can simply just hit the delete key on an empty cell and your random numbers will be regenerated. If you don’t want your numbers to change anymore then you will want to copy them and paste as values.
To use this to create sample data I am going to make two lists, one for employees, one for stores. From there, I can use the RANDBETWEEN function in conjunction with the INDEX function to extract values from the lists:
RANDBETWEEN Function
In columns A and B I am just using the RANDBETWEEN function to select a number between 1 and 5, as that is the number of different employees and stores I have listed in columns C and D. In columns E and F I use the INDEX function to extract from those lists using the random numbers generated in columns A and B.
I will break down the INDEX formula in column E a little bit here:
=INDEX($C$2:$C$6
In the first argument I am selecting my employee list since this is where I want the result to come from. I also lock the cells using the $ sign to ensure that as I copy the formula down that range is locked and will always reference C2:C6.
=INDEX($C$2:$C$6,A3
The second argument in the INDEX function is the row number from where I want to pull my value. Cell A3 is my first random value – which in this case is 4. This means that from the Employee List range (C2:C6) I want the value on the fourth row of that range – which is not row 4, it is row 5 since I start counting from the start of the range, which is on row 2. As I copy this formula down the row number will change to the corresponding value in column A. 
Because the lists only have one column you could actually stop here.
=INDEX($C$2:$C$6,A3, 1)
The last argument in the INDEX function is the column number. In this example I only have 1 column in my lists so the value is equal to 1. You could skip this argument and it will still work however it’s good habit to always enter the column number.
The above formula tells me to look at range C2:C6, and extract the value from the row that is referenced on A3 (which is 4), and from column 1. That point of intersection is Employee 4, since it is on the fourth line of that range, and in the first and only column.
If I copy the formula down a cell it will do the same except this time pull the value from the row referenced in cell A4 – this time it is 2. As a result, my result is Employee 2 since that value is on the second row of the range and again in the first column. 
Column F is the same formula as column E except this time it references the store list (column D) and the second RANDBETWEEN column (column B). This is just to show you how you might fill in multiple items. You wouldn’t want to use column A again otherwise you are guaranteed that the same row will be returned and you will always have Employee 4 tied to Store 4, and thus, not truly random combinations. 
In this example I have my lists, random numbers, and results all in the same area for illustrative purposes but they do not need to be even on the same sheet.